
In the world of skincare, serums are like the secret weapons in your beauty arsenal. They’re lightweight, potent, and designed to deliver concentrated active ingredients right where your skin needs them most. In this post, we’ll delve into the wonderful world of serums, explore their benefits, and guide you through creating a hydrating serum with powerful ingredients like hyaluronic acid and aloe vera. Let’s get started!
1. Introduction to Serums
What Is a Serum?
Serums are lightweight, fast-absorbing liquids packed with active ingredients designed to target specific skin concerns, such as dryness, dullness, or signs of aging. Unlike heavier creams and oils, serums penetrate deeper into the skin, delivering potent ingredients that provide visible results.
How Do Serums Differ from Other Skincare Products?
While moisturizers focus on hydration and creating a barrier to lock in moisture, serums are all about concentrated treatment. Think of serums as the high-octane fuel for your skincare routine—intense and specialized!
2. What Is Hyaluronic Acid?
Hyaluronic acid is a superstar ingredient in skincare, known for its incredible ability to retain moisture. It can hold up to 1,000 times its weight in water, making it a must-have for anyone seeking to boost their skin’s hydration.
Benefits of Hyaluronic Acid
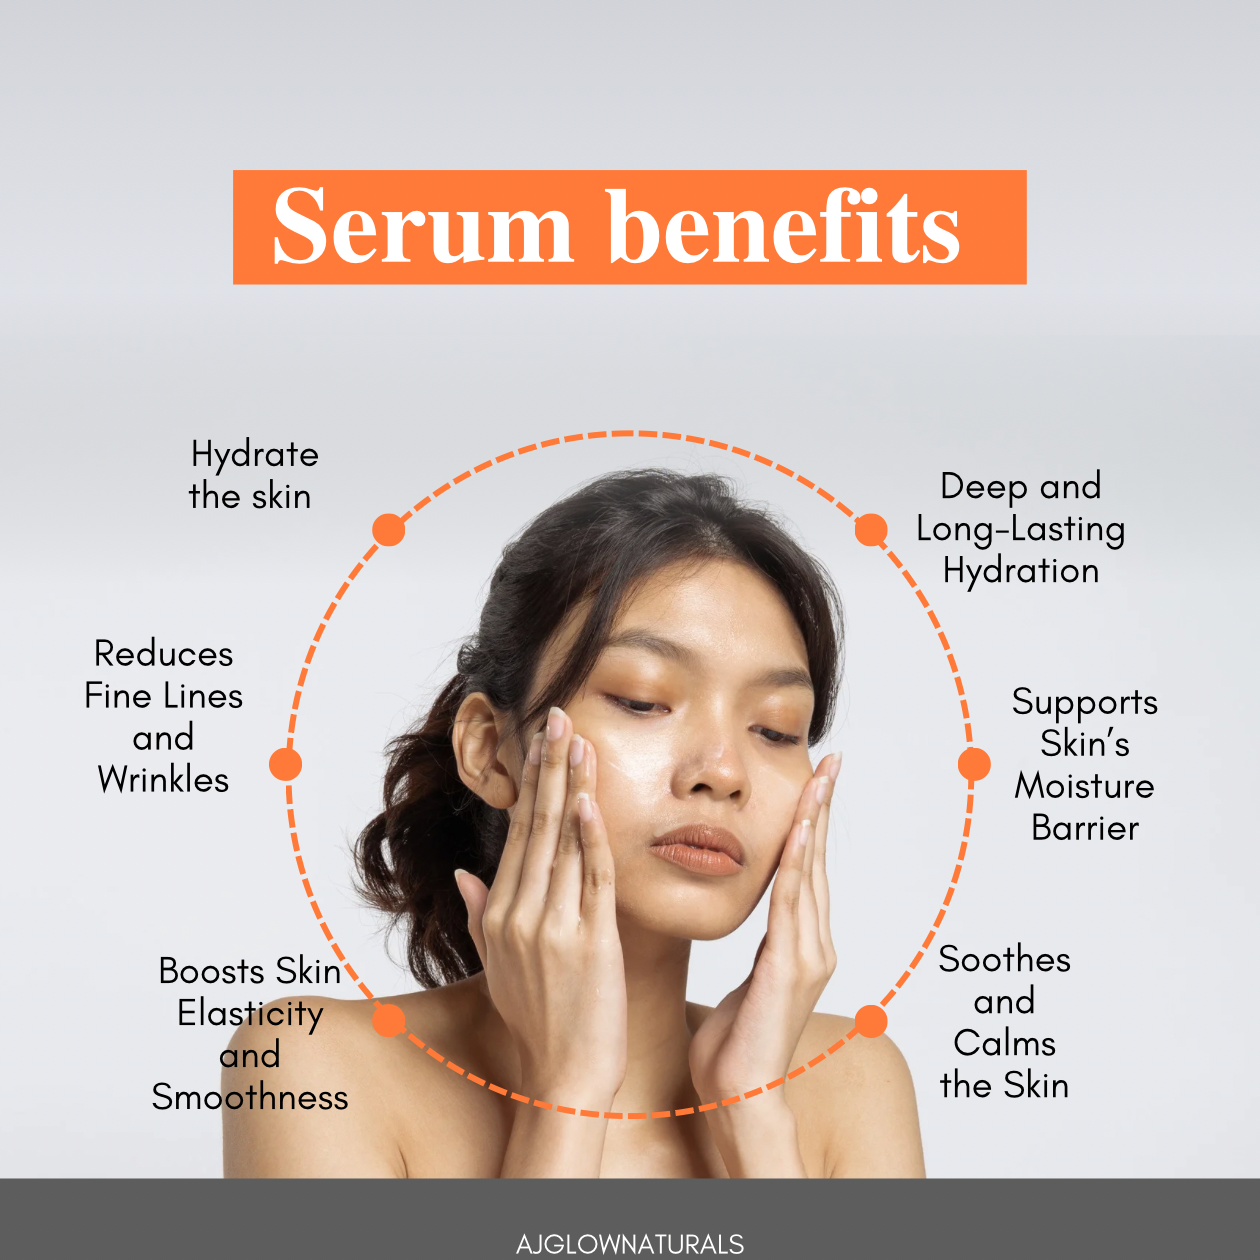
• Deep Hydration: Hyaluronic acid draws moisture from the environment into your skin, providing lasting hydration.
• Plumpness: By hydrating the skin, it helps reduce the appearance of fine lines and wrinkles, leaving your complexion looking youthful and plump.
• Soothing: Hyaluronic acid can help calm irritated skin, making it suitable for sensitive skin types.
3. Benefits of Using a Serum
Incorporating a serum into your skincare routine comes with numerous advantages:
• Targeted Treatment: Serums can address specific skin concerns, such as hyperpigmentation, dehydration, and signs of aging.
• Lightweight Formulation: Their lightweight texture ensures they absorb quickly without leaving a greasy residue.
• Enhanced Hydration: Serums work alongside moisturizers to boost hydration levels, leading to healthier, glowing skin.
4. Key Ingredients in the DIY Serum
Let’s break down the powerhouse ingredients in our DIY hydrating serum:
• Distilled Water (79 g): Serves as the base for our serum, providing hydration.
• N-acetyl Glucosamine (5 g): A humectant that helps attract moisture and supports skin barrier function.
• Disodium EDTA (0.5 g): A chelating agent that helps stabilize the formulation by binding metal ions.
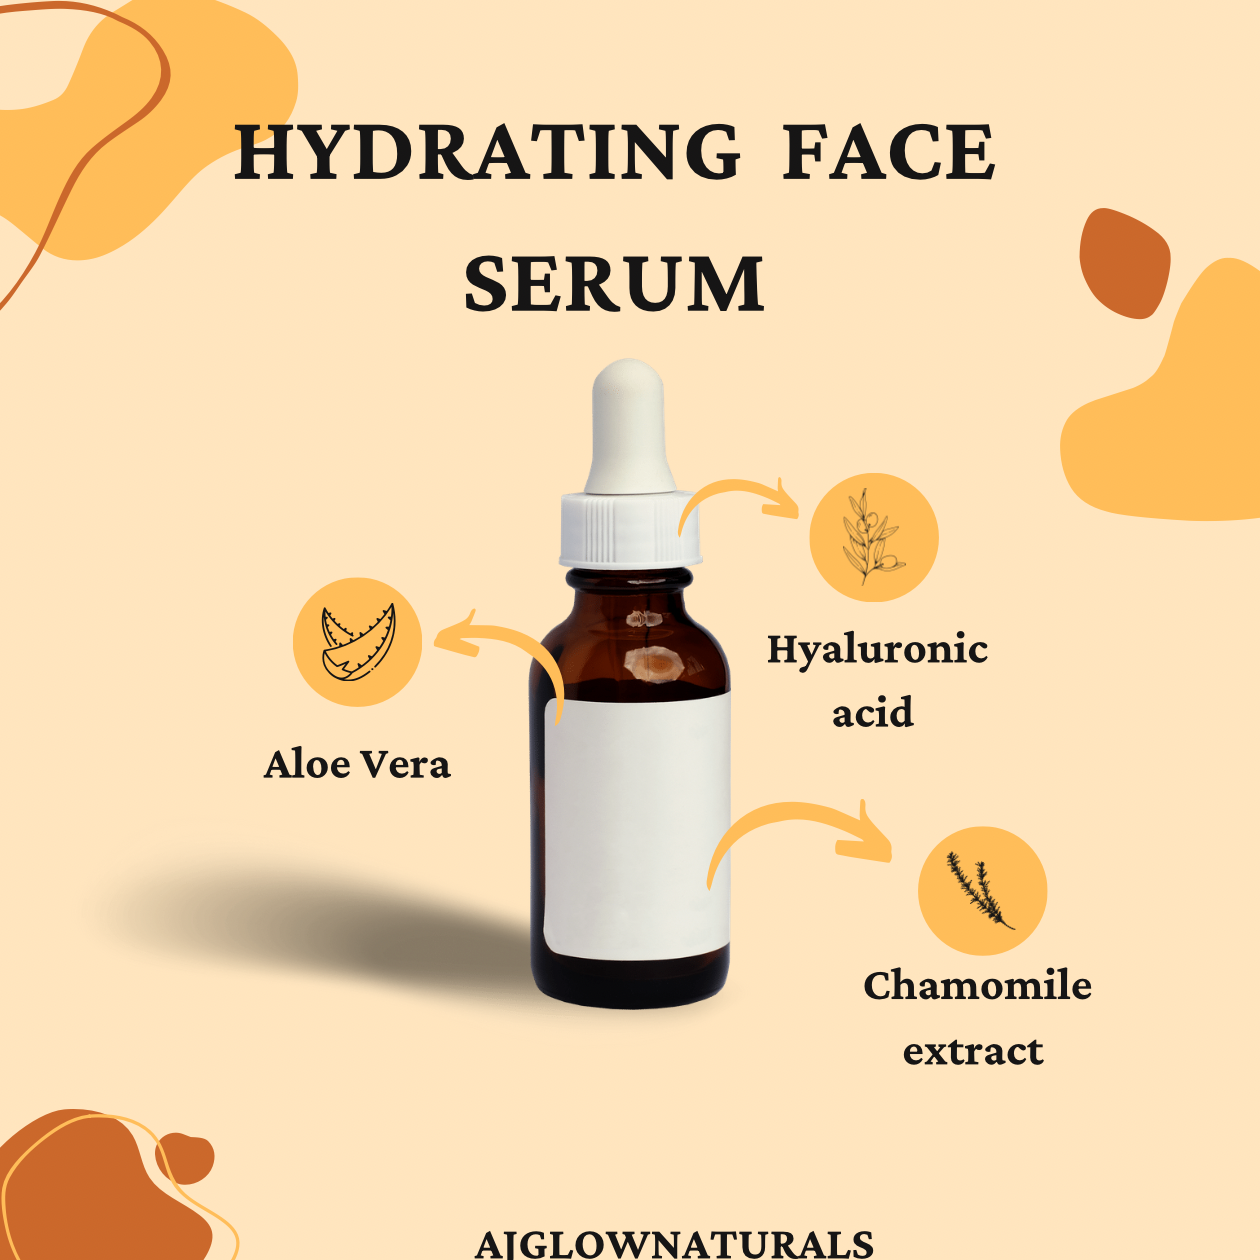
• Aloe Vera Extract (x200) (1 g): Known for its soothing and hydrating properties, it calms and nourishes the skin.
• Chamomile Extract (1 g): Offers anti-inflammatory benefits, soothing sensitive skin.
• Cucumber Extract (1 g): Provides hydration and has a cooling effect, making it perfect for irritated skin.
• Panthenol (1 g): Also known as vitamin B5, it attracts moisture and helps improve skin barrier function.
• Hydrolyzed Silk Protein (1 g): Helps improve skin texture and adds a silky feel.
• Sodium Lactate (1 g): A natural humectant that boosts skin hydration and softens the skin.
• Glycerin (5 g): A powerful humectant that draws moisture into the skin, keeping it hydrated.
• Hyaluronic Acid (HMW) (1 g): As mentioned earlier, it provides intense hydration and plumpness.
• Germall Plus (0.5 g): A broad-spectrum preservative to keep the serum safe for use.
• pH Adjuster (as needed): Ensures the serum is at an optimal pH for skin health.
5. Understanding the Importance of pH in Skincare
What Is pH?
pH measures how acidic or alkaline a substance is, on a scale of 0 to 14. Human skin typically has a pH of around 4.5 to 5.5, which is slightly acidic.
Why Is pH Important?
Maintaining the right pH is crucial for optimal skin health. If your skincare products are too alkaline, they can disrupt your skin’s barrier, leading to dryness and irritation. Conversely, products that are too acidic can cause irritation as well. Using a pH adjuster in your serum helps ensure it works harmoniously with your skin.
6. How to Use the Serum Effectively
Application Best Practices
1. Start with Clean Skin: Always apply your serum to freshly cleansed skin for optimal absorption.
2. Use a Small Amount: A few drops are usually enough to cover your face and neck.
3. Apply Before Moisturizer: For best results, apply the serum before your moisturizer. This allows it to penetrate deeply and deliver hydration effectively.
When to Apply
Use your serum in both your morning and evening skincare routines for consistent hydration and treatment.
7. Who Can Benefit from This Serum?
This hydrating serum is suitable for all skin types, including:
• Oily Skin: Lightweight hydration helps balance oil production.
• Dry Skin: Packed with humectants to replenish moisture.
• Combination Skin: Provides targeted hydration where needed.
• Sensitive Skin: Soothing ingredients like chamomile and aloe vera help calm irritation.
Specific Skin Concerns Addressed
• Dehydration: The serum’s humectants draw moisture into the skin.
• Irritation: Soothing extracts help calm and nourish sensitive skin.
8. Tips for Customizing Your Serum
Everyone’s skin is unique, and so are its needs. Here are some tips to customize your serum:
• Adjusting for Skin Type: If you have oily skin, consider adding a few drops of tea tree oil for its antibacterial properties. For dry skin, you might want to increase the amount of glycerin or add a nourishing oil like jojoba.
• Personal Preferences: Feel free to swap out extracts based on your preferences or availability. For example, you can use rose extract instead of chamomile for a lovely scent and additional soothing benefits.
9. Common Questions About DIY Serums
FAQs
Q: How long does the serum last?
A: With proper preservation (thanks to Germall Plus) and storage, your serum can last for 6-12 months.
Q: Can I store the serum in the fridge?
A: Yes! Storing your serum in the fridge can enhance its cooling effect, especially in hot weather.
Q: Are there safety considerations when making DIY skincare?
A: Always ensure your tools and containers are sanitized, and patch-test your serum on a small area of skin before full use to avoid any adverse reactions.
10. Conclusion
Creating your own DIY hydrating serum is a fun and rewarding way to enhance your skincare routine. With powerful ingredients like hyaluronic acid and soothing extracts, this serum is designed to provide your skin with the hydration and nourishment it craves. We encourage you to try this recipe, customize it to your liking, and experience the benefits firsthand. Happy crafting!
• Distilled Water: 79 g
• N-acetyl Glucosamine: 5 g
• Disodium EDTA: 0.5 g
• Aloe Vera Extract (x200): 1 g
• Chamomile Extract: 1 g
• Cucumber Extract: 1 g
• Panthenol: 1 g
• Hydrolyzed Silk Protein: 1 g
• Sodium Lactate: 1 g
• Glycerin: 5 g
• Hyaluronic Acid (HMW): 1 g
• Germall Plus: 0.5 g
• pH Adjuster: (as needed, typically minimal weight)
Step-by-Step Instructions for Mixing the Serum
1. Preparation:
• Sanitize all tools and containers to ensure a clean working environment.
2. Combine Phase A:
• In a clean container, mix Distilled Water (79) and N-acetyl Glucosamine (5) until fully dissolved.
• Add Disodium EDTA (0.5) and stir until completely incorporated.
3. Add Phase B Botanicals:
• Gradually incorporate the following ingredients into the mixture, stirring gently after each addition:
• Aloe Vera Extract (1)
• Chamomile Extract (1)
• Cucumber Extract (1)
• Panthenol (1)
• Hydrolyzed Silk Protein (1)
4. Incorporate Phase C:
• In a separate clean container, mix Sodium Lactate (1) and Glycerin (5) until well combined.
• Once mixed, add this combination to the main mixture (Phase A + Phase B) and stir thoroughly to ensure even distribution.
5. Prepare Phase D:
• In a small bowl, dissolve Hyaluronic Acid (1) into the Glycerin (5) from the previous step.
• Stir the mixture until the Hyaluronic Acid is fully dissolved and free of lumps. This step ensures a smooth texture in your serum.
6. Combine Phases:
• Slowly add the dissolved Hyaluronic Acid-Glycerin mixture (Phase D) to the main mixture, stirring continuously until fully combined.
7. Add Preservative and Adjust pH:
• Add Germall Plus (0.5) as a preservative to the mixture.
• Check the pH of the serum and adjust as necessary to achieve a pH range of 5-6, suitable for skin compatibility.
8. Packaging:
• Carefully pour the serum into sterilized dropper bottles for easy dispensing.
9. Label:
• Label your serum with the date and the list of ingredients for future reference.
Tips for pH Adjustment
• If your serum’s pH is too low, you can raise it using a sodium hydroxide solution (lye) or other appropriate pH adjusters.
• If it’s too high, you can lower it using a citric acid solution or another suitable acid.
Always use a pH meter or pH strips to accurately measure and adjust the pH of your formulation.
Texture Characteristics:
• Jelly-like Consistency: The presence of Hyaluronic Acid contributes to a slightly viscous, gel-like feel. This texture allows the serum to glide smoothly over the skin and absorb well without feeling heavy.
• Lightweight and Non-Greasy: Despite its jelly-like consistency, the serum should feel lightweight and refreshing, making it suitable for layering under other skincare products or makeup.
• Hydrating and Plumping Effect: The texture also enhances the perception of hydration, as it forms a slight film on the skin, helping to lock in moisture and create a plump appearance.
Discover the Secrets to Glowing Skin with My New eBook!
Excited about creating your own skincare products? My brand-new eBook, “Advanced DIY Body Scrubs: Your Guide to Glowing Skin,” is now available! This comprehensive guide covers everything you need to know about crafting luxurious, all-natural body scrubs right from your home.
In this eBook, you’ll learn:
• The benefits of DIY body scrubs and why they’re better than store-bought alternatives.
• How to choose the right ingredients for your skin type, including essential oils, exfoliants, and botanicals.
• Step-by-step formulas to customize your scrubs for specific skin concerns like dryness, oiliness, or sensitive skin.
• Expert tips on preserving your scrubs and making them gift-ready!
Whether you’re a beginner or experienced in DIY skincare, this eBook offers easy-to-follow guidance, safety tips, and customizable formulas. Take control of your skincare routine with natural ingredients that nourish and refresh your skin.
Download the eBook now and start creating your perfect body scrubs today! Ready to unlock radiant, healthy skin? Visit my store to grab your copy and begin your DIY skincare journey! https://payhip.com/b/yH7Ad
I’d love to hear your feedback—don’t forget to share your reviews after trying out the recipes. Your experience will help me create even better content for you in the future!✨