
Designer: Coral Del Mar
Basic Techniques
Skill Level: Intermediate
Abbreviations: USA Terms
1. Magic ring (mr)
2. RND (rounds)
3. Chain(s)(ch)
4. Increase (inc)
5. Slip stitch (ss)
6. Fasten off(fo)
7. Decrease (dec)
8. Single crochet (sc)
9. *( )* repeat stitches
10. Total stitches [ ]
Materials
1. 4-ply yarn in any color (i am using beige and white from the red heart brand)
2. Crochet hook 4.0 mm (you can adjust the size depending on the yarn you use).
3. Scissors
4. Stitch marker
5. Sewing needle
6. Stuffing/fiberfill (polyfill)
7. Safety eyes 10mm
8. Wire and tweezers for leg stability
Instructions:
PART 1& 2: MAKING THE HEAD AND THE EARS
These parts are worked in the video available on my channel. The video
is in spanish, but you can follow it without any problem because it has
subtitles in multiple languages. For the best experience, you can turn off
the volume and watch it along with subtitles in your preferred language,
so the audio and subtitles do not confuse you.
PART 3: MAKING THE BODY
RND 1: Using beige, start by making a mr with 6 sc. Use a stitch marker so that you
don’t lose count. [6sc]
RND 2: Increase in each stitch around. [12sc]
RND 3: 1sc, inc 6 TIMES around. [18sc]
RNDS 4-11: 8 rounds, sc in each stitch. [18sc] before starting to decrease,
remember to stuff the body. Do not overstuff!
RND 12: dec, sc 6 TIMES. [12sc]
RND 13: dec 6 times. [6sc]
RND 14: sc in each stitch [6sc], ss in the next stitch and fo. Leave a long tail for
sewing.
PART 4: MAKING THE FRONT LEGS (MAKE TWO)
The front and hind legs do not necessarily need stuffing.
RND 1: Using beige, start by making a mr with 4 sc. [4sc]
RNDS 2-6: 6 rounds, sc in each stitch. [4sc]fo and sitch in the front loops to close.
PART 5: MAKING THE HIND LEGS (MAKE TWO)
RND 1: start by making a mr with 6 sc. [6sc]
RND 2: inc in each stitch 6 TIMES. [12sc]
RNDS 3-4: 2 rounds, sc in each stitch. [12sc]
RND 5: Fold the piece, dec by passing through the first stitch and the second back, but do not finish the dec. [To understand this step, click this link that demonstrates how to continue the process of decreasing 5 loops].
RND 6: sc individually in the next 4 sc. [4sc]
RNDS 7-10: sc in each stitch. [4sc]. Fo and finish stitching in the front loops to close.
PART 6: TAIL HAIR
You can use a white mini pom pomto glue it on the back of the body oruse a contrast
color (white) or any color you want for your bunny's tail. Cut 3-4 strands of yarn and attach it to the last round stitches.
ASSEMBLING INSTRUCTIONS:
SEWING THE HEAD:
Start by sewing the head onto the body from where you finished the body (the
closure). Use the markers as a guide to position the head on the body.
Before sewing the legs, insert the wire for stability.
For the front legs, the wire length is 10cm then bend it in half and it should be 5cm.
For the hind legs, the wire length is 12cm then bend it in half and it should be 6cm.
SEWING THE LEGS:
Start by sewing the front legs, then attach the hind legs to the body.
Use the markers as a guide for the correct position of the legs on the body.
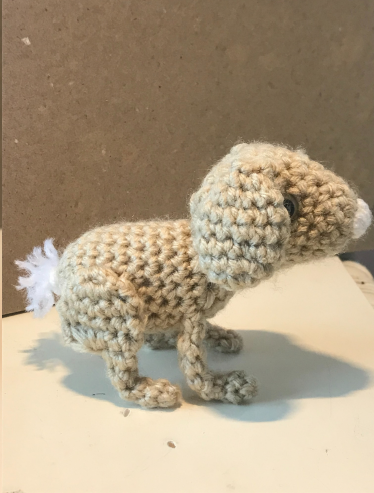
NOW YOU'VE FINISHED YOUR BUNNY!
I HOPE YOU LIKED THIS PATTERN.
LEAVE A REVIEW AND TAKE A PHOTO OF YOUR FINISHED PROJECT
MENTIONING cdmscrochet ON INSTAGRAM OR PINTEREST!
Follow CDM'S Crochet on:
LinkTree
YouTube
Ravelry
Comentarios ()