
Designer: Coral Del Mar
Basic Techniques
Skill Level: Intermediate
Abbreviations: USA Terms
1. Magic ring (mr)
2. RND (rounds)
3. Chain(s)(ch)
4. Half Double crochet (hdc)
5. Increase (inc)
6. Triple crochet (tc)
7. Slip stitch (ss)
8. Fasten off(fo)
9. Decrease (dc)
10. Single crochet (sc)
11. Double crochet(dc)
12. *( )* repeat stitches
13. Total stitches [ ]
Materials
1. 4-ply yarn in any color (I am using gray, white, and yellow from the Red Heart brand.
2. Crochet hook 3.5 mm (you can adjust the size depending on the yarn you use).
3. Scissors
4. Stitch markers
5. Sewing needle
6. Stuffing/fiberfill (polyfill)
7. Safety eyes 10mm
Click here if you want the video tutorial to do it.
Instructions:
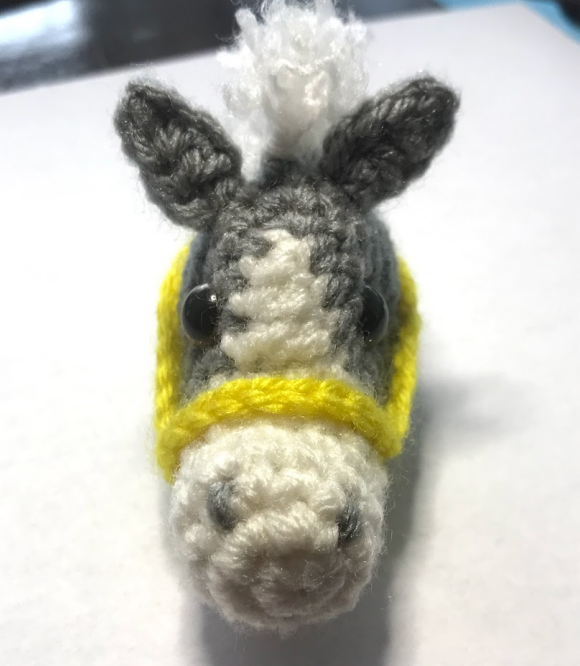
PART 1: MAKING THE MUZZLE (FROM THE MOUTH TO THE FOREHEAD OF THE FACE)
RND 1: Using white, start to do a mr and 6sc 6sc. [6sc]
RND 2: Increase 6 TIMES around. [12sc]
RNDS 3- 6: sc in each stitch around. [12sc]
RND 7: Now we will make the front of the face: 2 sc, 5 ch, in the 2 ch from the
hook. sc, in the next one a hdc, in the next one a dc, and in the last chain a tc. then
skip 4 stitches by counting the second sc from the beginning of round 7 and sc in
the fourth skipped stitch. Continue sc around to the marker. This will leave a space
of stitches that we will later sew.
PART 2: MAKING THE HEAD
RND 1: Fasten off and cut the white color leaving a long sewing tail to sew the gap. Change
the color to gray in the first stitch by making 1 ch and sc in the same space, 5 sc in the next
stitches, then at the end of the chain an inc, then 13 sc, ss in the chain, then sew the space
and with the gray color make double marks to make the nostrils (between rounds 1 and 2
of the first part).
RND 2: 7sc, inc, 14sc. [23sc]
RND 3: 8sc, inc, 14sc. [24sc]
RNDS 4-6: 24 sc around. [24sc]
Now add the eyes in the 3rd round leaving a considerable space between eyes. Make sure the triple crochet of the front of the head (both sides of the triple crochet touches the eyes).
RND 7: sc, dec around [16–17 stitches] Before continuing, fill with stuffing.
RND 8: dec around [8–9 stitches]
RND 9: dec around, skip last stitch. Finish off and close by sewing on the front loops to close
PART 3: THE EARS (MAKE TWO)
RND 1: Using gray, leave a long tail (because we are going to use it to sew the ear). ch 5, from the second chain of the hook, 1 sc, in the next one a hdc, in the next one tc, and in the last stitch a hdc. finish off and leave a long tail to sew the 2 sides of the ear.
PART 4: MANE
RND 1: mark the center stitches of the back head to make the horse's mane. Cut 14 strands for the mane hair and attach it to the back of the head one by one.
PART 5 (OPTIONAL): MAKING THE ROPE (HORSE’S BRIDLE)
MAKE SURE YOU DON’T TWIST THE CHAIN FOUNDATION WHILE WRAPPING AROUND THE NOSEBAND.
RND 1: Using yellow yarn, ch 19 and catch the tail of the first chain. This will wrap
around the noseband of the horse.
RND 2: ch 25 and ss in the chain next to it. Fo and finish sewing the tails down the
sides for a good fit.
NOW YOU'VE FINISHED YOUR HORSE KEYCHAIN!
I HOPE YOU LIKED THIS PATTERN.
LEAVE A REVIEW AND TAKE A PHOTO OF YOUR FINISHED PROJECT
MENTIONING @cdmscrochet ON INSTAGRAM OR PINTEREST!
Follow CDM'S Crochet on:
LinkTree
YouTube
Ravelry
Comentarios ()