

Sparkle isn’t just a craft choice; it’s a 30,000-year-old human obsession. In today’s guide, we are diving deep into the Glitter & Glue archives. We’re covering everything from the crushed beetles of Ancient Egypt to the precision-cut polymers of today. Then, we’re getting hands-on with 12 groundbreaking projects—including the high-demand "Phygital" Transfer method, where we take high-res digital glitter textures and fuse them onto physical tumblers. There is a primitive magic in things that shine. From the shimmer of a dragonfly’s wing to the high-gloss finish of a digital interface, glitter is more than a craft supply—it is a tool for capturing light. Today, we are exploring the fascinating evolution of glitter and 12 ways to master its texture in both the physical and digital realms. Before we get into it lets take a quick dive into the the history glitter textures and how they impact the gap between your craft table and your computer screen.
A Glimmer of History: From Beetles to High-Tech Bio-Glitter
Before we get our hands (and screens) messy, let's look at where this obsession began.
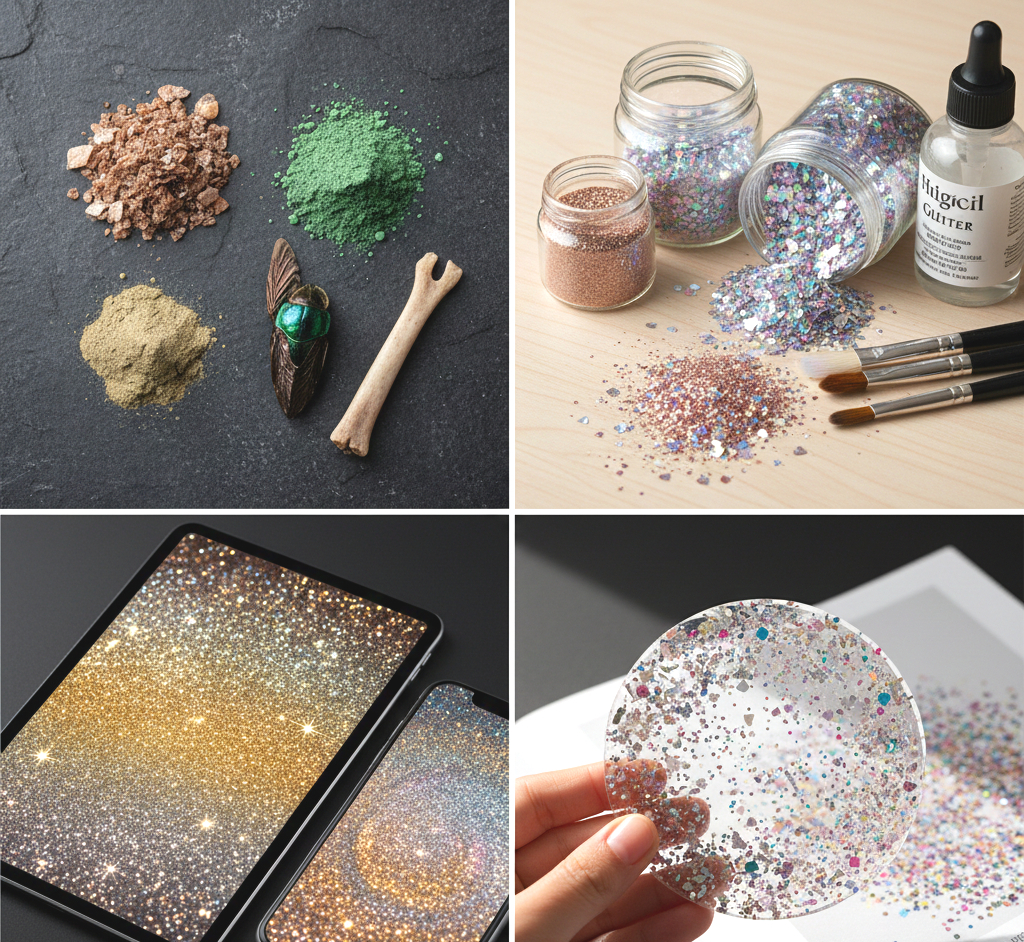
- The Stone Age;30,000 BCE: Prehistoric artists ground up Mica (a silicate and reflective mineral) to breathe life into the cave paintings they created.
- Ancient Egypt: To achieve that iconic royal glow, Egyptians crushed beetle wings and malachite to create shimmering cosmetics.
- The Accident of 1934: Modern glitter was actually a mistake! A New Jersey machinist named Henry Ruschmann was trying to find a way to dispose of scrap plastic and accidentally ground it into the tiny, uniform flakes we know today.
Today, we are in the era of Sustainable Sparkle, moving away from plastics toward plant-based cellulose and digital rendering that captures light without the mess.
Glitter isn't just a material; it's a way to manipulate light to evoke an emotional response. Whether you are getting your hands messy with glass shards at your craft desk or carefully layering pixels on your tablet, you are part of a 30,000-year-old human tradition of "making things shine."
As we look toward the trends of 2026, the most successful creators will be those who can dance between these two worlds—using digital textures to prototype and physical products to finalize.
Part 1: Physical "Phygital" Projects
In these 6 projects, we are taking digital glitter textures (printed on high-quality media) and applying them to physical objects for a mess-free, professional look.
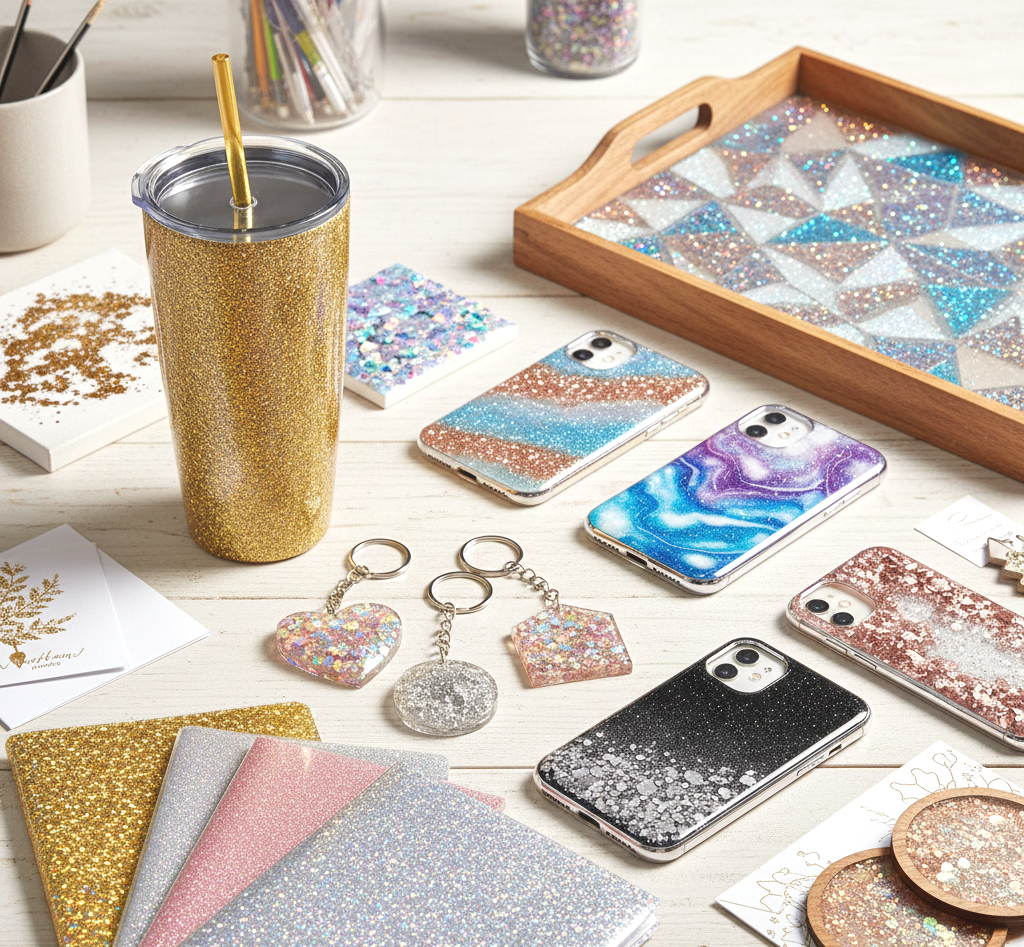
Physical glitter is the "soul" of the shimmer synthesis. From prehistoric cave paintings adorned with crushed mica to the high-tech polyester films used in modern auto paint, humans have always sought to capture light in their hands. In the world of physical crafting, choosing the right material is as much about science as it is about style. Polyester (PET) glitters are the gold standard for crafters today, prized for their ability to withstand the high heat of heat presses and the harsh chemicals of epoxy resins without losing their prismatic finish. Beyond just the color, the "cut" of the glitter defines the project's vibe: ultra-fine powders create a sophisticated, silk-like glow perfect for wedding stationery, while chunky hexagonal mixes provide the structural "crunch" and 3D depth needed for statement resin trays or festival makeup.
- The Pros: There is an undeniable "wow-factor" in how physical glitter reacts to real-world light. It offers a 360-degree sparkle, a tactile texture you can feel, and a sense of handmade luxury that digital pixels can only mimic.
- The Cons: It is notoriously difficult to contain (the "herpes of craft supplies"), can be environmentally taxing if not biodegradable, and requires chemical sealants like epoxy or polyurethane to prevent "shedding" over time.
- Best For: High-end boutique items, personalized gifts, home decor, and any project where the end-user will be holding and rotating the object in their hands.
Lets now dive into how to some Phygital products you can create at home
1. The "Glitter-Wrap" Pro Tumbler
The Project: Using a printed glitter-texture wrap to create a high-gloss, seamless tumbler.
- Materials: High-res digital glitter texture, Sublimation printer (or waterslide paper), 20oz stainless steel tumbler, Heat press or convection oven.
- The Steps:
- Print: Print your digital glitter texture onto sublimation paper.
- Prep: Clean your tumbler with 91% isopropyl alcohol. Even a fingerprint can cause a "faded" spot.
- Wrap: Wrap the paper tightly around the tumbler, securing the seam with heat-resistant tape.
- Heat: Bake in a convection oven at 400°F (204°C) for 6 minutes, rotating halfway.
- Reveal: Peel back the paper to find the glitter "infused" into the metal—all the shine, zero grit.
2. Waterslide Glitter Decals for Ceramics
The Goal: Achieving the look of a custom-glittered logo without the messy epoxy traditionally required for mugs.
- Prep Your Surface: Clean your ceramic mug thoroughly with 91% isopropyl alcohol. Any skin oils or dust will prevent the decal from bonding, leading to peeling later.
- The Print Phase: Use a high-resolution digital glitter texture. Print your design onto Waterslide Decal Paper (ensure you choose the correct version for your printer type: Inkjet or Laser).
- Sealing the Ink: This is the most vital step for Inkjet users. Spray the printed sheet with three light coats of Crystal Clear Acrylic Sealer, waiting 15 minutes between each. If you skip this, the "glitter" ink will run the moment it touches water.
- The Transfer: Cut out your design with a 1mm border. Submerge it in room-temperature water for 30–60 seconds. When the decal starts to slide easily off the paper backing, it’s ready.
- Application & Finishing: Wet the mug surface slightly, slide the decal onto the ceramic, and use a silicone squeegee or damp lint-free cloth to gently push air bubbles and excess water from the center out to the edges.
- The Cure: Let it air dry for 24 hours, then bake in a home oven (check your paper’s specific instructions, usually 225°F for 10 minutes) to set the decal permanently.
3. Glitter-Texture "Faux-Leather" Keychains
The Goal: Creating high-end, flexible accessories that mimic expensive glitter-encrusted leather.
- Design & Print: Open your "Chunky Glitter" digital texture in your cutting software (like Cricut or Silhouette). Print the texture onto Printable Heat Transfer Vinyl (HTV). Note: Do not mirror your image for printable HTV.
- The Cut: Use the "Print Then Cut" feature to cut your keychain shapes (circles, hearts, or initials).
- Weeding: Carefully remove the excess vinyl from around your shapes. Use a weeding tool to get into the small gaps of letters.
- The Press: Place your faux-leather scrap on your heat press or firm surface. Position the glitter-texture vinyl on top. Cover with a teflon sheet or parchment paper to protect the leather from melting.
- Temperature Control: Press at 305°F (152°C) for exactly 15 seconds using medium pressure.
- Assembly: Once cool, peel away the carrier sheet. Use a leather punch to create a hole at the top and attach your metal keyring hardware. The digital texture will now look like a structural part of the leather.
4. The "Infinity" Glitter Tray (Decoupage)
The Goal: Creating a deep, 3D "liquid glitter" effect using vellum and epoxy.
- The Base: Sand a wooden craft tray until smooth. Paint the bottom of the tray a solid color (white makes digital glitter pop, while black makes it look deeper and more "space-like").
- Printing on Vellum: Print your digital glitter texture onto translucent vellum paper. Vellum allows some of the light to pass through, which creates a glowing effect once the resin is added.
- The Glue-Down: Apply a very thin, even layer of Matte Mod Podge to the tray floor. Lay the vellum down, starting from one edge to avoid bubbles. Use a brayer (roller) to ensure it is perfectly flat. Seal the top of the vellum with another thin layer of Mod Podge to prevent the resin from "greasing" the paper.
- The Pour: Mix a 1:1 ratio of Clear Casting Epoxy Resin. Stir slowly for 3 minutes to avoid bubbles.
- The Synthesis: Pour the resin over the vellum. Use a heat tool to pop any surface bubbles. As the resin settles, it acts like a magnifying glass, "waking up" the digital pixels and making the flat print look like a 3D pool of shimmering glitter.
5. Custom Glitter Planner Covers
The Goal: A "bulletproof" sparkle shell for your 2026 organization.
- Paper Selection: Print your digital glitter texture on 80lb or 100lb bright white cardstock. The heavier the paper, the more professional the cover will feel.
- The Pouch: Use a 5mil or 10mil Lamination Pouch. Place your printed sheet inside, ensuring there is a small border of clear plastic around the edges to create a waterproof seal.
- Thermal Bonding: Run the pouch through a professional-grade laminator on the "Hot" setting. The heat bonds the plastic directly to the ink.
- Trimming & Punching: Use a corner rounder to take off the sharp edges. Use a heavy-duty disc-bound or spiral punch to create the holes for your planner.
- The Result: You now have a cover that looks like it’s made of solid glitter but is perfectly smooth to the touch and won't shed a single flake in your bag.
6. Glitter-Texture Sticker Sheets
The Goal: Elevating standard digital prints into multi-dimensional, holographic stickers.
- The Base Print: Print your glitter texture designs onto Premium Waterproof Sticker Paper.
- The "Rainbow" Layer: Take a sheet of Holographic Cold-Laminate Film (this often comes in "broken glass" or "star" patterns).
- The Application: Peel back the top inch of the holographic film’s backing. Align it with the top of your printed sticker sheet. Use a felt-edged squeegee to slowly press the film down over the print, peeling the backing away as you go. This prevents silvering (tiny air bubbles).
- Cutting: Use your cutting machine (Cricut/Silhouette) to cut "Kiss-Cut" stickers.
- The Visual Effect: The digital glitter texture provides the color and "depth," while the holographic overlay provides the actual light-refraction. Together, they create a "Phygital" product that looks incredibly expensive.
Part 2: Digital Glitter Creations
6 projects where the glitter stays on the screen, used for professional branding and digital products.
The Digital glitter is where "glam" meets "efficiency." In the modern designer’s toolkit, digital glitter isn't just a static photo; it’s a dynamic asset made of light. High-resolution digital textures—often rendered at 300 DPI}—allow you to apply a "perfect" sparkle to everything from a website header to a social media overlay with a single click. The true magic of digital glitter lies in blend modes. By shifting a glitter layer from "Normal" to "Color Dodge" or "Screen," you can make the pixels appear to emit light, mimicking the way a physical flake catches a camera flash. This "clean" glitter allows for endless experimentation: you can change a rose-gold texture to a lilac hue in seconds using a simple hue/saturation slider, something that would require a whole new jar of supplies in the physical world.
- The Pros: Zero mess and infinite "undo" buttons. Digital glitter is eco-friendly, highly cost-effective, and allows for perfect consistency across branding materials. It also enables "impossible" designs, like glowing text or interactive web banners that sparkle when a mouse moves.
- The Cons: It lacks the physical 3D "depth" of real flakes and can sometimes look "flat" if the designer doesn't know how to use shadows and light-mapping to give it life.
- Best For: Brand identities, social media marketing, digital planning (GoodNotes/Notability), "phygital" mockups for shop owners, and professional printing like sublimation or waterslide decals.
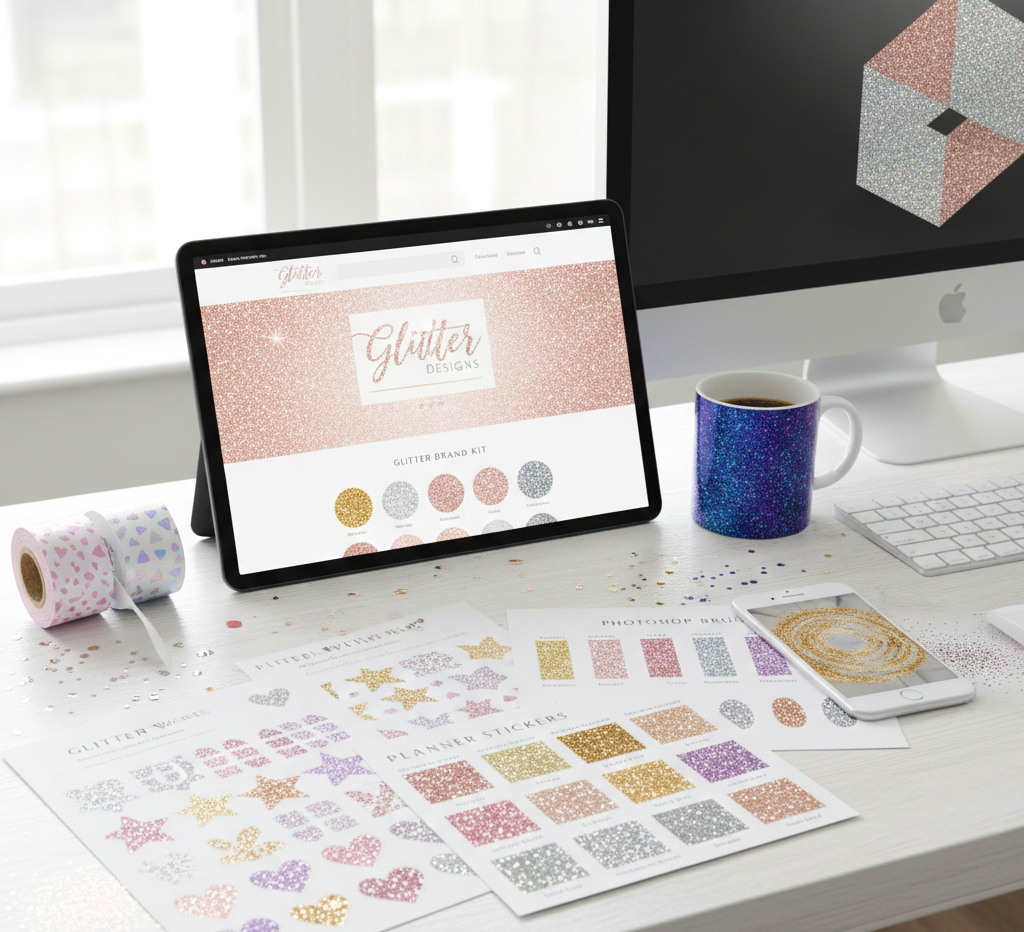
7."Signature Shine" Brand Kit
The Goal: Transforming flat logos into high-end, luxury branding that looks like embossed foil.
- Step 1: Set Your Canvas: Open your logo in a vector-based program (Illustrator) or Photoshop. Ensure your logo is a solid color (preferably black) on a transparent background.
- Step 2: The Clipping Mask: Place your high-res gold glitter texture layer directly above your logo layer. Right-click the glitter layer and select "Create Clipping Mask." The glitter will now only appear within the shape of your logo.
- Step 3: Adding Physical Depth: To make it look "real," double-click your logo layer to open Layer Styles.
- Add an Inner Glow (Set to 'Multiply' with a slightly darker gold/brown) to mimic the way light falls off the edges of real glitter.
- Add a subtle Drop Shadow (Distance: 2px, Spread: 0%, Size: 3px) to give the logo a "raised" effect on the page.
8. Digital "Washi Tape" for Planners
The Goal: Creating realistic, sparkling digital stickers for iPad journaling or web design.
- Step 1: Shape the Tape: Draw a long, thin rectangle. To make it look like real craft tape, use a Roughen Edges filter or a jagged eraser tool on the ends to create a "torn" look.
- Step 2: Apply Texture: Overlay your digital glitter texture onto the shape.
- Step 3: Lower Opacity: Real washi tape is slightly translucent. Set your layer opacity to 90-95%. This allows the "paper" underneath in your digital planner to show through slightly, making it look authentically thin.
- Step 4: Export: Save as a PNG-24 with transparency so you can "stick" it anywhere.
9. Social Media "Twinkle" Overlays
The Goal: Creating hypnotic, moving backgrounds for Instagram Stories or TikToks.
- Step 1: High-Res Placement: Import a glitter texture into your video editor (CapCut, Premiere, or Canva).
- Step 2: The Ken Burns Effect: Set a keyframe at the start of your clip with the image at 100% scale. At the end of the 15-second clip, set a keyframe at 110% scale and rotate the image by 3-5 degrees.
- Step 3: Light Play: This slow movement causes the digital pixels to shift against the screen’s light, creating a "shimmering" effect that mimics real-life movement.
- Step 4: Overlaying Text: Place your promotional text on top with a slight blur behind it to ensure the "sparkle" doesn't make the words hard to read.
10. Glitter-Mapped 3D Mockups
The Goal: Creating "lifestyle photos" of products that don't exist yet, saving you time and money.
- Step 1: The Base Image: Open a high-quality mockup of a plain white mug or t-shirt.
- Step 2: The Displacement Map: In Photoshop, create a black-and-white version of your mockup (where shadows are dark and highlights are light). Save this as a separate .PSD file.
- Step 3: Mapping the Glitter: Place your glitter texture over the mug. Go to Filter > Distort > Displace. Select the .PSD file you just saved.
- Step 4: Realism: The glitter texture will now "warp" and "bend" around the curves and wrinkles of the object. Set the layer blend mode to "Linear Light" or "Overlay" to pull the natural shadows through the glitter.
11. Custom "Glitter-Wash" Photoshop Brushes
The Goal: "Painting" with light and texture rather than just solid colors.
- Step 1: Define the Source: Take a high-contrast photo of a few scattered glitter flakes. Convert it to black and white. Go to Edit > Define Brush Preset.
- Step 2: Brush Settings: Open the Brush Settings Panel (F5). This is where the magic happens:
- Shape Dynamics: Set "Size Jitter" and "Angle Jitter" to 100% so no two flakes look the same.
- Scattering: Set to "Both Axes" and crank it to 150%.
- Step 3: The Paint: Now, when you drag your pen, you aren't drawing a line; you are "scattering" glitter flakes across your canvas.
12. Interactive Web Headers
The Goal: A "wow-factor" website banner that reacts to the user’s mouse movements.
- Step 1: The Layered Build: Create two versions of your header. Layer A is your text/branding. Layer B is the glitter texture background.
- Step 2: Parallax Coding: Using a simple Parallax script (or a website builder like Wix/Elementor), set the Motion Speed of the glitter background to be slower than the scroll speed of the text.
- Step 3: Mouse Tracking: If your platform allows "Hover Effects," set the glitter texture to shift 10px in whichever direction the mouse moves.
- Step 4: Visual Reward: This creates an "optical shimmer" that makes the visitor feel like they are tilting a physical card in their hand while browsing your site.
Even More Glittery Digital Products

1. Seamless Glitter Digital Papers
These are the "bread and butter" of digital crafting. My personal favorite creating and what we actually sell at Glitter creator, Glitter texture papers are high-resolution (3600 \times 3600 px) textures designed to "tile" perfectly without showing seams.
- Why people buy: Essential for scrapbooking, website backgrounds, and large-scale printing where you don't want a repeating line.
126 Seamless Glitter textures-12x12-Commerical Use-300 DPI
2. Glitter Alphabet & Number Sets (Clipart)
Instead of a font, these are individual, high-resolution PNG files for each letter, usually styled in "Rose Gold," "Silver," or "Holographic."
- Why people buy: It allows users to create names and titles with a realistic, 3D glitter "crunch" that standard fonts can't replicate.
3. Luxury Glitter Brushstrokes
These are digital "swashes" or "smears" that look like a paintbrush was dipped in glitter and dragged across the screen.
- Why people buy: They are perfect for placing behind a logo or text on Instagram posts to add an "artsy," handmade feel.
4. Geometric Glitter Frames & Borders
Minimalist frames (circles, hexagons, and rectangles) made of thin, sparkling lines.
- Why people buy: Wedding stationers love these for framing invitations and "Save the Date" cards.
5. Glitter Confetti Overlays
Transparent PNGs that feature "floating" glitter flakes of various sizes, usually with a "bokeh" or blurred effect.
- Why people buy: Photographers use these to add "magic" to portraits or to create a festive atmosphere in product photography.
6. "Dripping" Glitter Borders
A texture that looks like liquid glitter is dripping from the top of the page.
- Why people buy: Extremely popular in the "Glam" branding niche and for creating eye-catching headers for sales and promotions.
7. Procreate & Photoshop Glitter Brushes
A set of brush files that allow artists to "paint" with sparkle on their tablets.
- Why people buy: Illustrators use these to add highlights to hair, makeup, or clothing in digital fashion illustrations.
8. Glitter Planner Stickers (Pre-cropped)
Digital files formatted specifically for apps like GoodNotes, featuring glitter-textured checkboxes, banners, and "washi" strips.
- Why people buy: The digital planning community is massive and constantly seeks new ways to make their iPad "spreads" look tactile.
9. Glitter-Infused Social Media Templates
Editable Canva or Photoshop templates for "Sale" announcements or "New Post" alerts that feature integrated glitter textures.
- Why people buy: Small business owners want a "luxury" look without having to learn how to create complex textures themselves.
10. Multi-Tone "Holographic" Textures
Glitter that shifts colors (e.g., from lilac to rose gold) depending on the "angle" of the digital light.
- Why people buy: It feels cutting-edge and futuristic, making it a top seller for tech-focused or modern lifestyle brands.
Whether you find yourself at your craft bench or preparing your digital canvas, the heart of your work remains the same: you are a curator of light. The "Shimmer Synthesis" isn't about choosing between the physical and the digital; it’s about realizing that these two worlds now dance together to create something more magical than they could alone. By mastering the tactile grit of real-world materials and the infinite precision of digital textures, you aren't just making "crafts"—you are engineering an experience that sparkles across every medium. So, go ahead—make the mess, click the pixels, and never be afraid to add that extra layer of shine. After all, in a world that can sometimes feel a little dull, your job is to make sure it stays breathtakingly bright. Later Glitter Creator
In a world that is becoming increasingly digital, does the "mess" of physical glitter make it more valuable to you, or do you prefer the perfect, controlled shine of a digital texture? Comment Down Below
Comments ()