
Ready to create your own sensory bin? Many of these activities use simple supplies that can be reused again and again. Check out my favorite sensory bin essentials below to get started!
1.Bug Scavenger Hunt Bin
The Concept
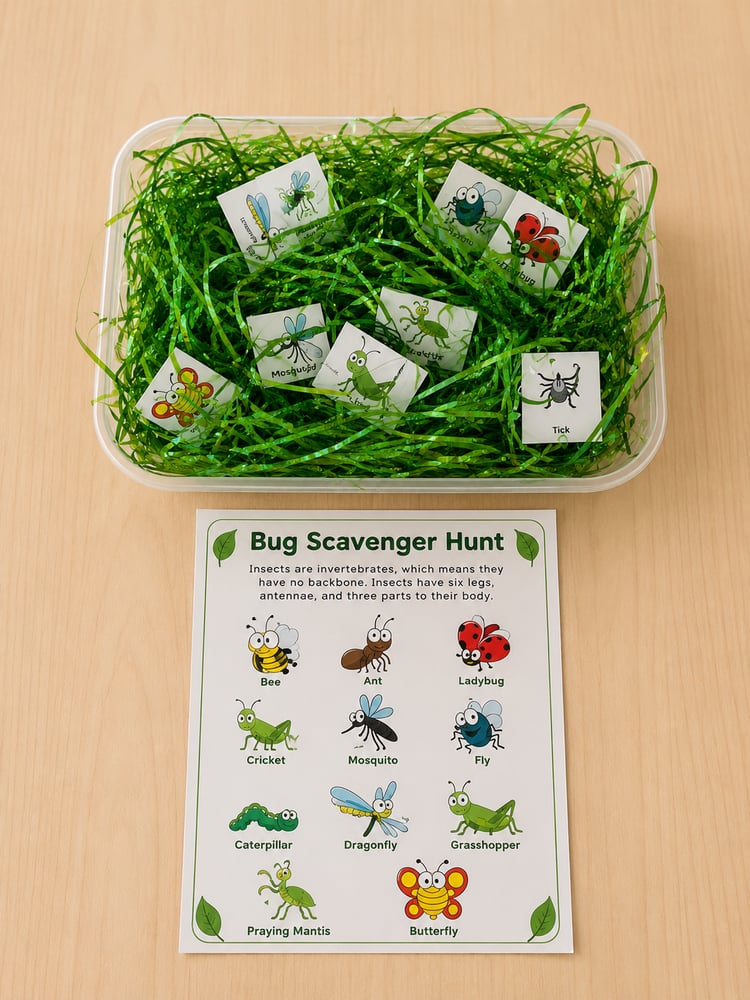
This bin is all about early science exploration, visual discrimination, and matching skills. By burying the bug cards in the "grass," children practice fine motor control and spatial awareness as they excavate each insect and cross-reference it with their master scavenger hunt checklist. It's an excellent way to introduce biological concepts (like invertebrates and body segments) in a totally hands-on, playful way.
How to Put It Together
- Step 1: Grab a shallow, clear plastic storage tub to act as your main sensory base.
- Step 2: Fill the tub generously with bright green plastic or paper Easter grass to mimic a lush backyard lawn.
- Step 3: Print out two copies of your insect graphic sheet. Keep one whole as the master "Scavenger Hunt" checklist. Cut the second copy into individual square flashcards.
- Step 4: Tuck the individual bug cards deep into the green grass, leaving just enough peeking out to invite little fingers to dig. Give the children the master sheet and let the hunt begin!
Amazon Affiliate Links to Include
- Clear Sensory Bins: Sterilite 6-Quart Clear Storage Tubs (12-Pack) – The ultimate staple size for individual sensory setups.
- Sensory Base: Green Plastic Easter Basket Grass Filler – Provides that perfect crinkly, grassy texture that can be reused over and over.
Color-Matching Plastic Egg Match
The Concept
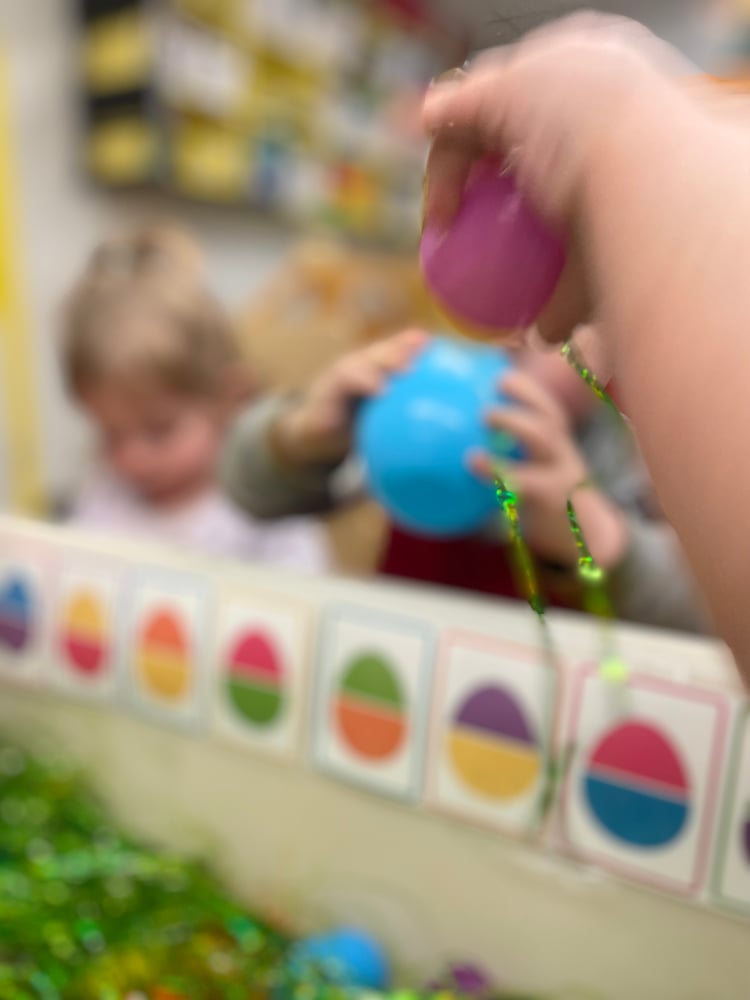
Perfect for toddlers and preschoolers, this activity targets color recognition, symmetry, and bilateral coordination. By taking apart and putting together plastic eggs, children strengthen their hand muscles and practice two-handed coordination. Matching the physical eggs to the 2D graphic flashcards on the bin wall bridges the gap between concrete objects and abstract visual representations.
How to Put It Together
- Step 1: Line the back inner wall of your sensory table or large bin with color-blocked egg flashcards showing different two-tone combinations (e.g., pink top/yellow bottom).
- Step 2: Fill the bottom of the bin with your leftover green crinkle grass to create a vibrant hiding area.
- Step 3: Pull apart a variety of colorful plastic Easter eggs and mix up the tops and bottoms. Toss them into the grass.
- Step 4: Encourage children to hunt through the grass, snap the correct color halves back together, and match their completed eggs to the corresponding flashcard guide on the wall!
Amazon Affiliate Links to Include
- Sensory Fillers: Plastic Easter Eggs – Look for standard hinge-free split eggs so kids can mix and match the colors easily.
- Mounting Essential: Scotch Removable Poster Tape – Perfect for securing your color-matching cards to the inside of the plastic bin without leaving sticky residue.
3. Ocean Clean-Up Rescue Mission
The Concept
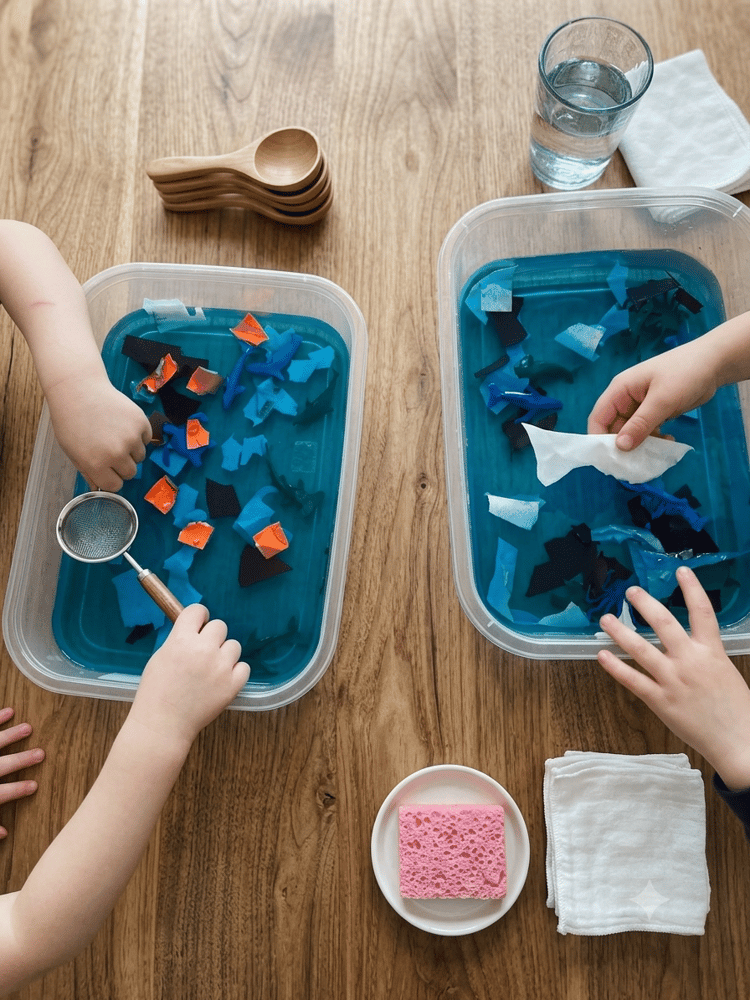
This water-play setup packs a double punch: it serves as a wonderful fine motor tool and an early introduction to environmental awareness and marine biology. Using small strainers or fine scoops forces children to use wrist stability and a controlled grasp. As they pull "trash" (tissue paper) out of the water to save the ocean animals, you can spark meaningful conversations about keeping our waters clean.
How to Put It Together
- Step 1: Fill two mid-sized clear plastic tubs about halfway with water. Add a single drop of blue food coloring to each to give it an inviting ocean depth.
- Step 2: Drop in an assortment of plastic marine animals (sharks, whales, sea turtles, etc.).
- Step 3: Shred up pieces of black, orange, and dark blue construction paper or tissue paper and scatter them across the water's surface to represent ocean debris.
- Step 4: Provide kids with small plastic hand strainers, slotted spoons, or tongs. Challenge them to "clean up the pollution" by scooping out the paper scraps and placing them on a nearby sponge or tray, leaving the sea creatures safe and sound.
Amazon Affiliate Links to Include
8 Pieces Plastic Rake, Sifter Shovel – Durable, vibrant, and perfectly sized for little water rescue missions.
- Fine Motor Tools: Learning Resources Helping Hands Fine Motor Tool Set – Includes the perfect mini-scoops and squeezers for water play.
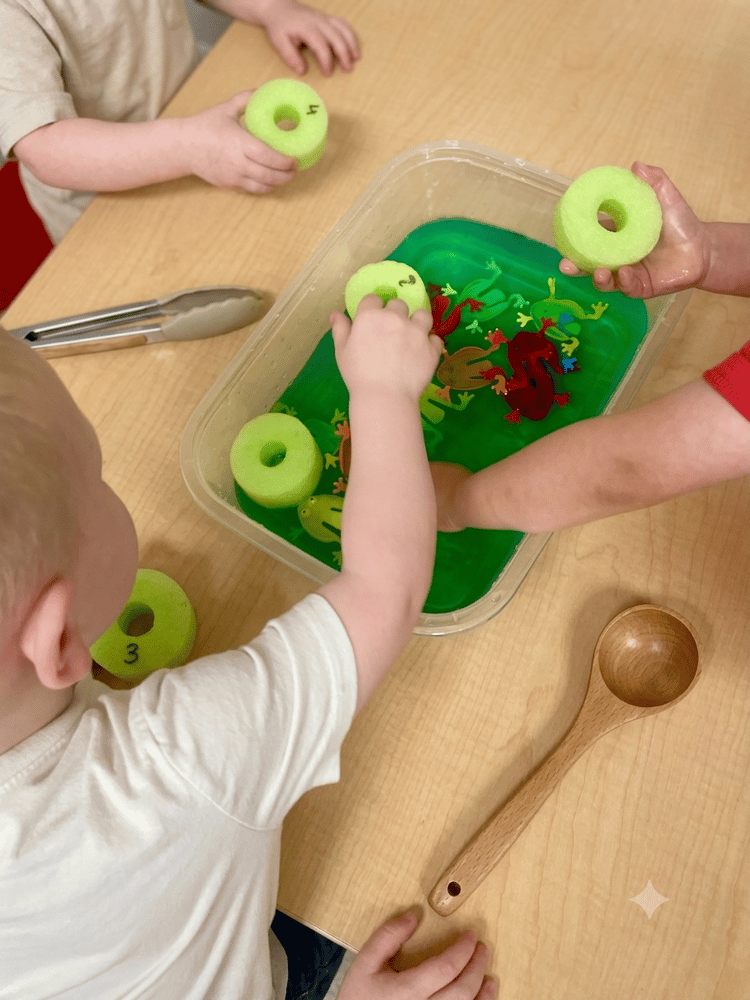
4. Little Frogs on a Lily Pad
The Concept
This vibrant liquid bin focuses heavily on mathematical concepts like counting, sorting, and color sorting, alongside sensory exploration. Manipulating slippery, floating pool noodle slices (lily pads) and small plastic frogs provides a rich tactile experience. Children practice hand-eye coordination as they try to balance the heavy plastic frogs onto the floating foam pads without flipping them over.
How to Put It Together
- Step 1: Take a standard green pool noodle and carefully slice it into 1-inch thick rounds using a serrated knife. These will act as your floating lily pads! (Bonus tip: Write numbers on them with a sharpie for an added counting challenge).
- Step 2: Fill a shallow clear bin with water and stir in a few drops of green food coloring to turn it into a murky swamp.
- Step 3: Float your pool noodle "lily pads" on top of the water.
- Step 4: Toss in a handful of colorful plastic frog figures or counters. Let the kids use their hands or tongs to pinch the frogs out of the water and balance them safely onto their floating lily pads.
Amazon Affiliate Links to Include
Swamp Floating Elements: Green Foam Pool Noodles (2-Pack) – An incredibly budget-friendly way to make dozens of durable, floating sensory lily pads! or to be really fancy grab these!: Artificial Floating Foam Lotus Flowers
Jump-n-Leap Frogs: 144-Pack Jump-n-Leap Frogs – Great for color sorting, stacking, and water-safe counting games.
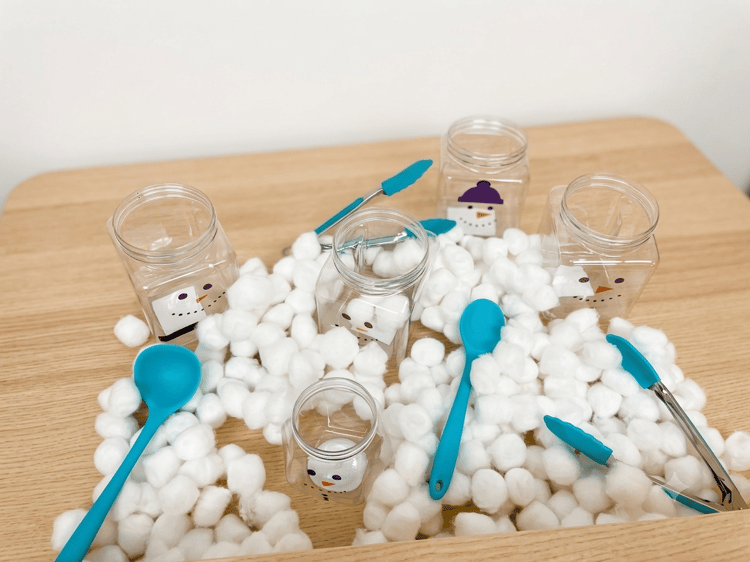
5. Stuff the Snowman Sensory Bin
The Concept
This winter-themed bin focuses heavily on fine motor control, spatial awareness, and volume exploration. As children use oversized spoons and fine-motor tongs to scoop up fluffy "snowballs" (cotton balls) and drop them into the narrow mouths of the snowman jars, they work on hand-eye coordination, wrist stability, and the precision grip needed for early writing.
How to Put It Together
- Step 1: Grab a handful of clean, empty plastic jars or recycled clear containers. Use a permanent marker or adhesive vinyl to draw simple snowman faces (black dots for eyes/mouth and an orange carrot nose) on the front of each jar.
- Step 2: Fill a deep plastic sensory tub with a mountain of white cotton balls to serve as your winter wonderland base.
- Step 3: Place your DIY snowman jars upright inside the tub, surrounding them with the fluffy snow.
- Step 4: Provide a collection of colorful plastic ladles, slotted spoons, and tongs. Invite your little learners to scoop, grab, and stuff the snowmen until they are full to the brim!
Amazon Affiliate Links to Include
- Sensory Base: 100% Pure Cotton Balls (Bulk Pack) – The perfect budget-friendly, mess-free "snow" that offers a wonderful soft tactile experience.
- Fine Motor Tools: Colorful Plastic Hand Tongs and Scoops for Kids – Great for building hand strength and finger isolation during transfer play.
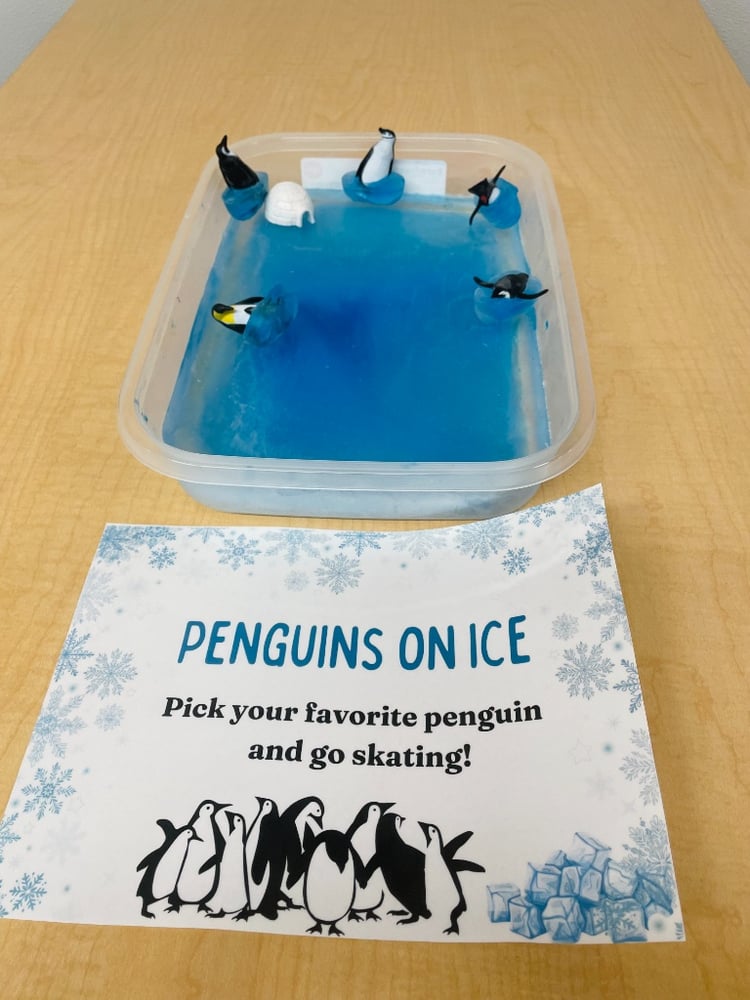
6. Penguins on Ice Sensory World
The Concept
Bring the Arctic straight into the playroom! This bin introduces children to temperature sensory play, imaginative storytelling, and cause-and-effect. Exploring the smooth, freezing texture of actual ice or the sleek surface of blue sensory gel allows kids to engage in dramatic play while experimenting with real-world concepts like freezing, melting, and habitat exploration.
How to Put It Together
- Step 1: Prepare your "ice rink" by freezing a shallow layer of water mixed with a drop of blue food coloring directly in a baking pan or storage container. Alternatively, use a blue sensory gel mat or blue water beads as a completely mess-free alternative.
- Step 2: Scatter some small upside-down blue plastic cups or clear acrylic ice rocks across the surface to act as floating icebergs for the animals to climb.
- Step 3: Add a small toy igloo structure or build one using white blocks to create a cozy shelter.
- Step 4: Place mini plastic penguin figurines all over the icy terrain. Add a matching "Penguins on Ice" prompt card to the edge of the bin to encourage kids to make their penguins "skate," slide, and explore!
Amazon Affiliate Links to Include
- Arctic Inhabitants: Mini Plastic Penguin Figurines (Assorted Species) – Durable, water-safe miniature figures that are perfect for little hands to manipulate.
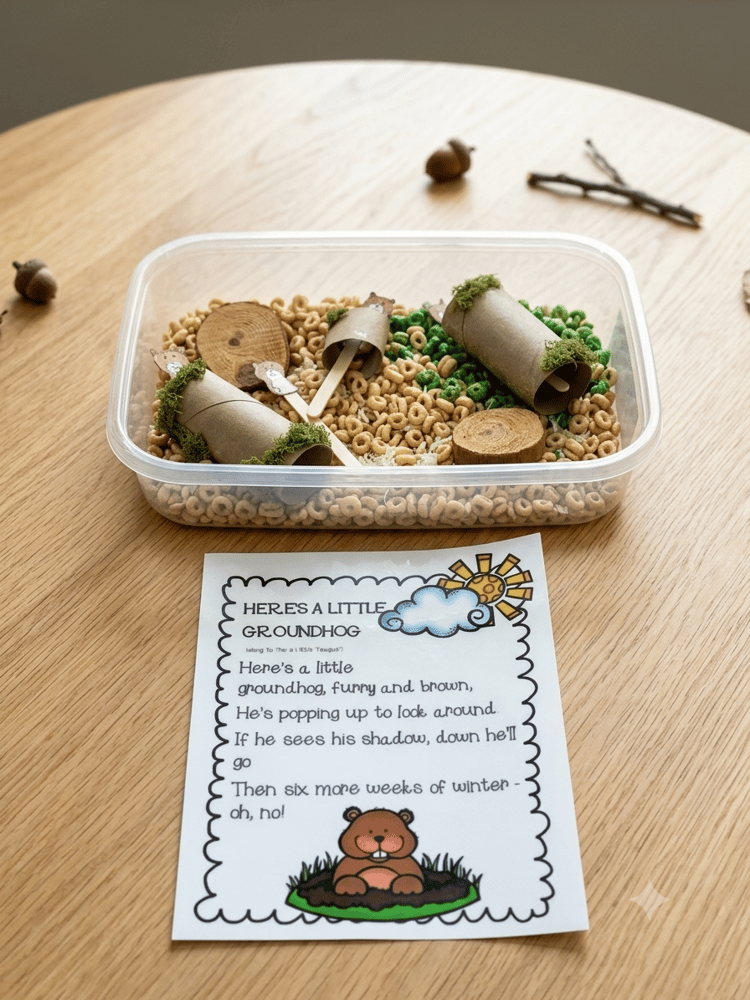
7. Groundhog Day "Peek-a-Boo" Bin
The Concept
This interactive setup perfectly blends early literacy, rhyming, and seasonal science (Groundhog Day, shadows, and changing seasons). Pushing the groundhog puppets up and down through their burrows mimics real animal behavior, providing a brilliant tactile accompaniment to a circle-time poem or song. It also targets bilateral coordination as kids hold the tube with one hand and slide the popsicle stick with the other. although my daycare babies really enjoyed eating the cherrios!
How to Put It Together
- Step 2: Create your groundhog burrows by wrapping empty toilet paper or paper towel cardboard rolls in green faux moss ribbon or green felt. Secure with hot glue.
- Step 2: Print out small groundhog illustrations, let the children color them in, and tape or glue them onto the tops of standard wooden popsicle sticks to create your "peek-a-boo" puppets.
- Step 3: Fill a wide tray or bin with a base of round whole-grain cereal (like Cheerios) to represent the earthy ground, and mix in a few handfuls of green loop cereal to mimic fresh patches of spring grass.
- Step 4: Stand your mossy burrows up in the cereal base, scatter a few decorative wood craft slices around the yard, and slide the groundhog puppets into the tubes so they can pop up to look for their shadows!
Amazon Affiliate Links to Include
- Burrow Textures: Preserved Green Moss – An incredibly sensory, textured material that instantly transforms cardboard tubes into realistic grassy burrows.
- Natural Accents: Natural Wood Slices for Crafts (Mini Pack) – Adds an organic, rustic look to woodland and backyard-themed sensory setups
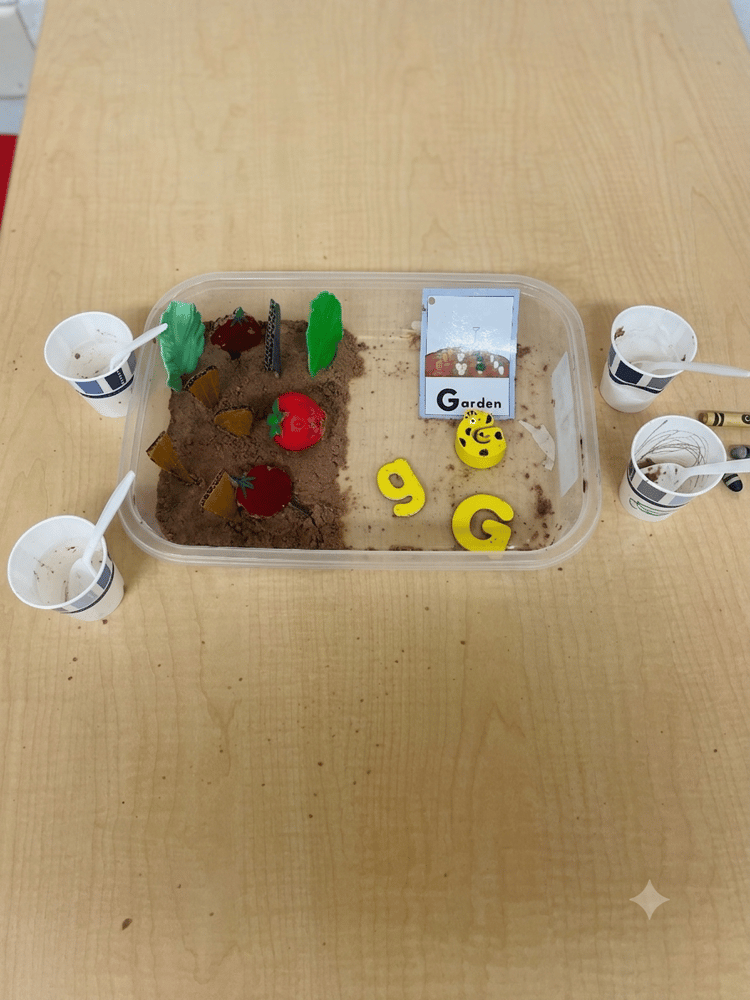
8. Letter "G" Garden Dig
The Concept
This bin is a fantastic tool for phonemic awareness, letter recognition, and texture exploration. By focusing entirely on the hard "G" sound ("G is for Garden, Giraffe, and Green vegetables"), children anchor their letter learning to real, multi-sensory actions. Digging through the "soil" to harvest vegetables and locate the hidden wooden alphabet pieces reinforces print motivation and language development.
How to Put It Together
Step 1: Create a rich, crumbly "garden soil" base by mixing cocoa powder with dry sand, or by whipping up a batch of brown cloud dough (flour, vegetable oil, and cocoa powder for scent and color).
- Step 2: "Plant" an assortment of faux felt or plastic garden vegetables (like carrots, radishes, and lettuce tops) into one side of the soil.
- Step 3: On the other side, place an educational card labeled "G Garden" alongside various physical representations of the letter G, such as a wooden block uppercase 'G', lowercase 'g', and a toy plastic giraffe.
- Step 4: Set up a few small paper cups with white plastic spoons right next to the bin. Invite children to grab a spoon, harvest the veggies, dig up the letters, and shovel the sensory soil into their individual cups.
Amazon Affiliate Links to Include
- Tactile Letters: Alphabet Letters (Bulk Craft Set) – Perfect for painting, burying, and helping kids identify both uppercase and lowercase letter shapes.
- Play Veggies: Felt or Plastic Play Vegetables for Kids' Gardens – Adds a gorgeous pop of color and a rewarding "harvesting" mechanic to agricultural play.
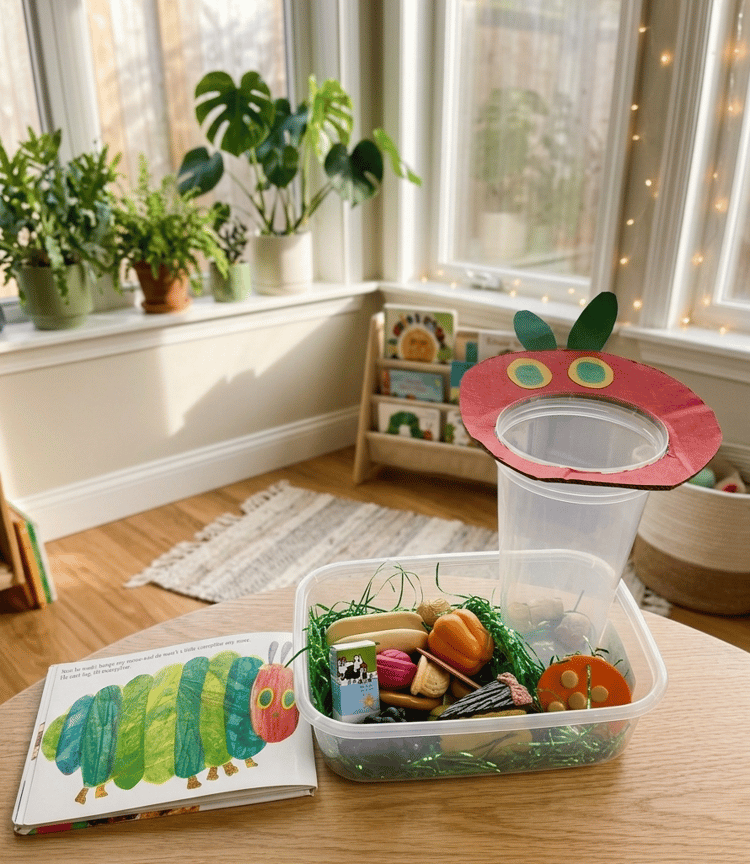
9 Feed The Hungry Caterpillar Bin
The Concept
Inspired by Eric Carle's classic book, this bin focuses on story retelling, sequencing, and healthy food recognition. By physically "feeding" the toy foods into the caterpillar’s mouth, children practice fine motor control and bilateral integration. This interactive storytelling method builds early reading comprehension, vocabulary, and memory retention as they recall exactly what the caterpillar ate each day of the week.
How to Put It Together
- Step 1: Create your caterpillar feeder by attaching a large cardboard or paper plate cutout of the caterpillar's red face to the top of a deep container or wide-mouth plastic jar. Cut a large circle out for the mouth so items can easily pass through.
- Step 2: Line the bottom of your sensory tub with a base of shiny green Easter grass or green paper shred to look like leaves.
- Step 3: Gather an assortment of play foods that match the book—including fruits like grapes, strawberries, and oranges, alongside the famous Saturday feast items like a piece of cake, a pickle, and a slice of Swiss cheese.
- Step 4: Place a copy of The Very Hungry Caterpillar next to the bin. Invite children to flip through the pages and find the corresponding food items in the grass to feed directly to the hungry caterpillar!
Amazon Affiliate Links to Include
- The Book: The Very Hungry Caterpillar Board Book by Eric Carle – A must-have children's classic for any home or classroom library.
- Play Food Elements: Learning Resources Sprouts Play Food Set – High-quality, durable play food pieces that fit perfectly into interactive feeding games.
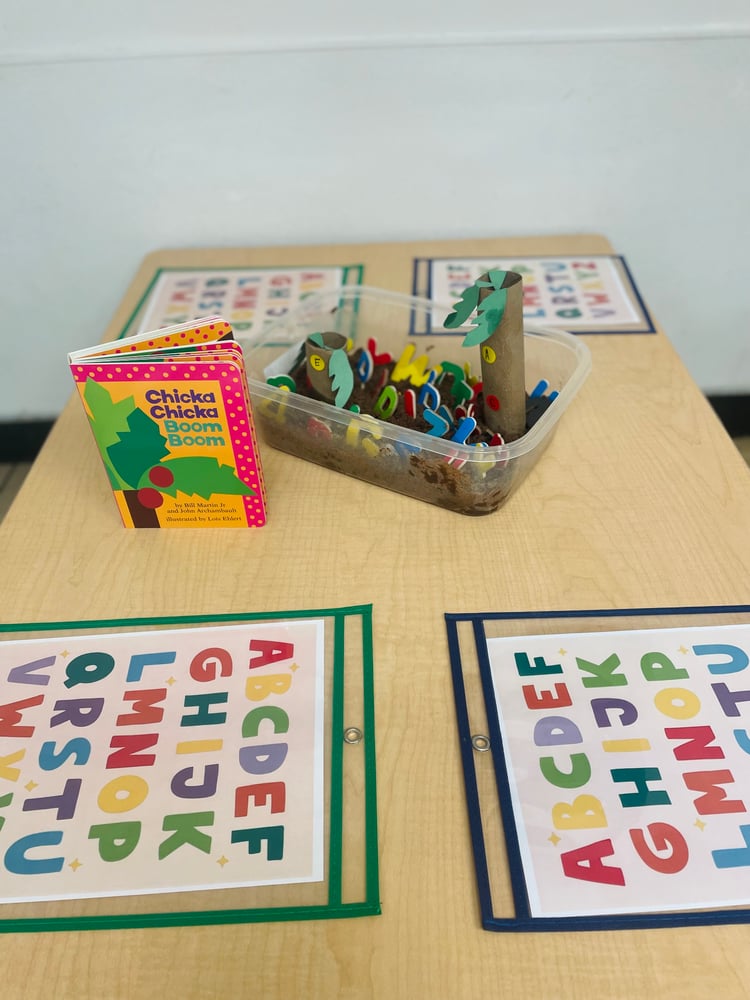
10.Chicka Chicka Boom Boom Coconut Tree Bin
The Concept
This bin brings the rhythmic, beloved alphabet book to life by focusing on letter recognition, uppercase and lowercase matching, and print awareness. Finding letters hidden in the "soil" and placing them around the coconut tree gives children a tactile connection to the alphabet. Utilizing dry-erase tracking mats alongside the bin bridges the gap between physical objects and visual reading tracking.
How to Put It Together
- Step 1: Build a couple of "coconut trees" by standing up sturdy cardboard paper towel rolls. Top them with green construction paper palm leaves, and add letter stickers or small dot labels (like "A" or "B") directly onto the trunk.
- Step 2: Fill your sensory bin with a dark base like black beans, dry coffee grounds, or brown sand to represent the earth at the base of the tree.
- Step 3: Scatter colorful plastic or magnetic alphabet letters throughout the sensory base.
- Step 4: Set up your Chicka Chicka Boom Boom book nearby, along with colorful alphabet master sheets slipped into dry-erase pocket sleeves. Have the kids dig out a letter, match it to their dry-erase sheet, and race it up to the top of the coconut tree!
Amazon Affiliate Links to Include
- The Book: Chicka Chicka Boom Boom Board Book – The perfect rhyming companion to make alphabet learning lively and memorable.
- Classroom Organization: Dry Erase Pocket Sleeves (10-Pack, Assorted Colors) – An absolute staple for protecting your printed matching sheets so they can be used with dry-erase markers over and over again.
- Tactile Letters: Colorful Plastic Magnetic Alphabet Letters Set – Vibrant, easy-to-clean letters that stand out beautifully against dark sensory bases.
Sensory bins are a fun and easy way to encourage learning through play.
I hope these 10 ideas inspire your next activity!
With love, Little learners & life.