Introduction
A battery indicator is an essential feature in any portable electronic project. Whether you’re building an Arduino project, an ESP32 IoT sensor, or a wearable device, knowing the battery voltage level helps prevent unexpected shutdowns.
In this tutorial, we’ll build a battery voltage monitor using the MX1BM1 battery monitor module. This compact board allows you to measure LiPo / Li-ion battery levels (3.0–5.2V) safely with your microcontroller’s ADC (analog-to-digital converter).
We’ll cover:
- How the module works
- Circuit wiring with Arduino / ESP32
- Example code to measure battery voltage
- Applications of battery monitoring in IoT and electronics
What is MX1BM1 Battery Voltage Monitor?
The MX1BM1 Battery Level Monitor Module is a small PCB designed to act as a battery indicator for microcontrollers. It works by scaling down the battery voltage using a resistive divider so that it can be safely read by 3.3V ADCs.
Key Features:
- Supports 3.0V to 5.2V input voltage (perfect for 1S LiPo / Li-ion)
- Outputs a scaled voltage for Arduino / ESP32 and other MCUs ADCs
- Enable pin for low-power operation (great for battery projects)
- Compact 12 × 10 mm board with standard 2.54mm pin header
- Includes a 10µF capacitor for stable voltage readings
Download the Gerber files here
Why you need this Battery Indicator in Your Projects?
Adding a battery indicator to your electronics project has several benefits:
- Prevent sudden shutdowns - get early warning before the battery dies
- IoT devices - report battery level to mobile apps or cloud dashboards
- Safe charging & protection - monitor low-voltage cut-off points
- Low-voltage - cuts-off system if voltage drops below defined value
- Diagnostics - test USB power levels or battery health
Pinout Description
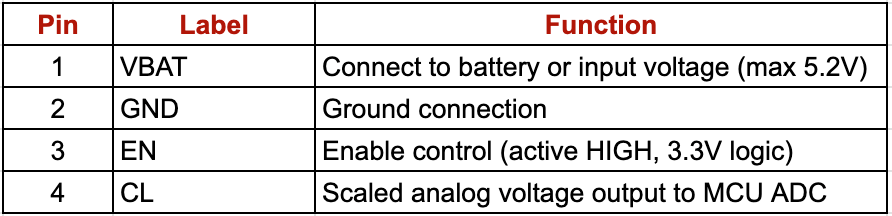
The EN pin allows you to turn the module on only when needed, reducing standby current in deep-sleep devices.
How it Works
The MX1BM1 module uses a resistive voltage divider to scale down the input battery voltage:

This means:
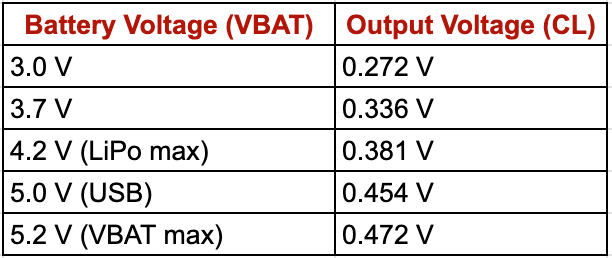
The microcontroller reads this scaled voltage through its ADC, then reconstructs the actual battery voltage using the known divider ratio.
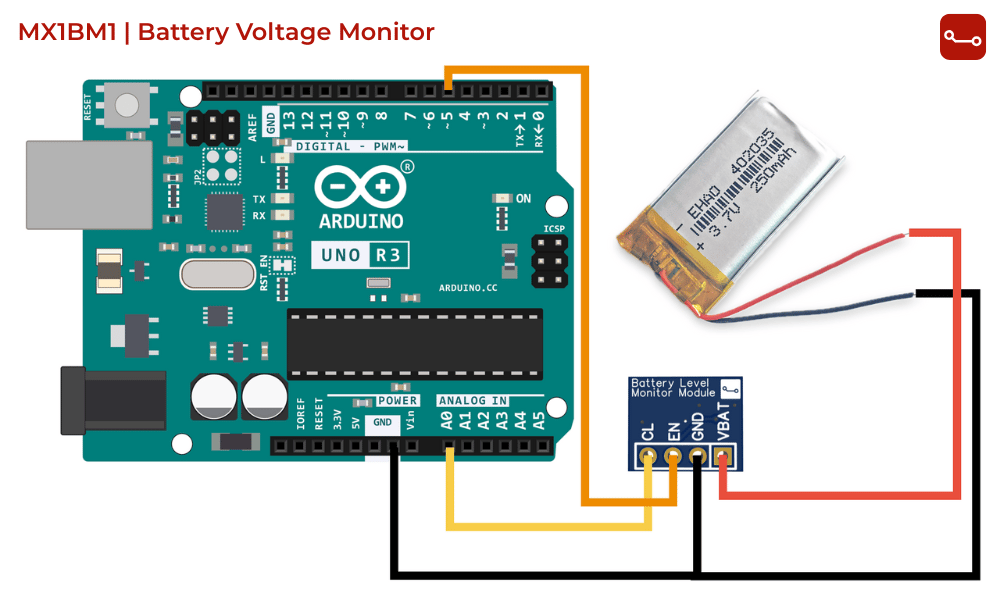
Circuit Setup – Battery Voltage Monitor with Arduino / ESP32
Components Required:
- MX1BM1 Battery Level Monitor Module
- Any MCU - Arduino Uno / STM32 board / ESP32
- 1S LiPo / Li-ion battery (3.0–4.2V)
- Jumper wires & breadboard
Connections (Arduino Example):
- VBAT → Battery +
- GND → Battery – & GND
- EN → D5 (or any GPIO)
- CL → A0 (ADC pin on Arduino)

Example Arduino Code for Measure Battery Voltage
#define EN_PIN 5
#define CL_PIN A0
void setup() {
pinMode(EN_PIN, OUTPUT);
digitalWrite(EN_PIN, LOW);
Serial.begin(9600);}
void loop() {
digitalWrite(EN_PIN, HIGH); // Enable module
delay(5); // Wait for stable output
int raw = analogRead(CL_PIN); // Read ADC value
digitalWrite(EN_PIN, LOW); // Disable module
// Voltage divider: R1 = 100k, R2 = 10k
// Divider ratio: CL = VBAT * (10 / 110) = VBAT * 0.0909
// So, VBAT = CL / 0.0909
float v_adc = raw * (3.3 / 4095.0); // ADC (assuming 12-bit ADC and 3.3V ref)
float battery_voltage = v_adc / 0.0909; // Reconstruct battery voltage
Serial.print("Battery Voltage: ");
Serial.print(battery_voltage, 2); // 2 decimal places
Serial.println(" V");
delay(1000);}
How the code works:
- MCU enables the module.
- Reads scaled voltage from CL.
- Converts it back to the actual battery voltage.
- Prints to the Serial Monitor.
- Module is disabled until the next reading.
Extensions & Ideas
- Add an OLED display to show battery percentage
- Send readings via Bluetooth Low Energy (BLE) or Wi-Fi
- Trigger a low-battery warning LED when voltage drops below 3.3V
- Use in remote IoT sensor nodes for smart battery diagnostics
Conclusion
With the MX1BM1 Battery Voltage Monitor Module, you can easily integrate a battery indicator into your Arduino or ESP32 projects. It’s compact, power-efficient, and ideal for IoT, wearables, and embedded systems.
Download the Gerber files here
Never let your devices die unexpectedly - add battery voltage monitoring today !