

If you have a multi-page PDF and want to turn specific page ranges into separate PDF files, you can do this easily with PyMuPDF in Google Colab.
For example, you can split a PDF like this:
- Pages 1–3 → pages_1-3.pdf
- Pages 4–6 → pages_4-6.pdf
- Pages 7–10 → pages_7-10.pdf
1. Install PyMuPDF
First, install the PyMuPDF library:

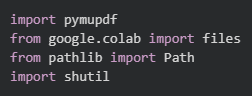
2. Import Libraries
Then import the libraries you’ll need:
3. Upload Your PDF
The following code opens a file picker so you can upload your PDF:
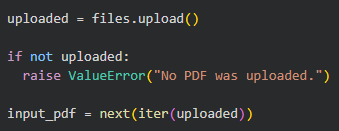
The uploaded file is stored in the variable input_pdf.
4. Create an Output Folder
Next, create an output folder called split_ranges where the individual PDF files will be saved:
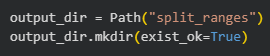
We set exist_ok=True so that Python won't return an error if the folder already exists.
5. Open the PDF
Next, open the uploaded PDF with PyMuPDF:

The variable doc now represents the entire PDF document.
6. Define the Page Ranges
Now define the page ranges you want to split from the PDF.
For example, if you want to create PDFs containing pages 1–3, 4–6, and 7–10:
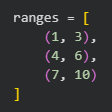
The numbers represent the PDF page numbers, starting at 1.
7. Split the PDF into Page Ranges
The following loop goes through every page range. For each range, it creates a new PDF, copies the selected pages into it, saves it, and then closes the new PDF:
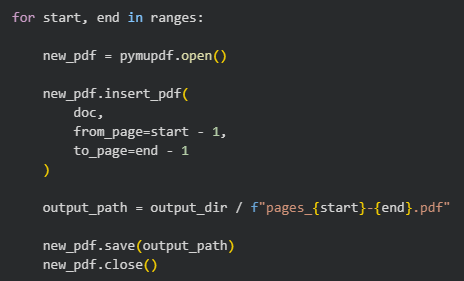
Here's what happens:
- start is the first page of the range.
- end is the last page of the range.
- start - 1 converts the page number into a zero-based page index.
- end - 1 converts the last page number into a zero-based page index.
- A new empty PDF is created for each range.
- insert_pdf() copies the selected pages into the new PDF.
- save() creates a file such as pages_1-3.pdf.
- close() closes the newly created PDF after it has been saved.
For example, a 10-page PDF with the ranges above will produce:
split_ranges/
├── pages_1-3.pdf
├── pages_4-6.pdf
└── pages_7-10.pdf
The first PDF contains pages 1, 2, and 3.
The second PDF contains pages 4, 5, and 6.
The third PDF contains pages 7, 8, 9, and 10.
8. Close the Original PDF
Once all the page ranges have been processed, close the original PDF:

9. Create a ZIP File
Instead of downloading every PDF individually, you can put all the individual PDFs into a ZIP file:
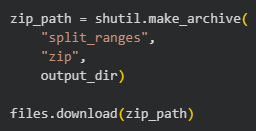
This creates:
split_ranges.zip
and automatically starts the download in Google Colab.
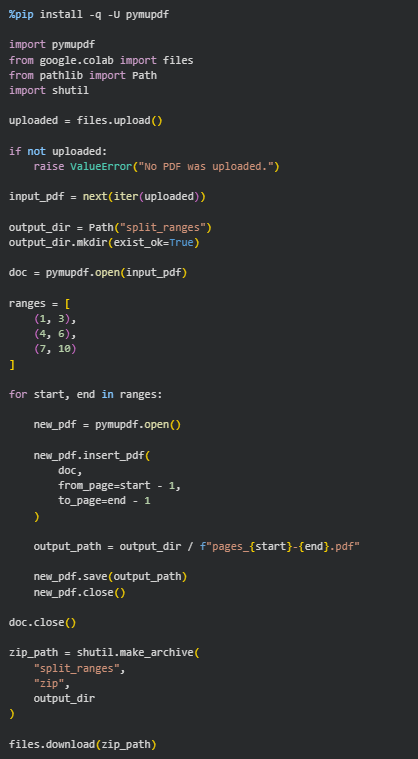
Complete Example
Open the notebook
Open the Google Colab notebook for this PDF mini-guide and run the code as you follow along.
Ready to put this into practice? Check out the Python and PDF resources in our store.
More PDF Python Resources
Want to learn how to Split a PDF into Separate PDF Pages in Google Colab?
Check out this mini-guide: How to Split a PDF into Separate PDF Pages in Google Colab.
Comments ()