
In the previous tutorial How to Install PyMuPDF in Google Colab, you installed PyMuPDF and prepared your Google Colab environment.
Now it's time to open your first PDF document using PyMuPDF.
Opening a PDF is the first step in almost every PDF program. Once a document is open, you can inspect its pages, read its metadata, extract text, search for content, and much more. Along the way, you'll also learn some essential Python concepts, including modules, functions, variables, strings, and objects.
No previous experience with PDF processing is required.
Tutorial objectives
By the end of this tutorial, you'll be able to:
- Upload a PDF file to Google Colab.
- Import the Google Colab file module and use it to upload files.
- Open a PDF document using PyMuPDF.
- Understand what Python functions are.
- Understand how variables store values.
- Understand what a Document object is.
- Verify that a PDF opened successfully.
- Prepare a PDF document for further inspection.
What you'll learn
In this tutorial you'll learn:
- How to upload a PDF file to Google Colab.
- How to use files.upload() to upload files.
- How to import modules using Python.
- What a function is and how to call one.
- How the assignment operator (=) stores values in variables.
- What strings are and why filenames are written in quotes.
- How pymupdf.open() opens a PDF document.
- What a Document object is.
- Why the opened PDF is stored in a variable called doc.
- How opening a PDF prepares it for future analysis.
Who this tutorial is for
This tutorial is for Python beginners who want to learn how to open and inspect PDF files using Google Colab. You'll learn the first essential step of every PDF program: opening a document so Python can work with it.
Prerequisites
Before starting, you should have:
- A Google account.
- A Google Colab notebook.
- PyMuPDF installed (Tutorial 1: How to Install PyMuPDF in Google Colab).
- A PDF file on your computer.
Upload a PDF to Google Colab
Before we can open a PDF, we first need to upload one into our notebook.
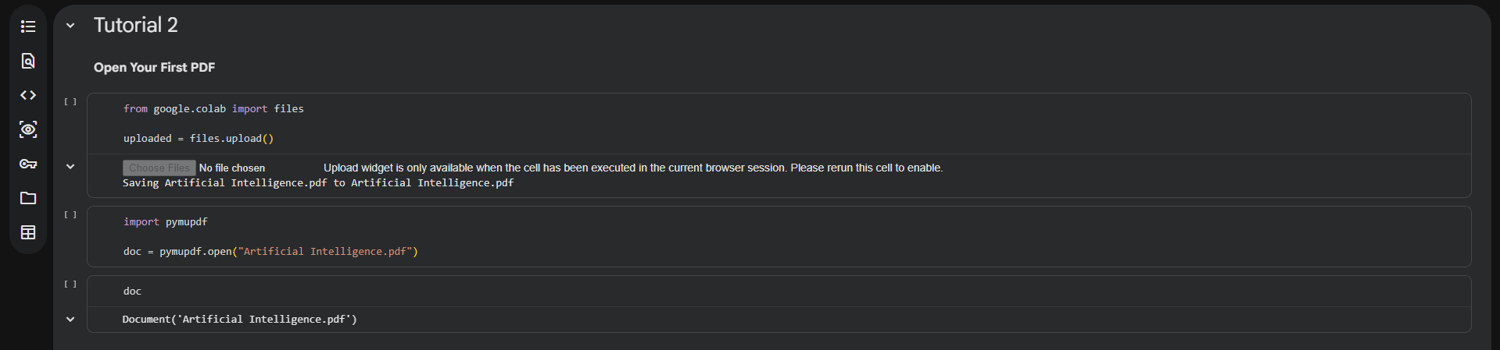
Run the following code:
from google.colab import files
uploaded = files.upload()
Google Colab will display a file picker. Select any PDF file from your computer.
After uploading, the PDF becomes available inside your notebook's temporary working directory. The file remains available while your Colab session is running, but you'll need to upload it again if you start a new session.
Understanding the upload code
from google.colab import files
This statement uses Python's from...import syntax to import the files module provided by Google Colab.
Let's break it down.
from...import
from and import are Python keywords. Together, they form the from...import syntax, which lets us import something specific from a package or module instead of importing the entire package. In this case, it lets us import the files module.
A keyword is a word that has a special meaning in Python. Keywords are part of the Python language itself and cannot be used as variable names.
Some common Python keywords include: import, from, as, with, if, for
google.colab
google.colab is a part of the Google Colab environment that provides tools for interacting with your notebook.
files
files is a module provided by Google Colab that contains functions for working with files.
A module is a file containing Python code that provides reusable functionality.
In this tutorial, we use the files module to upload a PDF from our computer into the notebook.
uploaded = files.upload()
This line calls the upload() function from the files module.
The upload() function opens a file picker that allows us to choose files from our computer and upload them to Google Colab.
The dot (.) tells Python that we want to access something that belongs to files.
In this case, we are accessing the open() function that is part of the files module.
A function is a reusable piece of code that performs a specific task.
Instead of writing the same code yourself every time, you can call a function whenever you need that task to be performed.
The assignment operator (=)
The equals sign (=) is called the assignment operator.
It stores a value in a variable.
For example:
name = "Python"
means:
"Store the text Python in a variable called name."
In our example:
uploaded = files.upload()
means:
"Run the files.upload() function and store the result in a variable called uploaded."
uploaded
uploaded is a variable name.
A variable is a name that stores a value so we can use it later.
The upload() function returns information about the uploaded file, including its filename and contents.
We store this information in the uploaded variable.
Although we create this variable, we do not need to use it directly in this tutorial.
We only need the uploaded filename when opening the PDF with PyMuPDF.
Open the PDF
After uploading your file, open it with PyMuPDF.
Suppose your uploaded file is named:
sample.pdf
Run:
import pymupdf
doc = pymupdf.open("sample.pdf")
If your file has a different name, replace "sample.pdf" with your filename.
Understanding the code
import pymupdf
import is a Python keyword that tells Python to load a library so we can use it.
After importing PyMuPDF, Python understands what pymupdf refers to, and we can use the functions provided by the library.
For example, when we call:
pymupdf.open()
we are asking PyMuPDF to open a PDF document and return a Document object that we can work with.
pymupdf.open("sample.pdf")
open() is a function provided by the PyMuPDF library.
The dot (.) tells Python that we want to access something that belongs to pymupdf.
In this case, we are accessing the open() function that is part of the PyMuPDF library.
The open() function:
- Finds the PDF file.
- Reads the document.
- Prepares it for inspection.
- Returns a Document object representing the PDF.
"sample.pdf"
This is the name of the PDF file we want to open.
The filename is wrapped in quotation marks because it is a string.
A string is simply a piece of text. In Python, strings are written inside either single quotes (') or double quotes (").
Examples: "hello", "report.pdf", "PyMuPDF"
PyMuPDF looks for this file in the notebook's current working directory.
If the filename does not exactly match the uploaded file, Python will raise a FileNotFoundError.
doc = pymupdf.open("sample.pdf")
We store the result of pymupdf.open() in a variable named doc.
You can choose almost any valid variable name. We use doc because it is short for "document" and clearly describes what the variable contains.
The value stored in doc is a Document object returned by PyMuPDF.
Throughout the rest of this course, nearly every example will use this doc variable.
The doc variable becomes our way to access the PDF, allowing us to inspect its pages, metadata, images, text, and much more.
What is a Document object?
When PyMuPDF opens a PDF, it creates a Document object.
An object is a value in Python that contains information and functionality related to that value.
You can think of the Document object as a Python representation of the entire PDF document.
Instead of repeatedly reading the file from disk, PyMuPDF keeps information about the document available in memory so we can easily inspect its contents.
Almost every operation we perform in this course starts with this Document object.
Verify that the PDF opened successfully
One easy way to verify that the PDF opened successfully is to display the document object.
In Google Colab, typing a variable name on its own displays its value.
Run:
doc
You should see output similar to:
Document('sample.pdf')
This confirms that PyMuPDF successfully opened the PDF.
What happens if the file doesn't exist?
Suppose you run:
doc = pymupdf.open("missing.pdf")
If PyMuPDF cannot find the file, you'll see an error similar to:
FileNotFoundError: no such file: 'missing.pdf'
This usually means the filename doesn't exactly match the uploaded file.
Double-check the filename and make sure it matches the uploaded file exactly, including uppercase and lowercase letters.
Why opening the PDF matters
Opening a PDF is the first step in almost every PDF application.
Once the document is open, PyMuPDF gives us access to its pages, metadata, images, text, links, annotations, and many other parts of the document.
Every tutorial that follows builds on this Document object.
Complete example
from google.colab import files
uploaded = files.upload()
import pymupdf
doc = pymupdf.open("sample.pdf")
doc
Remember to replace "sample.pdf" with the name of your uploaded file.
What's next?
Great job!
You have successfully opened your first PDF using PyMuPDF.
In the next tutorial, you'll learn how to count the number of pages in a PDF document. This is one of the most common tasks when inspecting PDF files and will become the first feature of your PDF Inspector.
Open the notebook
Open the Google Colab notebook for this tutorial and run the code as you follow along.
This tutorial is Lesson 2 of the upcoming free course, Build a PDF Inspector.
Pre-enrol for free here to receive each new tutorial by email as it's published and be notified when the complete course is released.
Comments ()