

This post will walk you through setting up your very first Google Apps Script to put some data in memory. We'll stick to a single spreadsheet and learn the basics of the GScript language. Want a video instead?
The Sample Data and Our First Script
First, open this link and make a copy of the sample data. The data is a bit of a mess, but that's what we're here to fix!
Google Apps Script is a powerful tool that bridges the gap between JavaScript and Google's suite of applications like Docs, Sheets, and Slides. You'll notice it uses a lot of JavaScript conventions, like ending each line with a semicolon ; and being case-sensitive. Spreadsheet is not the same as spreadsheet!
Let's start with the most basic script. This code sets up our workspace:
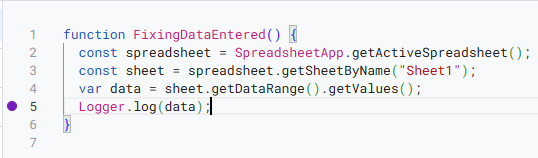
function FixingDataEntered() {
const spreadsheet = SpreadsheetApp.getActiveSpreadsheet();
const sheet = spreadsheet.getSheetByName("Sheet1");
}
This might look boring, but every script has to start somewhere. Let's break it down line by line:
- function FixingDataEntered() { This line starts our code block. FixingDataEntered is the name of our function, which we will use to "call" or run the code inside the curly brackets {}. Notice there is no semicolon here.
- const spreadsheet = SpreadsheetApp.getActiveSpreadsheet(); This line uses the built-in SpreadsheetApp object, which is a collection of tools (methods) for working with Google Sheets. The method .getActiveSpreadsheet() tells our script to connect to the spreadsheet you currently have open. We're storing this connection in a variable called spreadsheet. We use const because this value won't change while our script is running.
- const sheet = spreadsheet.getSheetByName("Sheet1"); Similar to the line above, we're now telling the script to find the specific sheet named "Sheet1" within the spreadsheet and store that information in a variable named sheet. Again, const is used because this value will stay the same.
- } The closing curly bracket tells the script where our function ends.
Setting Up Your Script
Now that we understand the code, let's put it into our spreadsheet.
- In your spreadsheet copy, go to the menu and click Extensions > Apps Script.
- A new tab will open with a default function. Delete this and copy-paste the code above into the script editor.
Good code has comments! This is a critical habit to build. Comments are notes you add to your code to explain what it does. The computer ignores them, but they are invaluable for you and others who might read your code later.
To add a comment, use a double slash //. The script will ignore everything after the // on that line.
function FixingDataEntered() { // Starts our function
const spreadsheet = SpreadsheetApp.getActiveSpreadsheet(); // Connects to the active spreadsheet
const sheet = spreadsheet.getSheetByName("Sheet1"); // Connects to the specific sheet named "Sheet1"
}
Task: Go into your script and add comments like these to each line to help reinforce your understanding.
Loading Data into Memory
Working with data directly in the spreadsheet is slow. It's much faster and more reliable to pull the data into the script's memory first. This also protects your original data so if something goes wrong, you can always go back to the original spreadsheet.
Click just before the final } in your script, hit enter to create a new line, and add the following:
var data = sheet.getDataRange().getValues();
That's a lot happening on one line! Let's break it down:
- var data: We're creating a new variable called data. This time we use var instead of const because the data might change as we work with it.
- = sheet.getDataRange().getValues();
- This is the action part.
- sheet
- Refers to the Sheet1 we defined earlier.
- .getDataRange()
- This method automatically finds the range of cells that contain your data, ignoring any empty rows or columns around it. This is super useful because it means your script will work no matter how many rows or columns of data you have.
- .getValues()
- This method takes that data range and pulls all the values from the cells into a two-dimensional array in your script's memory. We'll talk more about arrays in the next post, but for now, just know that it's how the data is stored.
Task: Add the comment
// puts all the data in the sheet into memory at the end of that line
Saving, Running, and Debugging
It's a good time to save your script! Click the disk icon or use <Ctrl> + <s>.
Now for the exciting part: running it!
- Click the Run button.
- The first time you run it, Google will ask for permission to access your spreadsheet. Click through the prompts and grant permission. This is your own script on your own account, so it's safe.
- The script will run in the background. It might seem like nothing happened, but it did a lot of work!
To see what the script is doing, we can use the Logger.log() function. This is a crucial tool for debugging.
Create a new line above the final } and add this:
Logger.log(data);
Run the script again. Now, a window will appear at the bottom showing you the contents of the data variable. You'll see all your spreadsheet data, complete with commas and square brackets—this is a visual representation of your data as an array.

Another powerful debugging tool is the debugger.
- Click just to the left of the Logger.log(data); line. A purple circle will appear. This is a breakpoint.
- Click the Debug button. The script will run but stop at this breakpoint.
- A new window on the right will show you the values of your variables at that exact moment. You can click on the data variable to explore the array and see how your data is structured. This is a fantastic way to understand what's happening inside your script.
- Notice how the array starts at zero...this will be very important!
- Click Stop to exit the debugger.
We've made a great start! You've created a script, loaded data into memory, and learned how to save, run, and inspect your code. Take a moment to save your work, then close the tabs.
This isn't easy stuff, and everyone gets tripped up on the details (like a missing semicolon!). We're in this journey together. In the comments below, let me know what you found most confusing. I'll jump in to clarify or update the post.
Comments ()