
Box Pleats: Because Fabric Deserves a Little Structure
Let’s talk about box pleats—those wonderfully tidy little folds that make fabric look like it has its life together, even when the sewing room absolutely does not. 😂
If you love full skirts, Renaissance gowns, historical clothing, or just the satisfying look of beautifully organized fabric, box pleats are definitely something you want in your sewing toolbox.
So… What Exactly Is a Box Pleat?
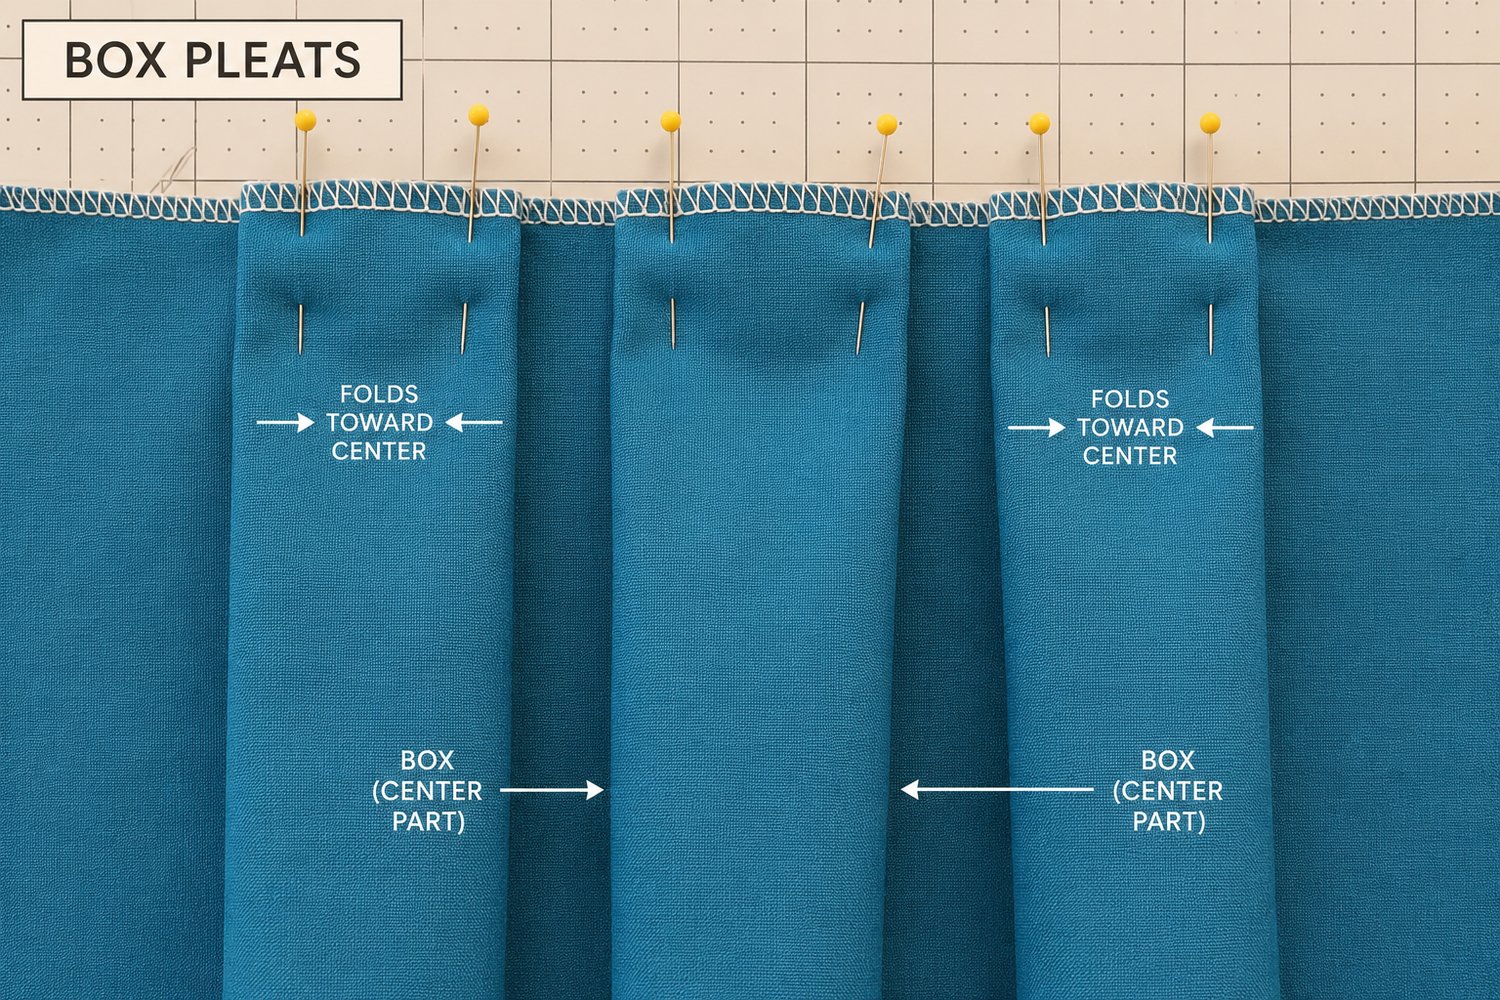
A box pleat is created by bringing two folds of fabric toward the center, creating a raised section that looks like a little “box” on the outside of the garment.
Think of it as fabric doing a tiny architectural project.
Instead of bunching fabric up into gathers, box pleats control the fullness in neat, structured sections. You get lots of fabric without all of it fighting for attention around your waist.
And honestly? We love a well-behaved skirt.
Why Box Pleats?
Because sometimes you want FULLNESS, but you don't want your skirt to look like you stuffed an entire bedsheet into the waistband and hoped for the best.
Box pleats give you:
✨ Fullness – Perfect for big, swishy skirts and dramatic gowns.
✨ Structure – Your fabric has somewhere to go instead of simply becoming a gathered blob.
✨ A Beautiful Silhouette – They create those lovely, intentional folds that look especially gorgeous in historical and Renaissance-inspired clothing.
✨ Versatility – Make them wide, narrow, deep, shallow, evenly spaced, or mix them with other pleats.
And the best part? Once you understand the basic fold, they’re surprisingly simple.
How to Box Pleat
Grab your fabric, your pins, and your patience. The fabric may test you. It usually does. 😂
Step 1: Mark Your Pleats
Start by deciding where your box pleats will go and mark the top edge of your fabric.
Measure twice. Pleat once.
Okay, technically you can pleat more than once—but you’ll be much happier if you get your measurements right the first time.
Step 2: Fold Toward the Center
For each box pleat, bring one fold toward the center.
Then bring the opposite fold toward the center.
The two folds should mirror each other, creating the raised center section that gives the box pleat its name.
Fold → Center → Fold
Congratulations. You have created a tiny fabric box. No assembly required.
Step 3: PIN IT!
This is where I have a little trick of my own.
I like to use two pins on each half of my box pleats. It helps keep everything firmly in place instead of allowing the pleat to wiggle around while I'm trying to sew.
Because apparently fabric enjoys moving precisely when you don't want it to.
Step 4: Check Your Work
Before you sew anything permanently, take a step back and look at your pleats.
Are they evenly spaced?
Are the centers lined up?
Are all the folds facing the direction they're supposed to?
Does everything look nice and tidy?
If something looks wonky, fix it now.
Future You will be extremely grateful.
Step 5: Secure Those Pleats
Once everything looks good, secure the top of your pleats with stitching or basting.
And here's another one of my favorite tricks:
When adding a waistband or collar over box pleats, I like to alternate my pins—one toward the outside of the pleat and one toward the inside.
I find this helps keep the pleats from shifting while you're attaching the waistband or collar.
It's a tiny little thing, but sometimes sewing is just a collection of tiny tricks that make your life approximately 47% less frustrating.
But Wait… Who Says You Have to Use Only Box Pleats?
Not me!
One of my favorite things about pleating is mixing things up.
You can use a box pleat in the center and knife pleats around it. You can reverse the direction of pleats. You can play with widths and spacing to create different patterns and silhouettes.
That's where sewing gets really fun.
Once you understand why the fabric folds the way it does, you're no longer just following a pattern—you can start designing your own.
And that's exactly what I love about historical-inspired sewing.
There are rules…
…but there is also plenty of room to play.
So grab that fabric, grab those pins, and give box pleats a try.
And if your first attempt looks a little wonky?
Congratulations.
You're sewing. That's what seam rippers are for. 😉
Welcome to the wonderful world of pleats, where the fabric gets folded, pinned, questioned, occasionally threatened, and eventually becomes something beautiful.
— Shannon Ridge Designs
Historical-inspired sewing, one pleat at a time. ❤️
Comments ()