
There are some sewing techniques that look intimidating until you realize the basic idea is actually pretty simple.
Cartridge pleating is one of them.
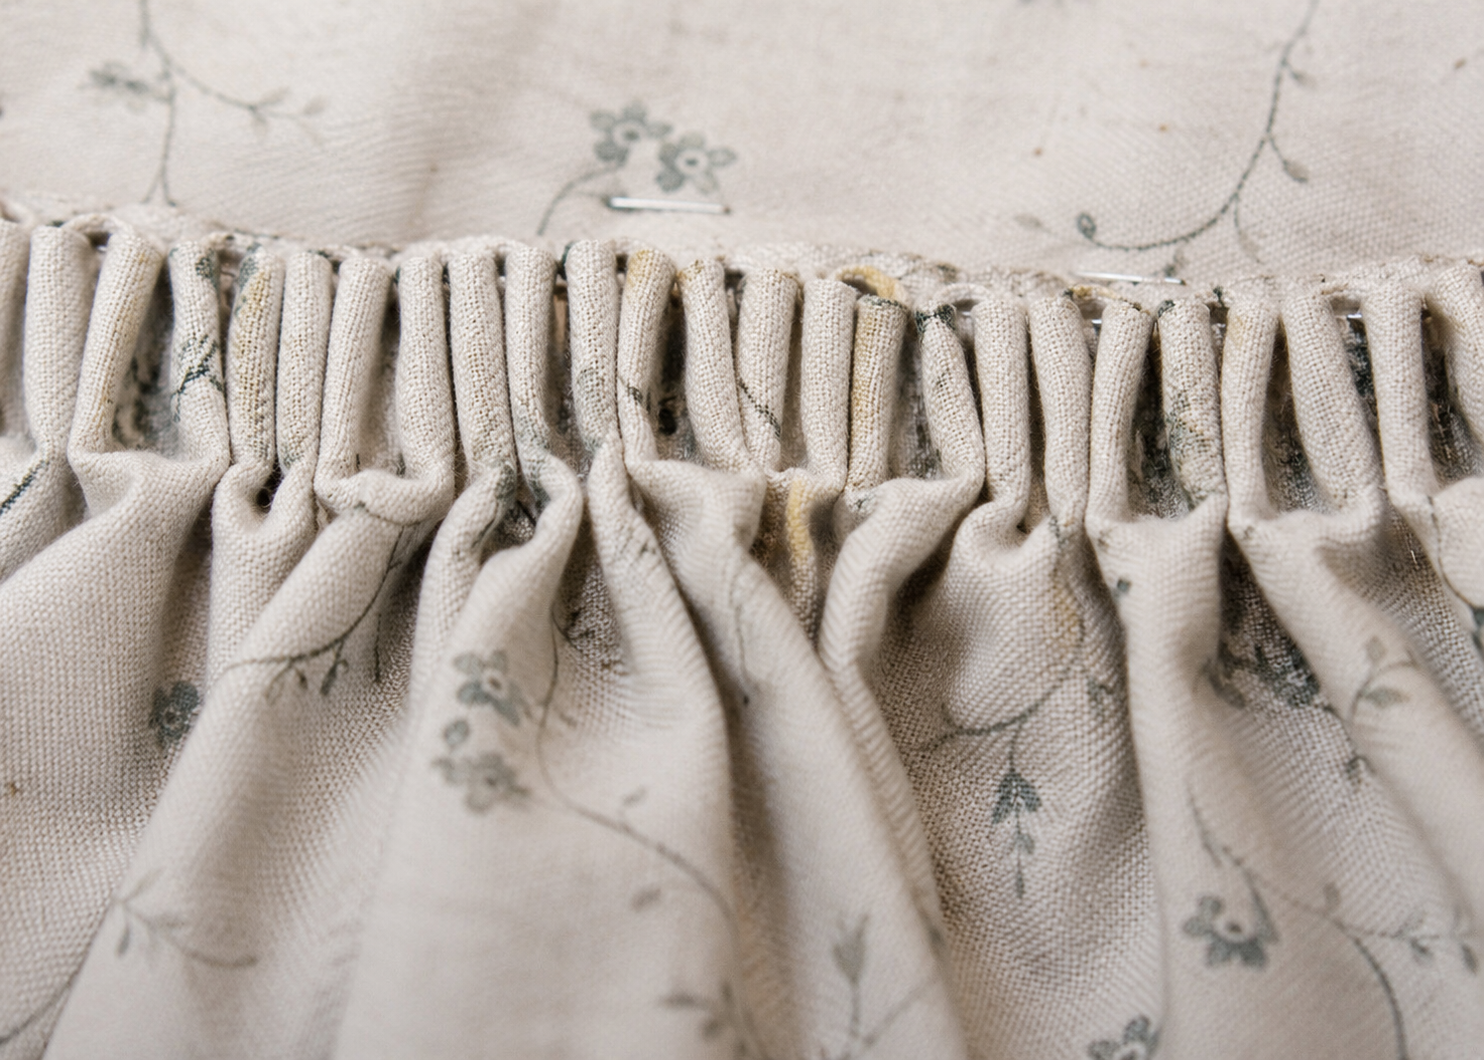
It looks like a row of tiny fabric tubes or little rolls standing shoulder-to-shoulder. It can take a surprisingly large amount of fabric and condense it into a relatively small waistband or armscye.
And if you're making Renaissance or historical-inspired clothing, cartridge pleats are one of those techniques worth knowing.
They're beautiful.
They're practical.
They're very old.
And, perhaps most importantly, they're done by hand.
So let's talk about what they are, why people used them, and how you can make them yourself.
First Things First: What Is a Cartridge Pleat?
Cartridge pleating—also called gauging or sometimes bullet pleating—is a method of gathering fabric using multiple rows of evenly spaced running stitches.
When those threads are pulled, the fabric gathers into rounded, tubular folds.
Unlike ordinary gathering, the fabric doesn't simply bunch up against the waistband.
Instead, the folds remain relatively distinct and can "spring" outward from the attachment point.
That's what gives cartridge pleats their characteristic look.
They're especially useful when you have a lot of fabric that needs to fit into a small space.
Think of taking several yards of full skirt and somehow convincing it to fit around a much smaller waist.
That's where cartridge pleats come to the rescue.
When Were Cartridge Pleats First Used?
This is where history gets interesting.
It is difficult to point to one exact year and say, “This is when cartridge pleating was invented.”
Textile construction techniques weren't usually documented the way modern sewing techniques are, and similar gathering methods could be described or interpreted differently.
However, evidence of this type of pleating appears in late-medieval and Renaissance clothing, particularly during the 15th and 16th centuries.
Cartridge-like pleating has been associated with garments such as the houppelande and other highly full garments, including sleeves. By the 16th century, the technique was being used to control large amounts of fabric at waistlines and sleeve openings.
So while we shouldn't claim that someone in a particular year suddenly invented the cartridge pleat, we can safely say that the technique has a long history and was well established in historical clothing by the Renaissance.
And it didn't disappear after the Renaissance.
Cartridge pleating appeared again prominently in 19th-century fashion, particularly in the 1830s–1860s, when extremely full skirts and sleeves needed to be fitted into smaller waistlines and openings.
Apparently, humanity has been asking the same question for centuries:
“How am I going to fit all this fabric around that tiny waist?”
The answer keeps being:
More pleats.
Why Use Cartridge Pleats?
There are several reasons.
1. They Control A LOT of Fabric
This is the big one.
A wide skirt can contain an enormous amount of fabric.
Cartridge pleating lets you compress that fullness into a relatively small waistband or bodice.
Historical garments could use very large amounts of fabric, particularly when fashionable silhouettes called for dramatic fullness. Royal Museums Greenwich notes, for example, that late-Tudor drum farthingales could support skirts containing up to about 3 meters of fabric.
Cartridge pleating is one way to manage that fullness.
2. They Create a Distinct Silhouette
Cartridge pleats don't simply make a skirt smaller.
They can help the fabric stand away from the body near the waist.
That creates a rounded, full silhouette rather than allowing all the fabric to fall straight down.
For historical garments, that can be exactly what you're looking for.
3. They're Adjustable
Because the pleats are created by pulling gathering threads, you can adjust the fullness before permanently attaching the skirt.
That makes it possible to distribute the fabric around the waist rather than ending up with one enormous wad of fabric in one place.
4. They're Strong
When properly sewn, cartridge pleats can create a very secure connection between a full skirt and a bodice or waistband.
And with a heavy fabric, that's important.
A velvet skirt doesn't exactly weigh the same as a lightweight cotton one.
Your stitches have to earn their keep.
So How Do You Make Them?
Here's the fun part.
For a basic skirt, you'll need:
- Your skirt fabric
- Strong hand-sewing thread
- A hand-sewing needle
- A ruler
- Fabric marker or chalk
- Scissors
- Your bodice or waistband
- Pins
You can use two or more rows of gathering stitches. Historical examples vary, and the exact spacing depends on the garment, fabric, and desired effect. Surviving garments and historical reconstructions show very fine, closely spaced gauging as well as larger, more practical versions.
For a beginner, I'd recommend starting with something comfortably visible rather than attempting microscopic Renaissance-era stitches.
Your sanity will thank you.
Step One: Prepare Your Fabric
Finish the seams of your skirt first.
You want the top edge ready for your gathering stitches.
If your fabric is particularly lightweight or unstable, you may want to reinforce the area where the pleats will be attached.
For heavier fabrics, you may also find that a strip of sturdy fabric or tape helps support the pleated edge.
Step Two: Mark Your Lines
This is the part where patience pays off.
Mark two or more parallel rows along the top edge of your skirt.
Your rows need to be evenly spaced.
Then mark your stitch points along those lines.
For example, you might start with stitches every ½ inch.
The exact spacing isn't universal.
Smaller spacing creates smaller, tighter pleats.
Larger spacing creates larger pleats.
And your fabric thickness will affect the final result too.
Step Three: Sew the Gathering Stitches
Thread your needle with a strong thread.
Then begin sewing a line of evenly spaced running stitches.
Don't knot the thread every few inches.
You want the thread to run continuously so that you can pull it later.
Now sew your second row.
And your third, if your design calls for one.
Here's the important part:
Keep the stitches lined up.
If your first row has a stitch at one point and the second row has that stitch several millimeters away, the resulting pleat can twist instead of forming a neat little column.
The more accurately your rows line up, the more orderly your pleats will become.
Step Four: Pull the Threads
Now comes the satisfying part.
Begin gently pulling your gathering threads.
The fabric will start collapsing into little rounded folds.
Keep working gradually.
Don't yank.
Your thread may be strong, but that doesn't mean it's invincible.
As the fabric gathers, distribute the fullness evenly.
If one section is extremely tight while another is barely gathered, stop and adjust it.
Your goal is to create an even field of little pleats.
Step Five: Match the Skirt to the Bodice
Now measure your finished gathered section against the waist of your bodice.
This is where dividing both pieces into quarters—or even smaller sections—can be incredibly helpful.
Mark corresponding points on the skirt and bodice.
Match those points together.
Then distribute the pleats between them.
This prevents you from discovering at the very end that you have six inches of skirt left over and nowhere to put it.
Ask me how I know.
Actually, don't.
It's better for everyone.
Step Six: Attach the Pleats
This is where cartridge pleating differs from simply gathering fabric and sewing across the top.
You want to secure the individual pleats to the bodice or waistband.
Traditionally, this can be done by hand, often with small stitches catching the tops of the pleats. Historical examples can show extremely fine stitching, with individual pleats secured very closely together.
Take your time.
You're essentially building a row of tiny fabric springs.
And Then… Take a Step Back
Once the skirt is attached, look at it from the side.
You'll see something wonderful.
Instead of the fabric simply falling from the waist, it can push outward before falling downward.
That is one of the defining visual characteristics of cartridge pleating.
It's part of what makes the technique so useful for historical silhouettes.
How Much Fabric Should You Use?
There isn't one magic ratio.
Your final amount depends on:
- Fabric weight
- Fabric thickness
- Stitch spacing
- Number of gathering rows
- Desired fullness
- Waist measurement
- Desired silhouette
This is one reason cartridge pleating is worth practicing on scrap fabric.
Make a small sample.
Try ½-inch spacing.
Then try ¼-inch.
Pull them up.
Look at the difference.
You'll quickly discover what your particular fabric wants to do.
And fabric absolutely has opinions.
Cartridge Pleats vs. Regular Gathering
They're similar, but they don't behave exactly the same way.
Regular gathering tends to create soft, irregular fullness.
Cartridge pleating creates more organized, rounded folds.
Gathering generally lays closer to the waistband.
Cartridge pleating can create more pronounced fullness and a distinctive "spring" away from the attachment point.
That's why cartridge pleating can be so effective for historical clothing.
It's not simply about getting fabric onto a waistband.
It's about controlling how that fabric behaves once it's there.
And Here's My Favorite Part...
There's something wonderfully old-fashioned about cartridge pleating.
You're sitting there with a piece of fabric that may be several yards wide.
You're marking tiny dots.
You're running thread through them.
Pulling.
Adjusting.
Stitching.
One little fold at a time.
No machine is doing the work for you.
No shortcut is magically making the fabric behave.
Just you, your needle, your thread, and a whole lot of patience.
And when you're finished, you've created a construction technique that has roots reaching back centuries.
That's pretty special.
A Few Beginner Tips
Use strong thread.
You don't want to spend an hour gathering only to snap your thread halfway through.
Mark carefully.
Even spacing makes a huge difference.
Don't pull too aggressively.
Gentle, steady tension is your friend.
Divide your skirt into sections.
Quartering the fabric makes distributing fullness much easier.
Practice first.
Try the technique on scrap fabric before committing to your finished gown.
Don't obsess over microscopic stitches.
Historical examples can be extraordinarily fine. Start with a scale you can comfortably manage and improve with practice.
The Beauty of an Old Technique
Cartridge pleats are a perfect example of why I love historical sewing.
Something that looks decorative is also incredibly functional.
Those little folds aren't just there to look pretty.
They're controlling fabric.
Creating shape.
Distributing fullness.
Supporting weight.
And helping turn a flat piece of cloth into a garment that moves around a human body.
That's the real magic of sewing.
You aren't just making fabric fit the body. You're teaching the fabric how to behave.
And sometimes, that lesson comes in the form of hundreds of tiny little pleats.
— Shannon Ridge Designs
Old-world inspiration. Handmade craftsmanship. One stitch at a time.
Comments ()