
Deutz-Fahr AGROPLUS 60 70 80 Tractors Workshop Repair Service Manual PDF - MDFAP60AP80OPEK.zip
Deutz-Fahr AGROPLUS 60, AGROPLUS 70, AGROPLUS 80 Repair & Service Guide
Document 307.1064.3.6 - Workshop Manual for the Deutz-Fahr AGROPLUS 60, AGROPLUS 70 and AGROPLUS 80 (PDF format)
Complete official service manual for Deutz-Fahr AGROPLUS 60, AGROPLUS 70, AGROPLUS 80, with all the shop information to maintain, diagnose, repair, rebuild like professional mechanics.
Deutz-Fahr Tractors AGROPLUS 60, AGROPLUS 70, AGROPLUS 80 Tractors workshop service & repair manual includes:
* Numbered table of contents easy to use so that you can find the information you need fast.
* Detailed sub-steps expand on repair procedure information
* Numbered instructions guide you through every repair procedure step by step.
* Troubleshooting and electrical service procedures are combined with detailed wiring diagrams for ease of use.
* Notes, cautions and warnings throughout each chapter pinpoint critical information.
* Bold figure number help you quickly match illustrations with instructions.
* Detailed illustrations, drawings and photos guide you through every procedure.
* Enlarged inset helps you identify and examine parts in detail.
Total Pages: 509 pages
File Format: PDF (bookmarked, Searchable, Printable, high quality)
Language: English
TABLE OF CONTENTS
List of contents
Tractor configurations AGROPLUS 60 - 70 - 80 ..6
Dimensions and weights..7
Prescribed lubricants and capacities ..8
Conversion tables ..9
Parts ..10
1 - ENGINE
2 - CLUTCH
Gearshift clutch..12
General specifications ..12
Cecking clutch ..16
Adjusting clutch control pedal ..16
Bleeding air from the hydraulic circuit..16
Stripping the slave cylinder..17
Stripping the master cylinder ..18
Diagnosing malfunctions ..20
POWERSHIFT unit, general specifications ..21
POWERSHIFT unit detach from the gear box ..24
Assembly of POWERSHIFT unit ..35
Re-assembly of the POWERSHIFT unit. ..37
Fitting the oil manifolds of the POWERSHIFT unit ..39
Diagnosing malfunctions ..44
3 - TRANSMISSION
General specifications ..45
Technical specifications ..45
Speed change configurations ..47
Section through transmission ..51
Section through transmission with POWERSHIFT unit ..52
Separating the front gearbox from the engine ..61
Dismantling the gearbox ..62
Removal of the gearbox input and P.T.O. shafts ..62
Separating the POWERSHIFT unit from the gearbox ..62
Removal of the gear train positioned in the front gearbox ..63
Disassembly of the inversor control rods and forks ..64
Dismantling of the gearchange rod and fork assembly ..65
Dismantling of the gearchange selector rods and forks assembly ..66
Removal of the shaft with the actuator for engagement/disengagement of the front-wheel drive ..67
Removal of the range gear shaft .. 67
Examining parts removed ..68
Adjusting play of the gearbox shafts by means of the thrust plates on the mini/inversor
shaft and the secondary shaft ..69
Warnigns related to assembly of the gears of the P.T.O. unit, the range reduction unit and synchronised
P.T.O. shaft ..73
Assembly of the P.T.O. ..73
Installation of the range reduction unit, the gear for the front-wheel drive shaft
and the parking brake discs..73
Points where sealant is to be used ..75
Tightening torques ..78
Bevel drive adjustment ..81
Servicing operations ..82
Rear power take-off ..83
P.T.O. clutch ..88
Technical specifications ..89
Correct positions of P.T.O. sensors and cables ..89
Clutch inspection ..91
Checking clutch hydraulic pressures ..92
Checking the end-play of the front shaft of the P.T.O. clutch ..93
Renewal of the rear P.T.O. clutch ..94
Main operations for removal of the rear P.T.O. unit ..95
Diagnosing malfunctions ..100
4 - AXLES
Rear axle ..101
Installing the rear half-shafts ..102
Removal and disassembly of the epicyclic reduction unit..104
Fitting lateral stub axles of the wheel ..105
2WD extendible axle..106
Removing the axle from the front support ..108
Centre steering lever ..111
Wheel hub ..112
End float adjustment ..114
Front-wheel drive..115
Specifications ..115
Epicyclic reduction unit ..119
Side hubs..121
Tightening torques..122
Adjusting bevel gears ..124
Adjustment of the internal control of the mechanical differential lock..125
Installing the differential assembly into the drive axle ..125
Diagnosing malfunctions ..126
5 - VEHICLE
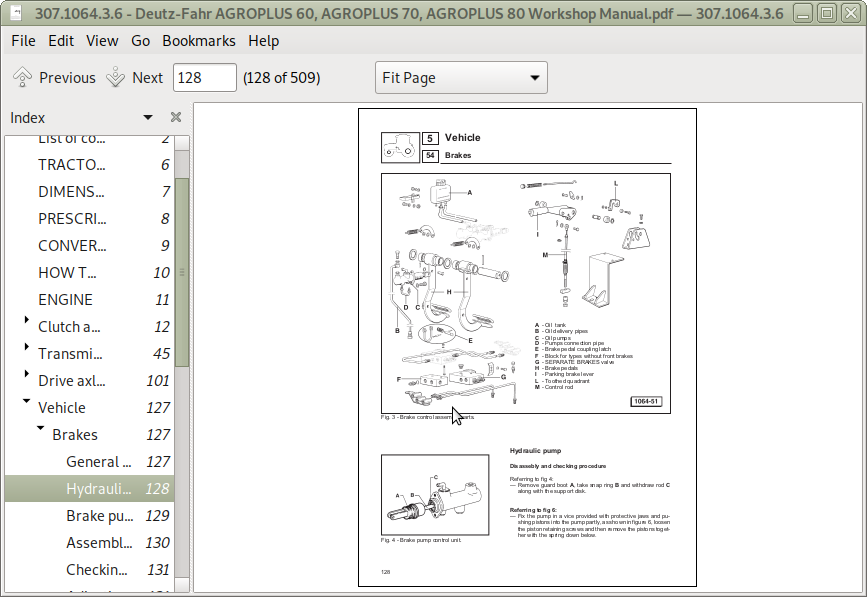
Brakes - General information..127
Hydraulic pump..128
Assembly of brake master cylinder ..130
Checking the front brake disks on 2WD and 4WD front axles and the rear brake disks.. 131
Adjusting service brake pedals ..131
Correct installation of inspection cover for parking brake discs..132
Checking parking brake pads ..134
Bleeding air from the brake hydraulic system..135
“Separate Brakes” valve ..136
Diagnosing malfunctions ..140
Hydraulic lift with “load sensing” ..141
Installing the lift and front cover plate of the gearbox ..142
Lift mechanism ..142
Checking the safety valves ..142
Checking the protrusion of the non-return valve..143
Adjusting the lift ..145
Lift hydraulic circuit ..147
Sensing arm assemblyMontaggio dell'organo sensibile ..154
Power-lift distributor valve spring setting specifications ..155
Electronic lift ..156
Control panel ..157
Control level or depth control knob ..157
Mix position/draft control..157
Lowering speed control knob..158
Maximum lift height control knob ..158
Up/Down control switch ..158
Up control ..158
Control/Float mode ..158
Lift status indicator light ..158
Remote pushbuttons for lift operation from ground ..159
Lift operation ..160
List of electronic lift tests ..164
Precautions for electronic equipment ..173
Checking the electronics system ..173
Checking mechanical components ..173
Front hydraulic liftSollevatore idraulico anteriore..174
Hydraulic accumulator and antishock valve for front lift ..176
Front power take-off - General information..177
Section of the P.T.O. ..178
Fitting the "RING-FEEDER" rings..182
Checking the clutch ..183
Diagnosing malfuntions ..184
Spring specifications..184
6 - CONTROLS
Hydrostatic steering ..185
Inspections and checks ..186
Steering pump ..186
Directional control valve ..186
Check the setting of the pressure relief valve..186
Bleeding the hydraulic circuit ..186
Assembly of orbital pump unit ..186
Teering wheel shaft and steering cylinders ..187
Instructions for the hydrostatic steering distributor assembly ..189
Diagnosing malfuntions ..192
Mechanical controls ..196
Electro-hydraulic controls ..197
Front P.T.O. clutch engagement control..202
Rear P.T.O. clutch engagement control ..202
Differential lock engagement control ..202
Front-wheel drive engagement control ..202
Rear P.T.O. engagement control ..202
Gearbox ..202
Front and rear lift ..202
Hydraulic circuit diagram ..202
Solenoid valve - Specifications ..207
Adjustment of front and rear differential lock control ..214
7 - BODYWORK
Platform ..215
Cab - General information ..216
Cab air filter ..218
Screen wash ..218
Screen wipers (front and rear) ..218
Removing the driving platform complete with cab ..219
Breakage of the top hood release cable ..220
High visibility cab roof ..222
8 - SYSTEMS
Ventilation ..223
Heating System ..223
Air conditioning unit for cabs ..227
Operation and maintenance of the air-conditioning system ..228
Water dripping from the points at which condensate drain lines are connected to the conditioning unit ..229
Checking system ..231
System safety elements ..231
Temperature regulation ..231
Charging the system..232
Filling the metering unit ..232
Refilling the system with oil ..232
Verifying operation of the system after recharging ..234
Directions for tightening air conditioning system pipeline fittings ..234
Diagnosing malfuntions ..241
Hydraulic system ..242
Oil filters ..243
Hydraulic pumps ..243
Checking the relief valves of the hydraulic lift system ..243
Stripping the hydraulic pump ..244
Auxiliary hydraulic spool valves ..247
Checking the pressure relief valve setting ..250
Checking the operating pressure ..250
Conversion of auxiliary spool valves from double acting to single acting operation..250
Checking the surface of the valve spools ..250
Trailer hydraulic braking system ..251
Use of the tractor with CUNA 341/01 hydraulic trailer braking ..253
Installing the hydraulic braking valve for trailers equipped with “safety brake”
( ITALIAN version) ..258
Electrical system AGROPLUS 60 (up serial number1017) - 70 (up serial number 2773) - 80..261
Electrical system AGROPLUS 60 (under serial number 1016) - 70 (under serial number 2772) ..445
General safety directions..446
Jump start utilizing another battery..447
Recharge system..449
Heating system ..450
Starting system ..450
Ignition key ..452
Ventilation control ..452
Push button control..452
Beacon push button..454
Work ligths..454
2-Speed windscreen wiper switch ..454
Relay ..455
Electronic flasher unit ..455
Switch controlling..456
Switch controlling: differential lock - P.T.O. clutch - 4RM - 540 1000 rpm/min P.T.O. speed selector -
Economy P.T.O. - Live P.t.o. - electric starter system..456
Switch for emergency brake ..456
Fuse box ..457
Instrument panel with digital display ..458
Operation of the broken belts alarm control unit..460
Engine stop operation with a type 2MH engine control unit ..462
Electrical wiring..465
9 - APPENDIX
Power lift tester version 1.24a ..I