
RigFlow
On Sale
$20.00
(50% off)
$10.00
RigFlow is a rigging add-on for Blender that transforms the way you create armatures.
Simply sketch a path where you want your bones to be, and RigFlow will generate an interactive segmented chain.
With powerful features like live visual feedback, smart snapping, one-click mirroring, and direct joint manipulation, RigFlow bridges the gap between technical rigging and creative freedom.
Add-on Features
- Dual Drawing Modes:
- Draw Mode: Sketch a free-form path to create an entire bone chain at once, perfect for organic limbs, spines, and tails.
- Extrude Mode: Click and drag to create bones one by one.
- Interactive Joint Manipulation: Grab and reposition any joint in the chain (including intermediate joints) to refine the bone placement in real-time. The rest of the chain adjusts.
- One-Click Symmetrical Rigging: Activate Mirror Mode to have every path you draw automatically duplicated and mirrored across the X, Y, or Z axis, cutting your rigging time in half for symmetrical characters.
- Intelligent Path Snapping & Joining:
- Automatically snap the ends of your paths to existing bone chains to create complex, branching skeletons with ease.
- The "Auto-Connect" feature ensures that bones with coinciding heads and tails are automatically parented, creating a clean, connected hierarchy.
- Live Visual Feedback: See your bone structure and volumetric envelopes update in real-time as you draw. Adjust the envelope opacity and preview your final rig's volume before generating.
- Customizable Bone Resolution: In Draw Mode, use the "Bone Segments" slider to define exactly how many bones your path should be divided into, giving you full control over the chain's density.
- One-Button Armature Generation: Once you're happy with your drawn paths, click "Generate Bones." RigFlow builds the final armature, connects all the bones, and can even automatically parent your mesh to the new rig with automatic weights.
- Non-Destructive Workflow: Supports Undo (Ctrl+Z) and a Clear All function (Ctrl+C), you can experiment freely without fear of losing your work.
Documentation
1. Installation
- Go to Edit > Preferences > Add-ons.
- Click Install from disk and navigate to your rigflow_0_1.zip file.
- Enable the "Rigging: RigFlow" addon by checking the box.
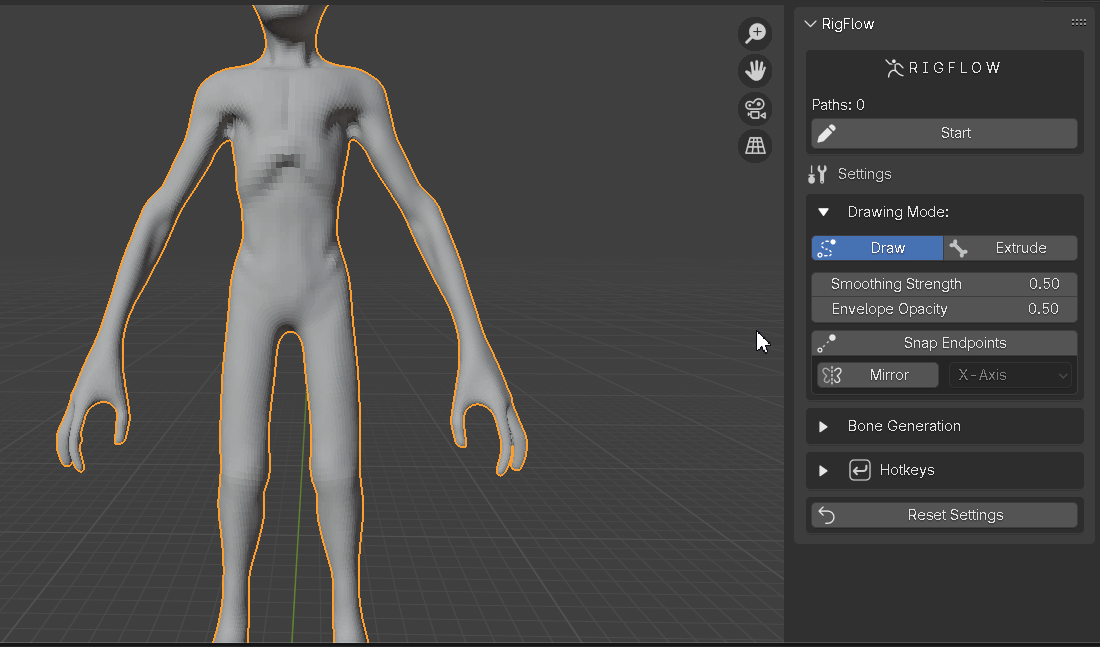
- The RigFlow panel will appear in the 3D View's sidebar (N key) under the "Rigging" tab.
2. Basic Workflow
- Select the mesh object you want to rig.
- In the RigFlow panel, click the "Start" button. Your viewport will now be in drawing mode.
- To Draw a Path: Hold Ctrl and Left-Click + Drag your mouse across the surface of your mesh.
- To Adjust: Release Ctrl. Now you can Left-Click and Drag any of the circular joint handles to move them.
- When you are satisfied with your paths, click the "Generate Bones" button in the panel.
- RigFlow will create a new Armature named "RigBoneArmature" and, if "Auto-Parent with Weights" is enabled, will parent your mesh to it.
3. Panel UI Explained
- Start / Rigging...: The main button to enter or exit the interactive drawing mode.
- Paths: Shows a live count of the number of separate bone paths you have drawn.
Drawing Mode Settings:
- Draw Mode (Selector): Switch between Draw and Extrude modes.
- Smoothing Strength: (Draw Mode only) Controls how much smoothing is applied to your freehand path. Higher values result in smoother, less noisy curves.
- Envelope Opacity: Adjusts the transparency of the bone volume preview.
- Snap Endpoints: If checked, the start/end of a path will try to snap to nearby paths or vertices.
- Snap Threshold: Controls the search distance for snapping.
- Mirror Bones: Toggle symmetrical drawing on or off.
- Mirror Axis: Choose the axis for mirroring (X, Y, or Z).
Bone Generation Settings:
- Bone Segments: (Draw Mode only) Sets the number of bones a single drawn path will be converted into.
- Auto-Connect: When generating, automatically connects and parents bones whose head/tail positions match.
- Auto-Parent with Weights: After generation, automatically parents the active mesh to the new armature using Blender's automatic weighting.
If you run into any errors or questions please contact me: animationsvfx@gmail.com