
"Mastering Your Sawzall: A Comprehensive Guide on How to Safely and Efficiently Put a Blade in a Sawzall"
The Sawzall, a versatile reciprocating saw, is a go-to tool for a wide range of cutting applications. Whether you're a seasoned professional or a DIY enthusiast, understanding how to put a blade in a Sawzall is fundamental for unleashing the full potential of this powerful tool. In this detailed guide, we'll walk you through the step-by-step process of securely and efficiently how to put a sawzall blade in. By the end of this article, you'll be equipped with the knowledge to tackle various cutting tasks with confidence.
Part 1: Know Your Sawzall
1.1 Understanding the Sawzall:
- The Sawzall, a trademarked name for a reciprocating saw made by Milwaukee Tool, is characterized by its powerful and rapid back-and-forth cutting motion. It is commonly used for cutting through a variety of materials, including wood, metal, plastic, and more. see more
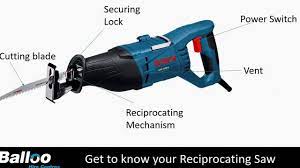
1.2 Components of a Sawzall:
- Familiarize yourself with the key components of your Sawzall, including the body, handle, trigger, blade clamp or chuck, and the shoe. Knowing these parts is essential for a smooth blade installation process.
Part 2: Safety First
2.1 Personal Protective Equipment (PPE):
- Before handling any power tool, including the Sawzall, prioritize your safety by wearing the necessary personal protective equipment. This includes safety glasses, hearing protection, and work gloves.
2.2 Power Off and Unplugged:
- Ensure that the Sawzall is powered off and unplugged before attempting to insert or change the blade. This eliminates the risk of accidental starts and ensures a safe blade installation process.
2.3 Secure Work Area:
- Work in a well-lit and clutter-free area. A secure work environment minimizes the risk of accidents and allows you to focus on the blade installation process without distractions.
Part 3: Selecting the Right Blade
3.1 Consider the Material:
- Choose a blade that is suitable for the material you intend to cut. Different blades are designed for cutting wood, metal, plastic, or a combination of materials. Refer to the manufacturer's recommendations for guidance.
3.2 Blade Length Matters:
- Select a blade with an appropriate length for your cutting task. Longer blades are ideal for deeper cuts, while shorter blades offer better control and precision.
3.3 TPI (Teeth Per Inch):
- The TPI of a blade determines its cutting speed and the type of material it's best suited for. Coarser blades with fewer TPI are ideal for cutting wood, while finer blades with more TPI are suitable for metal.
Part 4: Step-by-Step Guide to Putting a Blade in a Sawzall
4.1 Prepare the Sawzall:
- Ensure that the Sawzall is turned off and unplugged. If it's a cordless model, remove the battery. This guarantees a safe environment for the blade installation process.
4.2 Locate the Blade Clamp or Chuck:
- Identify the blade clamp or chuck, which is usually located at the front of the Sawzall. The blade clamp is designed to hold the blade securely in place during operation.
4.3 Release the Blade Clamp:
- Depending on the model, release the blade clamp using the designated mechanism. This may involve flipping a lever, pressing a button, or using an Allen wrench to loosen the clamp.
4.4 Insert the Blade:
- Hold the new blade with the teeth facing forward and the cutting edge down. Align the blade with the blade clamp and push it into the clamp until it seats firmly. Ensure that the blade is positioned straight and fully inserted.
4.5 Secure the Blade Clamp:
- Once the blade is in place, secure the blade clamp using the designated mechanism. This may involve flipping a lever back into place, tightening a screw, or following the manufacturer's specific instructions.
4.6 Perform a Safety Check:
- Give the blade a gentle tug to ensure that it's securely held in place. A properly installed blade should not wobble or come loose. Confirm that the blade is aligned straight with the cutting edge facing forward.
4.7 Adjust the Shoe Position (Optional):
- Some Sawzall models have an adjustable shoe that allows you to change the cutting depth. If necessary, adjust the shoe position based on your cutting requirements.
Part 5: Testing and Fine-Tuning
5.1 Power On and Test Cut:
- Power on the Sawzall and perform a test cut on a scrap piece of material. This allows you to assess the blade's performance and make any necessary adjustments before tackling your main cutting task.
5.2 Fine-Tune Blade Position:
- If the blade is not cutting straight or is veering to one side, fine-tune its position. Turn off the Sawzall, unplug it, and repeat the blade installation steps, ensuring proper alignment.
Part 6: Tips for Maintenance and Extended Blade Life
6.1 Regular Inspection:
- Periodically inspect the blade for signs of wear, damage, or dullness. Replace blades that show wear to maintain optimal cutting performance.
6.2 Proper Blade Storage:
- Store your Sawzall blades in a cool, dry place to prevent rust and corrosion. Consider using blade organizers or protective cases to keep them in top condition.
6.3 Cleaning After Use:
- After each use, clean the Sawzall, including the blade and blade clamp, to remove debris and sawdust. A clean tool operates more efficiently and prolongs the life of the blade.
6.4 Use the Right Blade for the Task:
- Always use the appropriate blade for the material you're cutting. Using the wrong blade can result in inefficient cutting and premature wear.
6.5 Monitor Blade Temperature:
- During extended use, monitor the temperature of the blade. Excessive heat can lead to blade wear and reduced cutting efficiency. Allow the blade to cool between prolonged cutting sessions.
Conclusion:
Mastering the art of putting a blade in a Sawzall is an essential skill for anyone working with this powerful cutting tool. By following the comprehensive steps outlined in this guide, you'll be equipped to safely and efficiently install blades, enabling you to tackle a variety of cutting tasks with confidence. Remember to prioritize safety, select the right blade for the job, and perform regular maintenance to ensure optimal performance and extended blade life. With these skills in hand, you'll unlock the full potential of your Sawzall, making it a valuable asset in your toolkit.