

VoroFX - Procedural Fracturing
VoroFX
Procedural Fracturing for Blender
Create, direct, and simulate destruction without a complicated workflow. VoroFX combines a procedural Geometry Nodes fracture system with Blender's rigid body physics to take an object from intact mesh to simulated destruction in just a few steps.
MAIN OVERVIEW
SIMPLE WORKFLOW
Fracture. Confirm. Simulate.
01 — Fracture → 02 — Confirm → 03 — Physics → 04 — Constraints → 05 — Destroy
PROCEDURAL WORKFLOW
Procedural Voronoi Fracturing
Start with your mesh and create a procedural Voronoi fracture directly through Geometry Nodes. Because the fracture remains procedural before confirmation, you can continue adjusting the pattern before committing it to individual shards.
- Procedural Voronoi fracture generation
- Adjustable fracture count
- Randomized fracture patterns
- Non-destructive setup before confirmation
- Fracture gap control
- Fast rebuild workflow
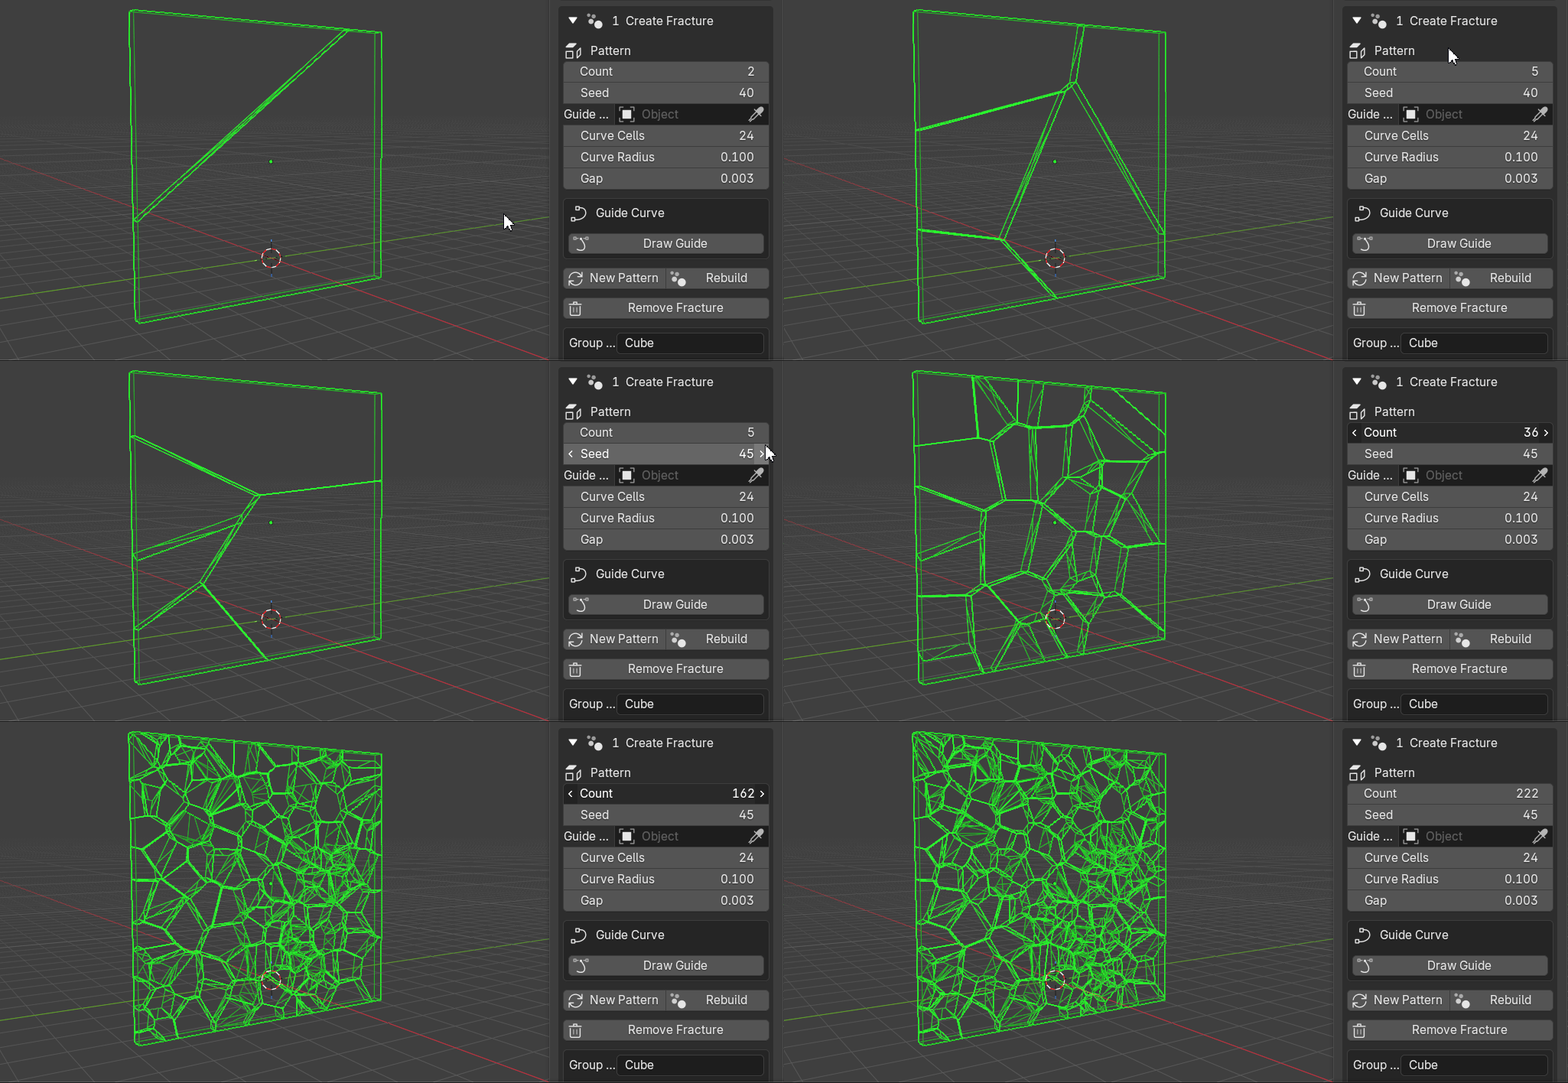 PROCEDURAL FRACTURE
See changes in real-time, no need to wait.
ART DIRECTION
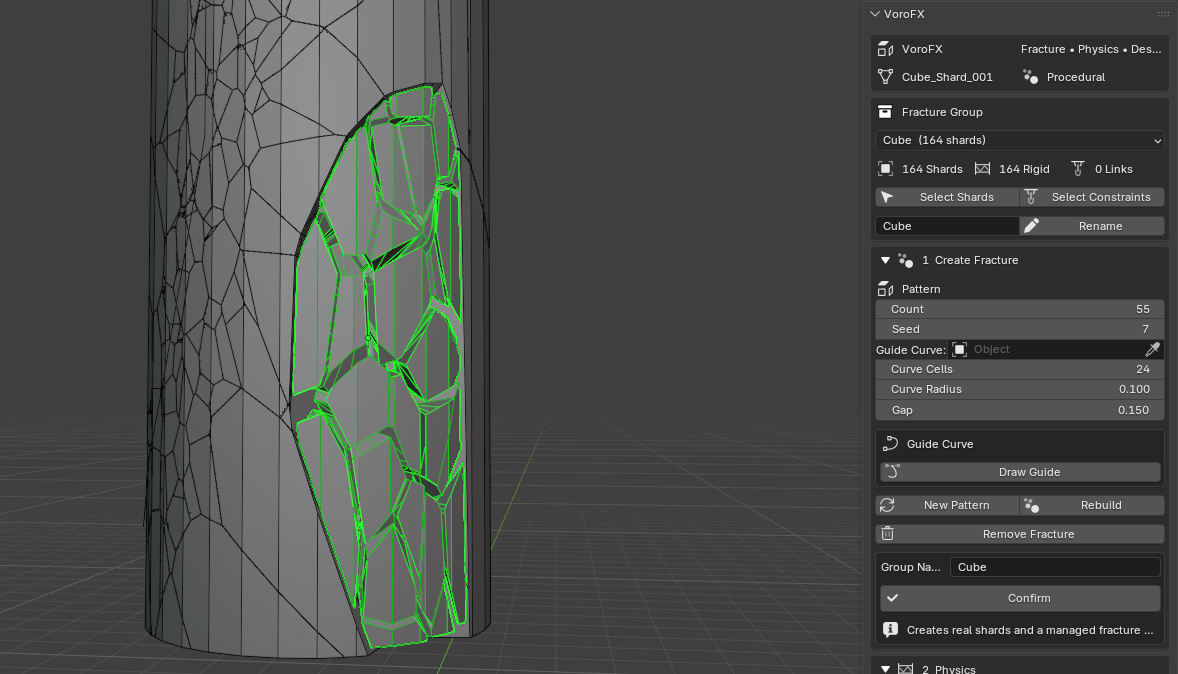
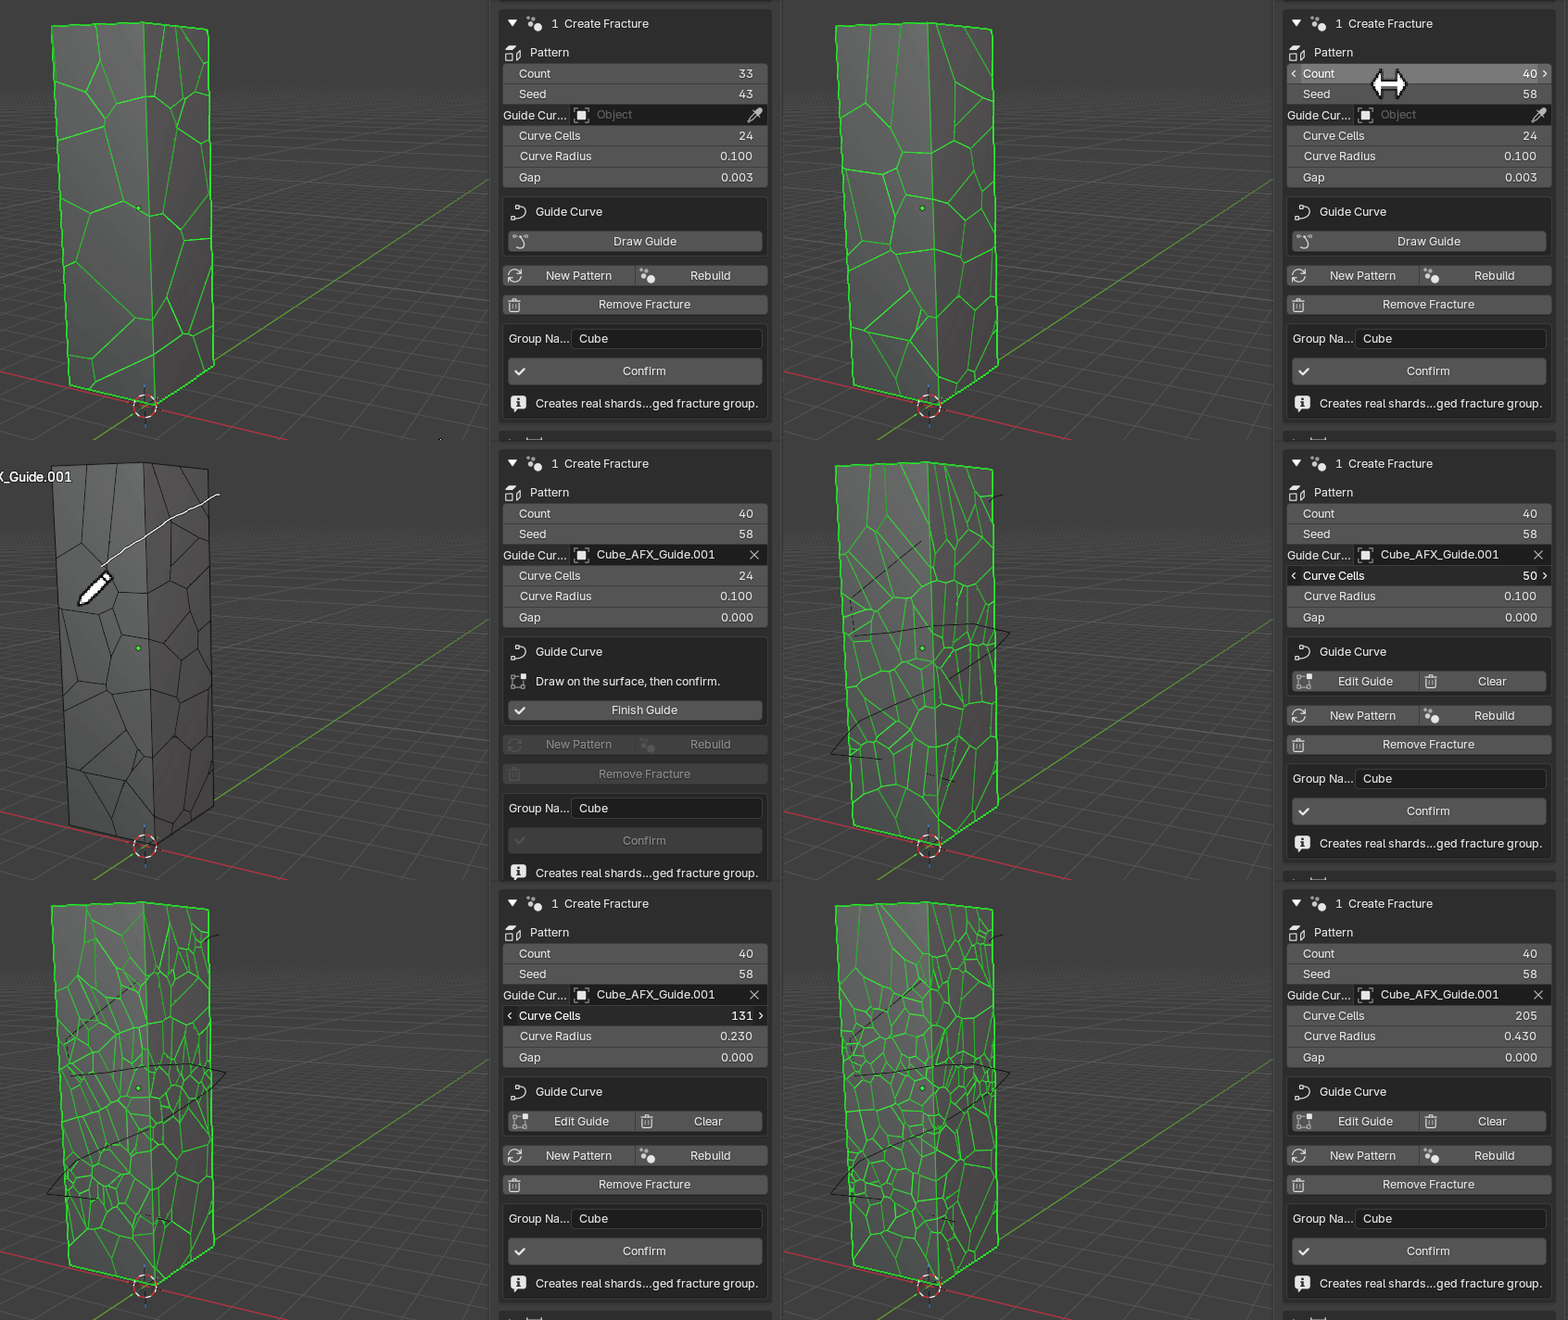
Direct Fractures with Guide Curves
Destruction doesn't always need to be completely random. VoroFX includes a Guide Curve workflow that lets you influence where fracture detail is concentrated.
Draw directly in the scene, edit the guide, and use it to art-direct the fracture pattern. Concentrate detail around important areas without increasing fracture density across the entire object.
ART-DIRECTED DESTRUCTION
Use procedural controls for the overall fracture while guide curves direct additional detail exactly where you want it.
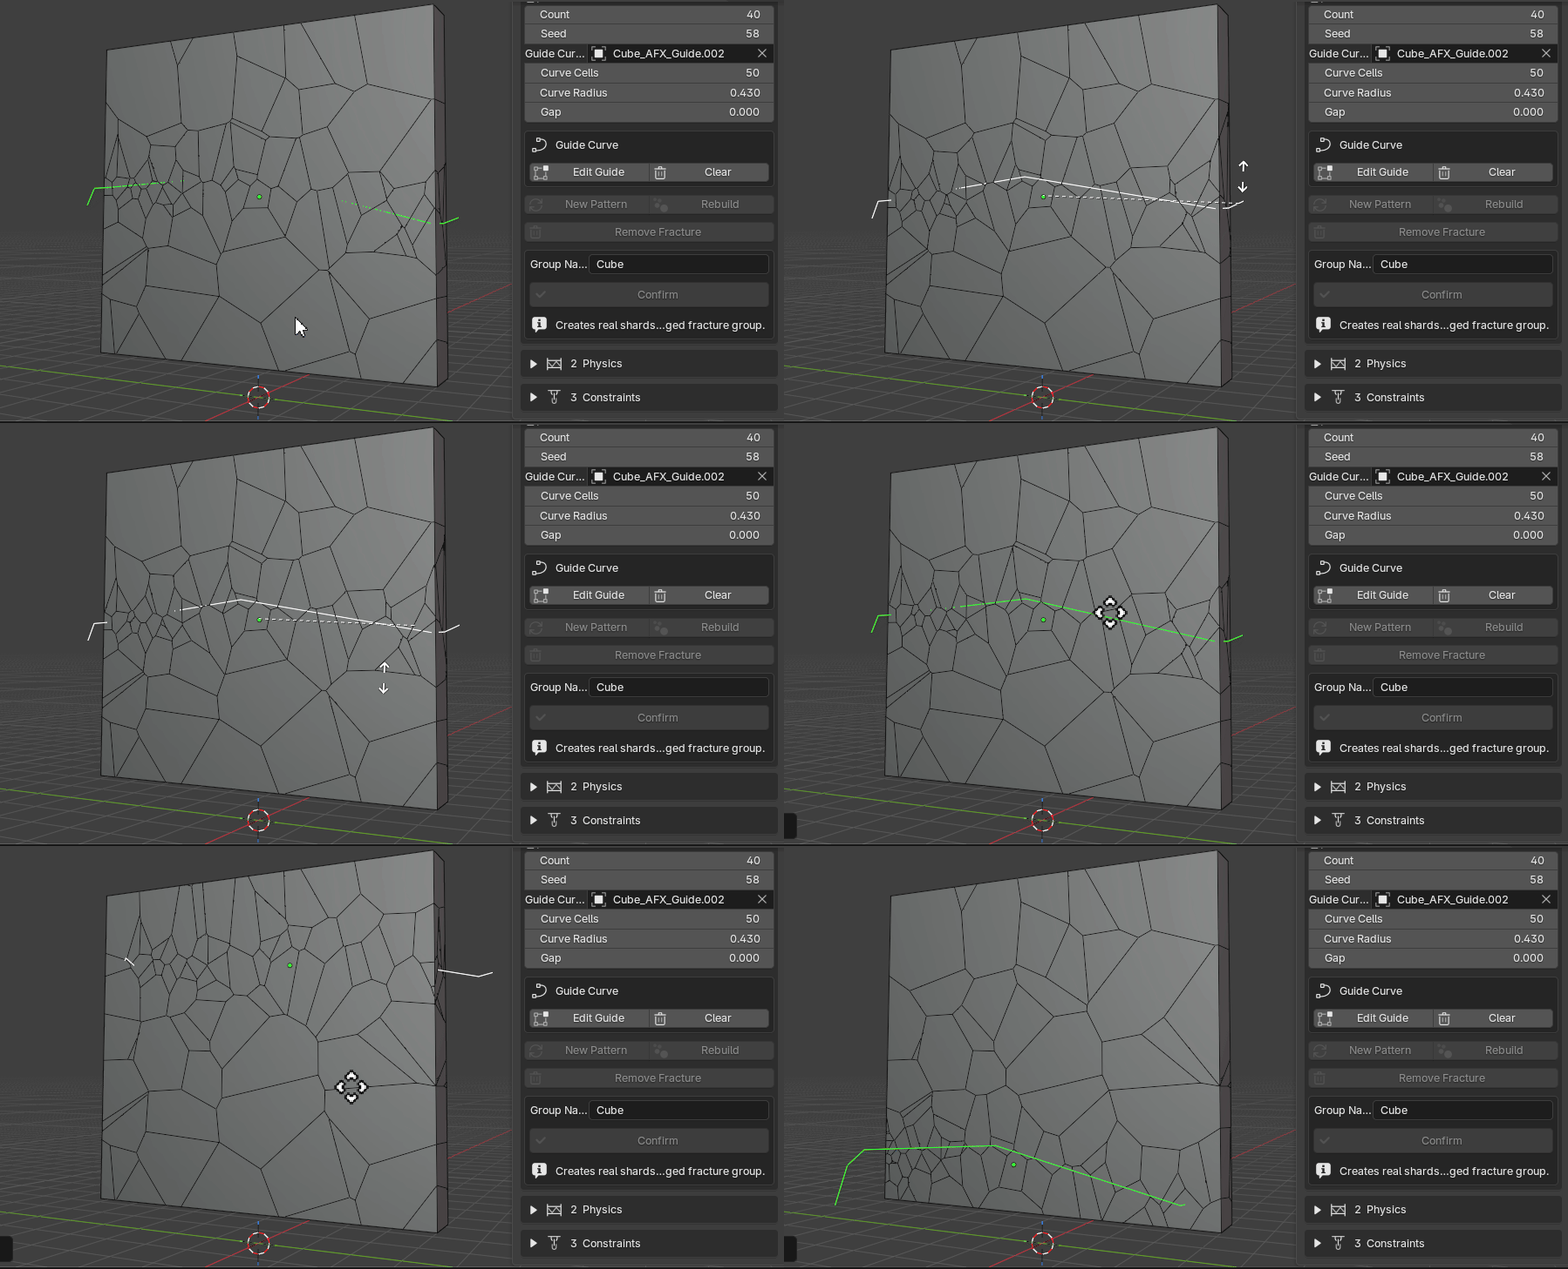 GUIDE CURVE FRACTURING
Control where fracture detail appears.
WHEN YOU'RE READY
✓ Confirm the Fracture
Keep experimenting while the fracture is procedural. Once you're happy with the result, simply press Confirm.
VoroFX automatically:
✓ Applies the procedural fracture
✓ Separates the pieces into real shard objects
✓ Sets shard origins
✓ Creates a managed VoroFX fracture group
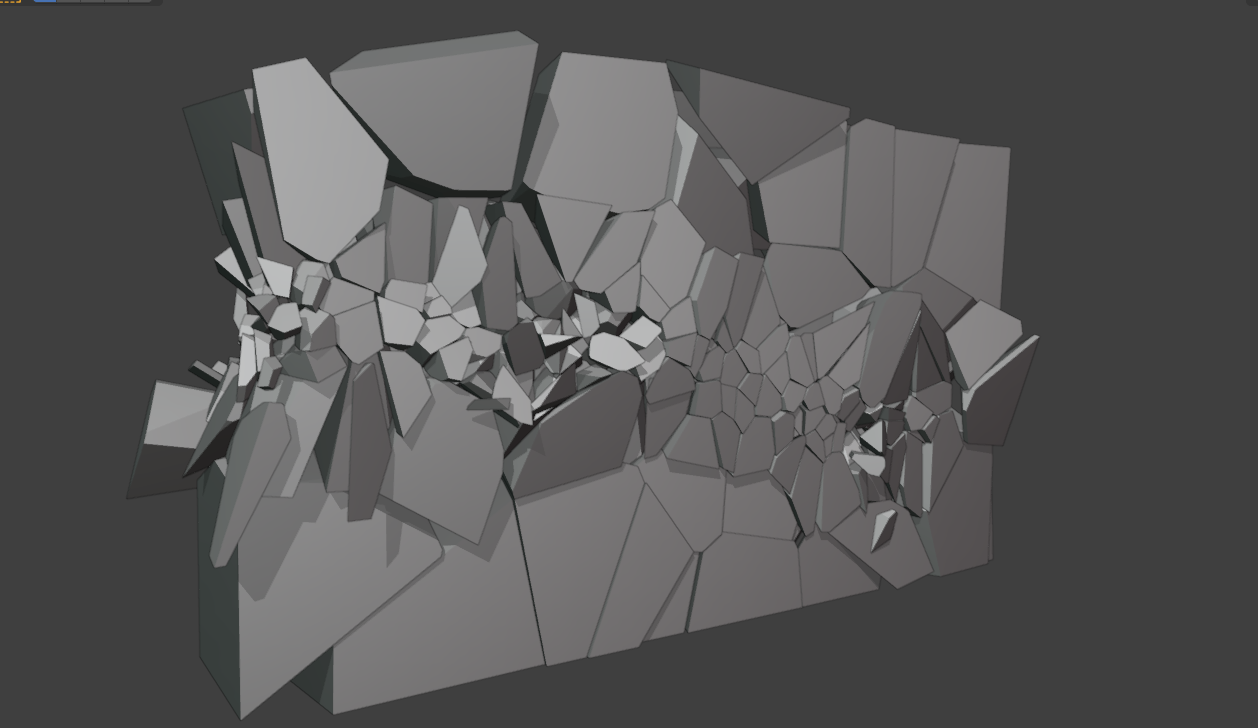
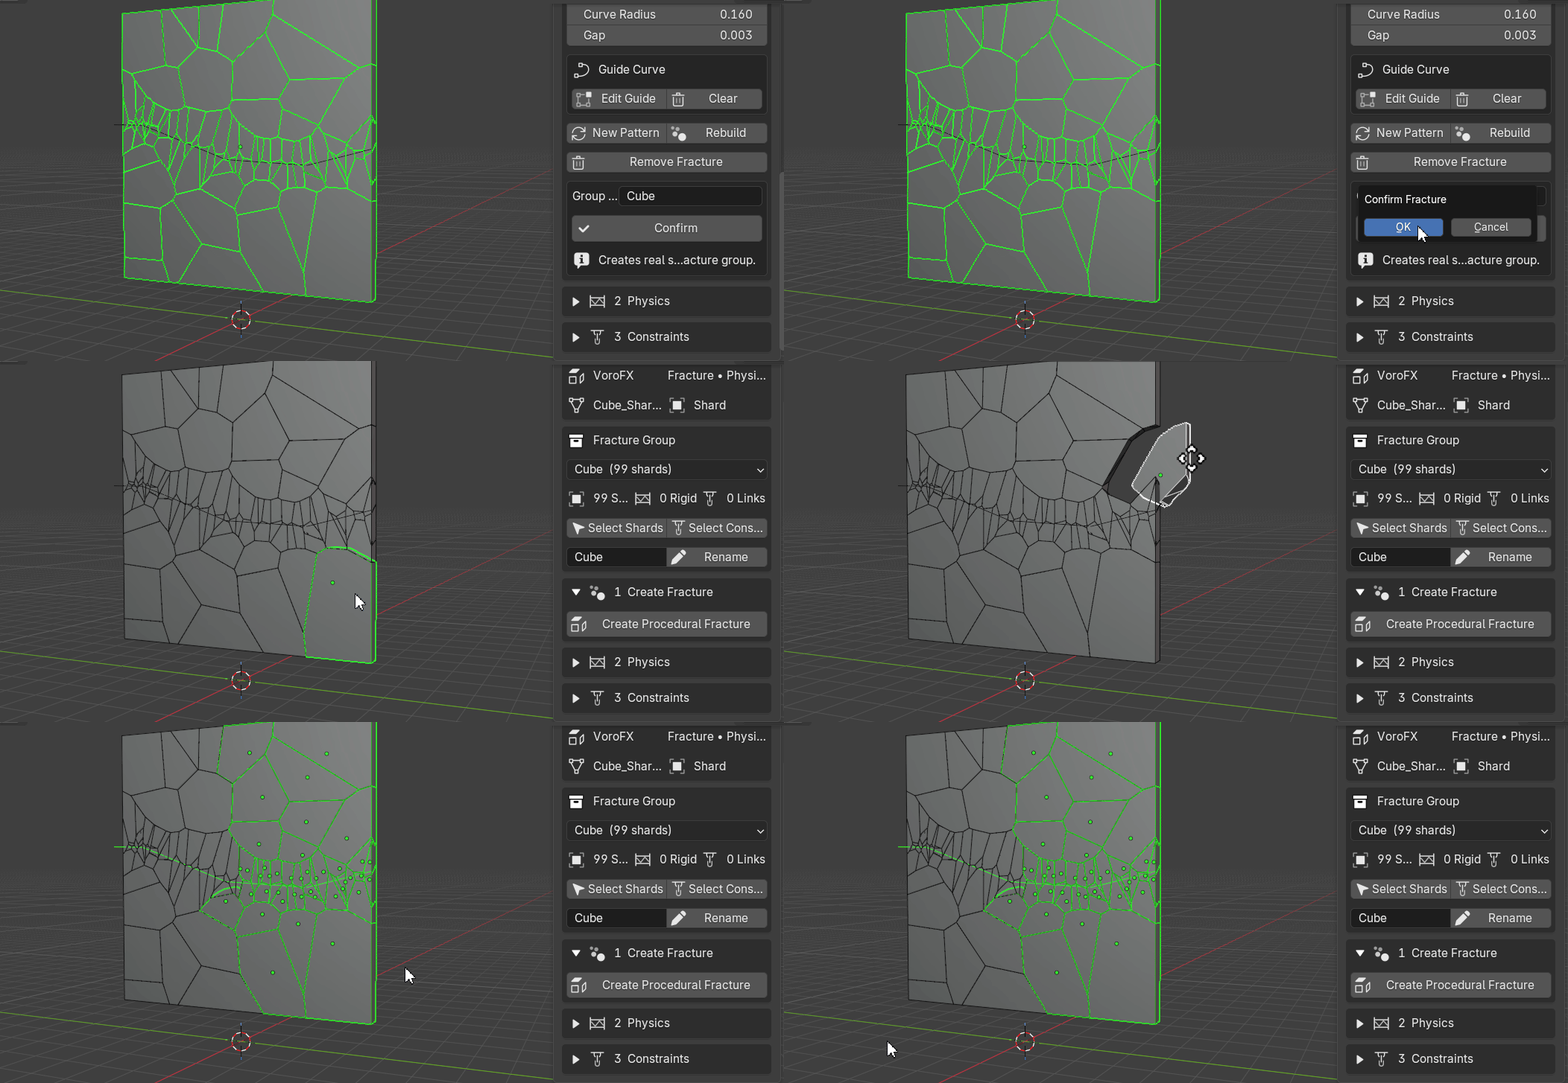 CONFIRM WORKFLOW
Procedural fracture can become real individual shards. Ready to simulate.
BLENDER PHYSICS
Built Around Blender Rigid Bodies
VoroFX turns confirmed fracture pieces into standard Blender rigid bodies, allowing your destruction setup to work with Blender's familiar physics system.
Physics Controls
• Mass
• Collision Shape
• Friction
• Bounciness
• Linear Damping
• Angular Damping
• Deactivation
• Collision Margins
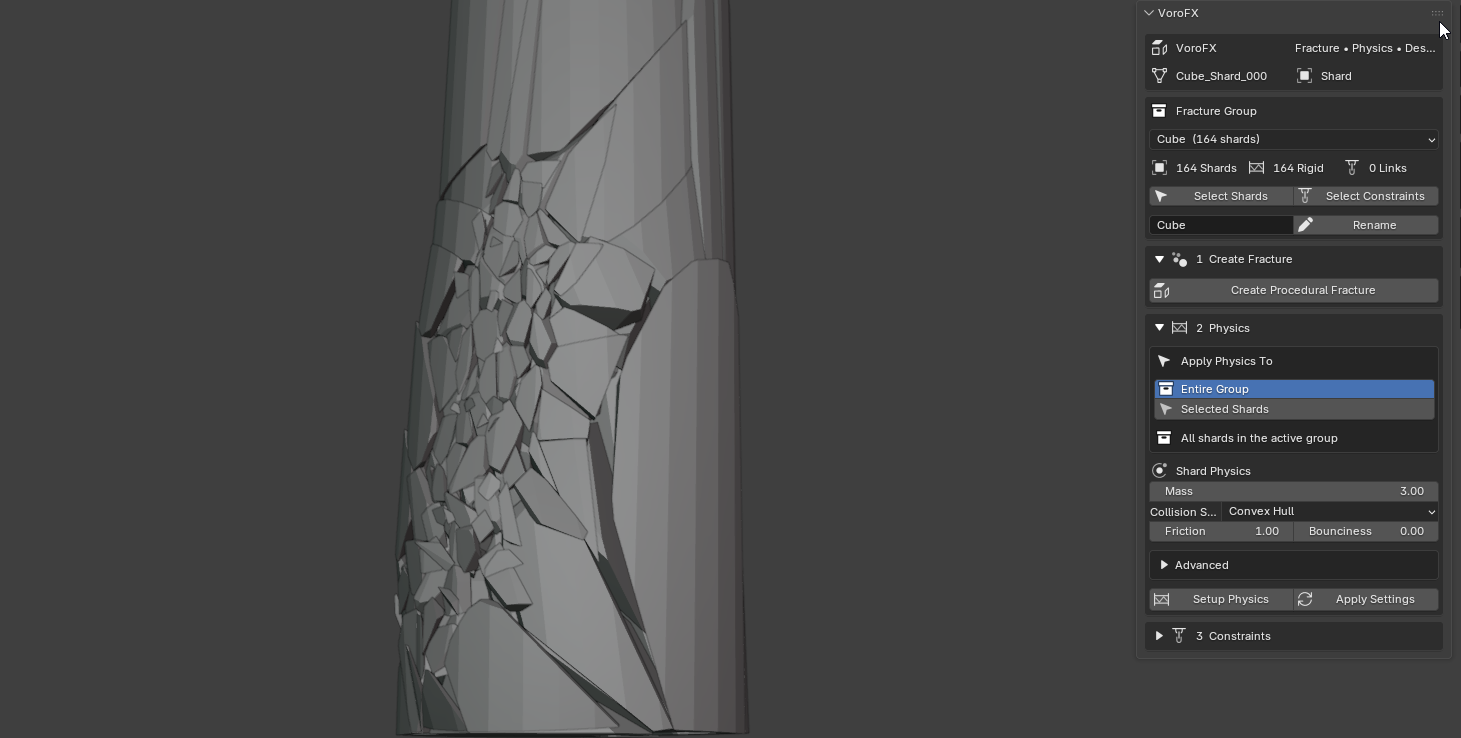
SELECTION OR ENTIRE GROUP
Apply physics to the entire active fracture group or only the shards you currently have selected.
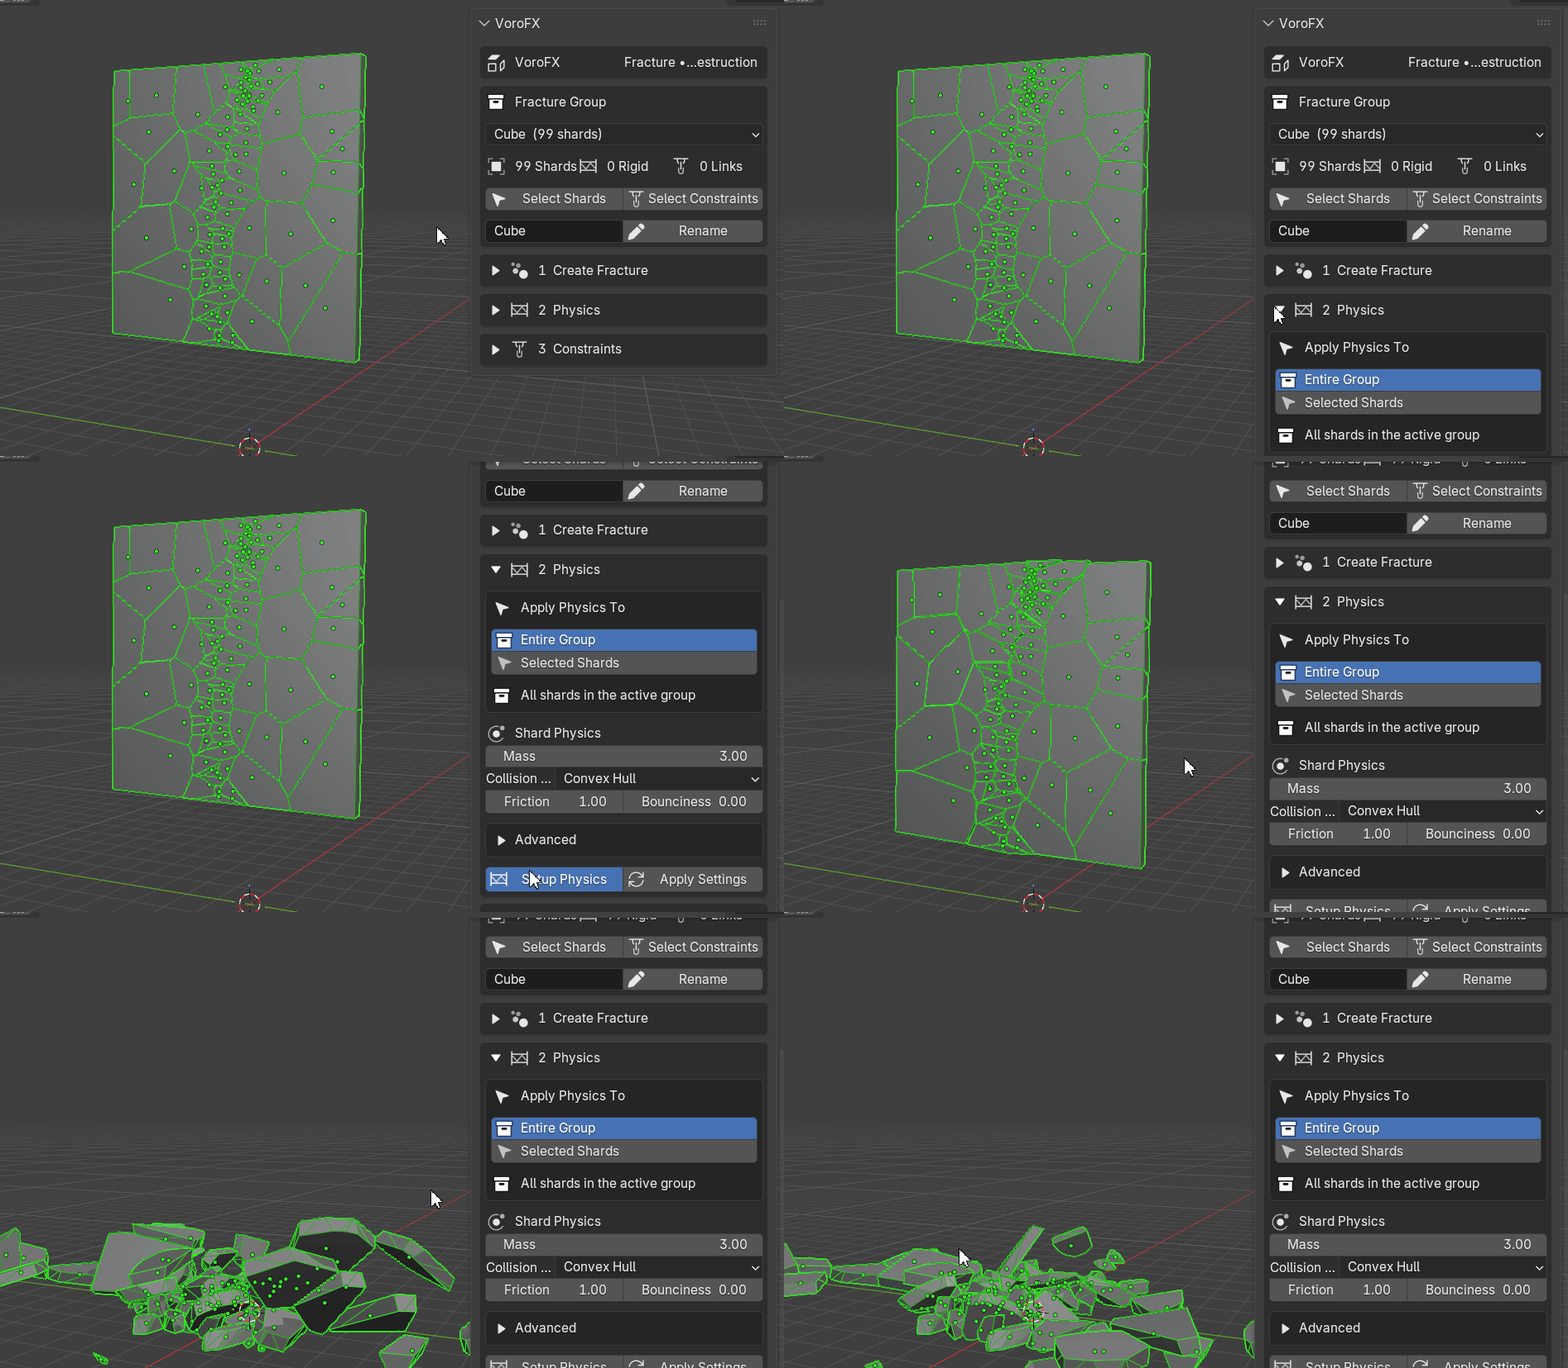 RIGID BODY PHYSICS
Set up your rigid bodies instantly.
DESTRUCTION CONTROL
Automatic Breakable Constraints
Connect nearby shards using automatically generated Blender rigid body constraints. Instead of manually creating connections between fracture pieces, VoroFX analyzes the active fracture group and builds them for you.
- Constraint type
- Connection distance
- Maximum neighbors per shard
- Breakable constraints
- Breaking threshold
- Linked collision control
- Active Group or Selected Shards targeting
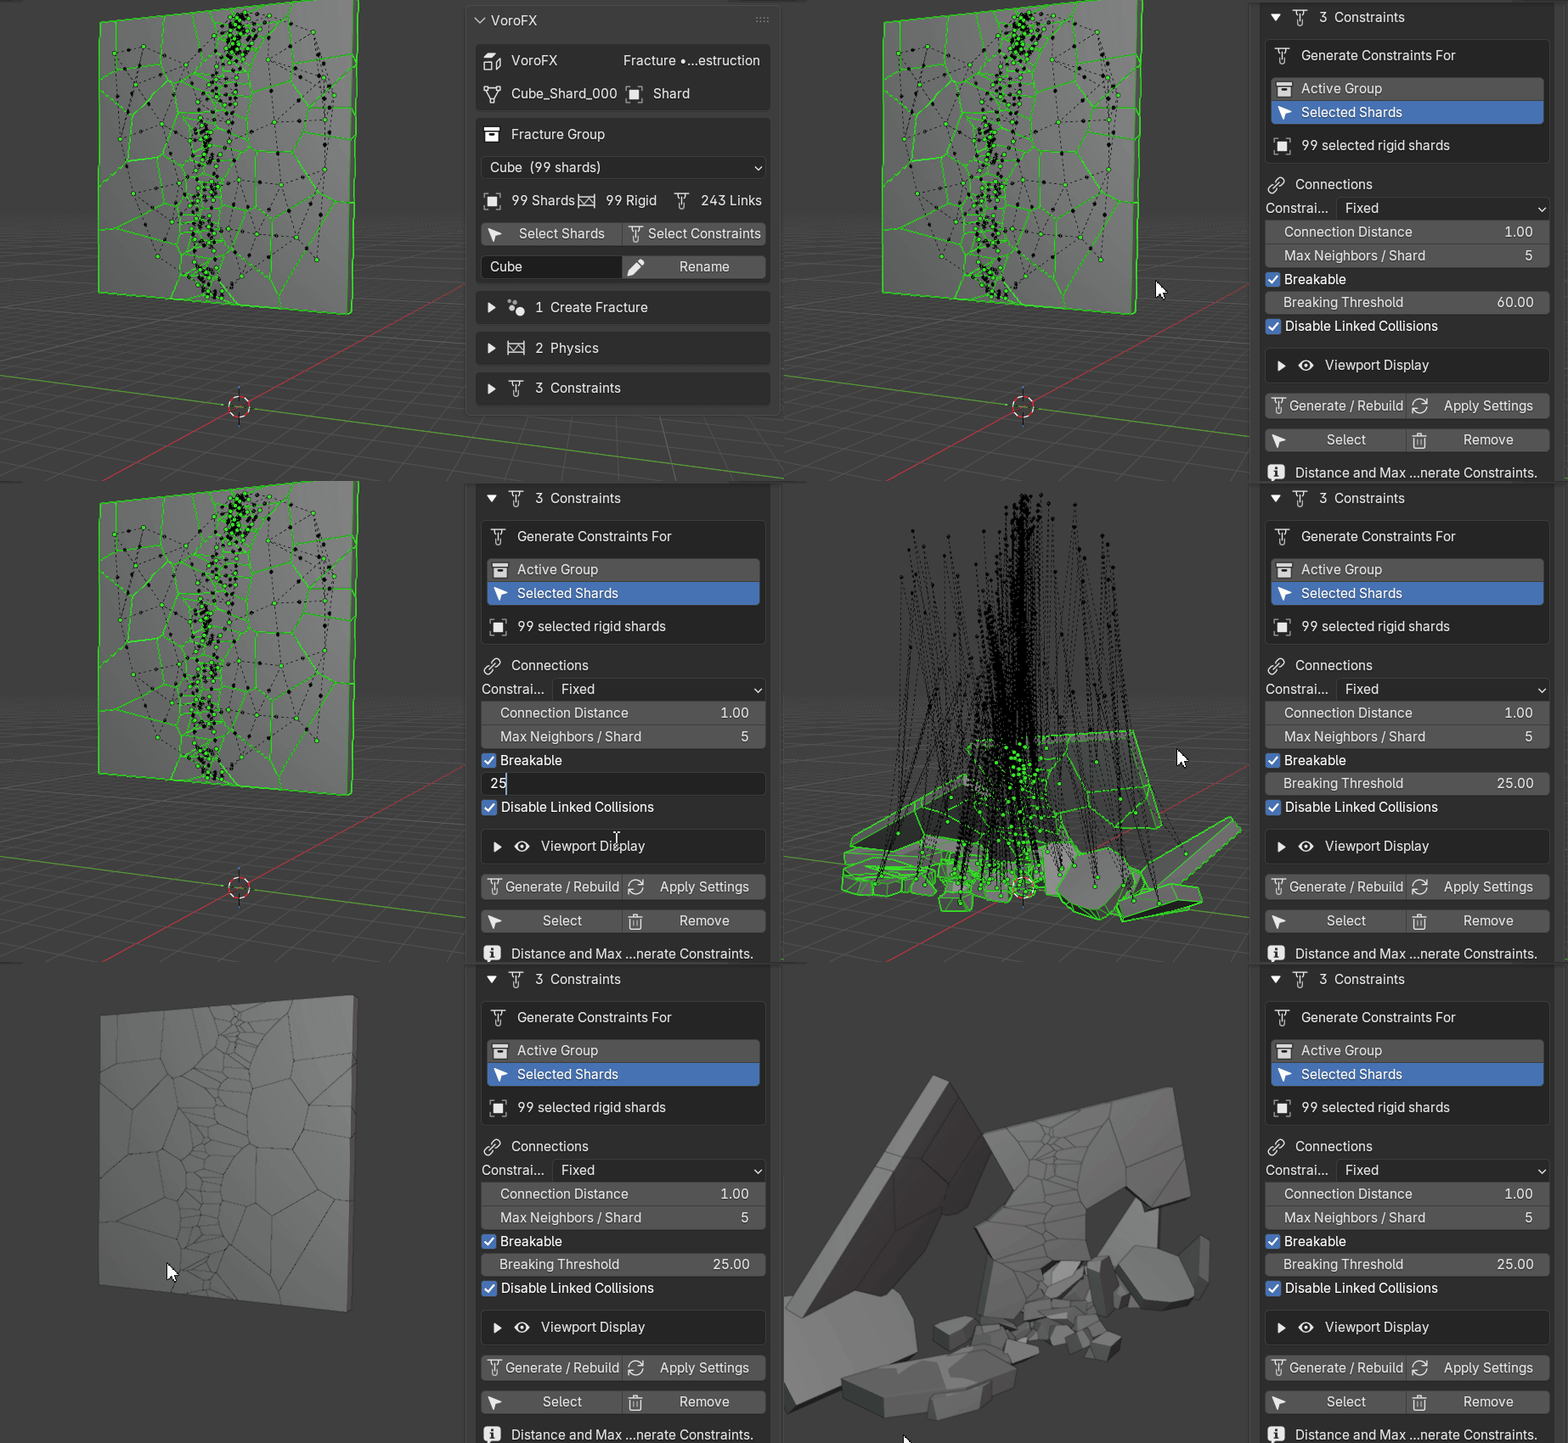 BREAKABLE CONSTRAINTS
Setting up constraints has never been easy. Now it is.
ORGANIZATION
Managed Fracture Groups
VoroFX keeps converted destruction setups organized using managed fracture groups.
- Choose the active fracture group
- See shard, rigid body, and constraint counts
- Select every shard in the group
- Select generated constraints
- Rename groups
- Apply physics to an entire group
- Generate constraints for an entire group
FROM OBJECT TO DESTRUCTION
One Focused Workflow
VoroFX is designed to remove the repetitive setup normally involved in turning procedural fracture geometry into an organized rigid body destruction simulation.
Great For:
• Destruction effects
• Breaking props
• Walls & architecture
• Impact-style fractures
• Procedural fracture experiments
• Rigid body simulations
• Motion graphics
• VFX workflows
Requirements:
Blender 5.2+
Uses Blender Geometry Nodes and the native rigid body system.
Build Destruction Faster with VoroFX
Procedural fracture generation, art-directed detail, managed shards, rigid body setup, and breakable constraints. Brought together in one add-on.
Documentation
OFFICIAL DOCUMENTATION
VoroFX
Procedural Fracturing for Blender
Everything you need to create procedural fractures, convert them into managed shards, configure rigid body physics, and build breakable destruction setups with VoroFX.
Contents
01 — Installation
02 — Quick Start
03 — Creating a Fracture
04 — Guide Curves
05 — Confirming the Fracture
06 — Fracture Groups
07 — Rigid Body Physics
08 — Constraints
09 — Constraint Display
10 — Recommended Workflow
11 — Tips
12 — Troubleshooting
01 — GETTING STARTED
Installation
Install VoroFX like a standard Blender add-on.
Installation Steps
1. Open Blender.
2. Open Edit → Preferences → Add-ons.
3. Choose the option to install an add-on from disk.
4. Select the VoroFX add-on file.
5. Enable VoroFX if necessary.
6. Return to the 3D Viewport.
The VoroFX interface is available from the 3D Viewport Sidebar(N).
02 — QUICK START
Your First Destruction Setup
Select Mesh → Create Fracture → Adjust → ✓ Confirm → Setup Physics → Constraints → Simulate
03 — FRACTURING
Creating a Procedural Fracture
Select the mesh you want to fracture and press Create Procedural Fracture.
VoroFX creates the fracture procedurally using Geometry Nodes. At this stage the result has not yet been converted into separate objects.
NON-DESTRUCTIVE STAGE
Experiment with the fracture before pressing Confirm. This is the best time to change the pattern and guide curve.
Fracture Controls
Use the fracture controls to shape the procedural result before confirmation.
Adjust the fracture parameters and watch the Geometry Nodes result update directly in the viewport.
New Pattern
Generate another fracture pattern without leaving the VoroFX workflow.
Rebuild
Rebuild the procedural fracture setup when needed.
Remove Fracture
Remove the procedural fracture setup before it has been confirmed.
04 — ART DIRECTION
Guide Curves
Guide Curves let you influence where additional fracture detail is concentrated.
Instead of increasing detail across the entire mesh, use a curve to direct the fracture toward the area that matters.
Draw Guide — Create the guide directly in the viewport.
Edit Guide — Modify the existing curve.
Finish Guide — Finish editing and return to the fracture workflow.
Clear Guide — Remove the current guide.
TIP
Guide curves are most useful before confirming the fracture, while the setup is still procedural.
05 — FINALIZE
✓ Confirm
Once the procedural fracture looks the way you want, enter a Group Name and press Confirm.
Confirm changes the fracture from a procedural setup into real individual shard objects that can participate in Blender physics.
Confirm automatically:
✓ Applies the fracture
✓ Separates loose pieces
✓ Creates individual shard objects
✓ Sets shard origins
✓ Creates a managed VoroFX group
IMPORTANT
Make your procedural fracture adjustments before Confirm. Confirm is the transition into the shard and physics workflow.
06 — ORGANIZATION
Fracture Groups
Confirmed shards are registered as a managed VoroFX fracture group. Groups make it easier to work with multiple destruction setups in one scene.
Group Controls
• Choose the active fracture group
• View shard count
• View rigid body count
• View constraint count
• Select all group shards
• Select group constraints
• Rename the group
07 — PHYSICS
Rigid Body Physics
VoroFX uses Blender's rigid body system for confirmed shards.
Apply Physics To
Entire Group
Setup or update physics on every shard belonging to the active fracture group.
Selected Shards
Setup or update physics only on the VoroFX shards currently selected.
Basic Physics
Mass — Controls shard mass.
Collision Shape — Shape used for rigid body collision.
Friction — Resistance when shards slide against surfaces.
Bounciness — Controls restitution during impacts.
Advanced Physics
Linear Damping
Angular Damping
Enable Deactivation
Start Deactivated
Collision Margin
SETUP PHYSICS
Adds/configures rigid bodies for the chosen target.
APPLY SETTINGS
Updates existing rigid bodies using the current VoroFX physics settings.
08 — CONNECTIONS
Rigid Body Constraints
Constraints connect rigid-body shards together, allowing an object to remain assembled until enough force causes its connections to break.
Generate Constraints For
Active Group
Build constraints between rigid-body shards in the active VoroFX group.
Selected Shards
Build connections only between selected rigid-body shards.
Constraint Settings
Constraint Type
Select the Blender rigid body constraint type.
Connection Distance
Controls how far apart shards may be before VoroFX considers them for a connection.
Max Neighbors / Shard
Limits how many generated connections each shard can receive.
Breakable
Allows generated connections to break during the simulation.
Breaking Threshold
Controls the breaking threshold used by the generated constraints.
Disable Linked Collisions
Controls collisions between shards directly connected by a constraint.
REBUILD REQUIRED
Connection Distance and Max Neighbors affect which connections are created. Generate/Rebuild constraints after changing them.
09 — VIEWPORT DISPLAY
Constraint Helper Display
Constraint helpers can be customized independently from their underlying Bullet constraint behavior.
Display Shape
Axes, Arrows, Single Arrow, Circle, Cube, Sphere or Cone.
Display Size
Adjust the viewport size of the helper.
In Front
Draw helpers in front of scene geometry.
Show Names
Display object names in the viewport.
Hide Helpers
Hide helper objects while retaining their rigid body constraints.
APPLY SETTINGS
Display settings can be updated on existing generated helpers without rebuilding the connection network.
10 — RECOMMENDED WORKFLOW
Building a Destruction Setup
01 — FRACTURE
Select the original mesh and create a procedural fracture.
02 — ART DIRECT
Adjust the fracture and use a Guide Curve where additional detail is needed.
03 — CONFIRM
Name the fracture group and convert the procedural result into real shards.
04 — PHYSICS
Configure rigid body properties and run Setup Physics.
05 — CONSTRAINTS
Generate breakable connections if the object should initially remain assembled.
06 — SIMULATE
Play the Blender timeline and refine the physics and breaking behavior.
11 — TIPS
Getting Better Results
Stay procedural until you're satisfied.
Adjust the fracture and Guide Curve before pressing Confirm.
Use groups for complex scenes.
Separate destruction setups into clearly named fracture groups.
Use selection targeting for local changes.
You don't need to modify every shard when only part of the setup needs different physics.
Keep constraint networks reasonable.
Connection Distance and Max Neighbors determine how many links VoroFX generates.
12 — TROUBLESHOOTING
Common Questions
Why can't I set up physics yet?
The procedural fracture must first be confirmed so VoroFX has real shard objects to use for rigid body physics.
Why aren't constraints being generated?
Constraints require rigid-body shards. Make sure Physics has been set up for the target shards first.
Why did changing Connection Distance do nothing?
Connection Distance changes the generated network itself. Use Generate/Rebuild after changing it.
Can I hide the constraint helpers?
Yes. Enable Hide Helpers. The viewport helpers can be hidden while the underlying rigid body constraints remain active.
Can I apply physics to only part of the fracture?
Yes. Set Physics Target to Selected Shards and select the shards you want to modify.
VoroFX QUICK REFERENCE
Fracture → Confirm → Physics → Constraints → Simulate
Keep the fracture procedural while designing the pattern. Confirm when you're ready to create real shards, then use the Physics and Constraints sections to build the final destruction setup.
VoroFX • Procedural Fracturing for Blender