
John Deere 317G Compact Track Loader Workshop Repair Service Manual PDF (TM13854X19) - MJODTM13854X19.zip
A full-service repair guide for the John Deere 317G Compact Track Loader, offering the same workshop-level detail professionals rely on to service, fix, and overhaul your machine.
Inside the John Deere 317G Compact Track Loader workshop service repair manual, you'll find:
* Numbered table of contents easy to use so that you can find the information you need fast.
* Detailed sub-steps expand on repair procedure information
* Numbered instructions guide you through every repair procedure step by step.
* Notes, cautions and warnings throughout each chapter pinpoint critical information.
* Bold figure number help you quickly match illustrations with instructions.
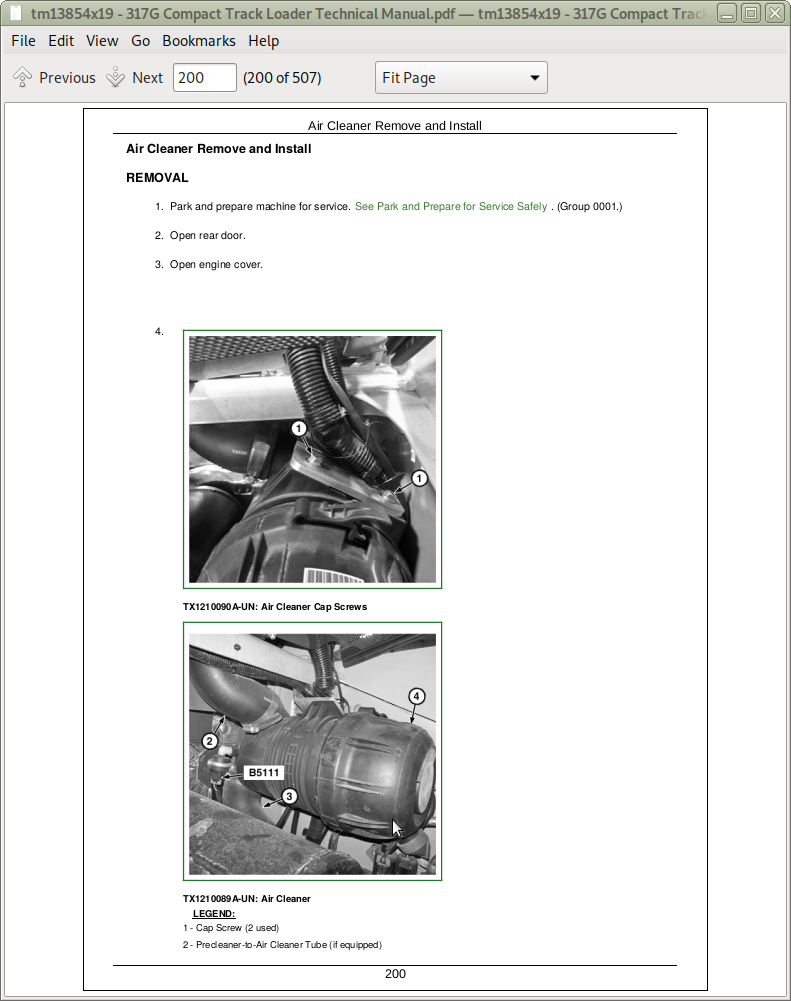
* Detailed illustrations, drawings and photos guide you through every procedure.
* Enlarged inset helps you identify and examine parts in detail.
tm13854x19 - 317G Compact Track Loader Technical Manual.pdf
tm13854x19 - 317G Compact Track Loader Technical Manual.epub
Total Pages: 497 pages
File Format: PDF/EPUB/MOBI/AZW (PC/Mac/Android/Kindle/iPhone/iPad; bookmarked, ToC, Searchable, Printable)
Language: English
tm13854x19 - 317G Compact Track Loader - Table of Contents
Foreword
Manual Identification—READ THIS FIRST!
Section 00: General Information
Group 0001: Safety
Recognize Safety Information
Follow Safety Instructions
Operate Only If Qualified
Wear Protective Equipment
Avoid Unauthorized Machine Modifications
Inspect Machine
Stay Clear of Moving Parts
Avoid High-Pressure Fluids
Avoid High-Pressure Oils
Work In Ventilated Area
Avoid Static Electricity Risk When Refueling
Prevent Fires
In Case of Machine Fire
Prevent Battery Explosions
Handle Chemical Products Safely
Handle Starting Fluid Safely
Decommissioning — Proper Recycling and Disposal of Fluids and Components
Exhaust Filter Ash Handling and Disposal
Prepare for Emergencies
Clean Debris from Machine
Add Cab Guarding for Special Uses
Use Steps and Handholds Correctly
Start Only From Operator's Seat
Use and Maintain Seat Belt
Prevent Unintended Machine Movement
Avoid Work Site Hazards
Keep Riders Off Machine
Avoid Backover Accidents
Avoid Machine Tip Over
Operating On Slopes
Operating or Traveling On Public Roads
Inspect and Maintain ROPS
Travel Safely
Prevent Acid Burns
Add and Operate Attachments Safely
Park and Prepare for Service Safely
Service Cooling System Safely
Remove Paint Before Welding or Heating
Make Welding Repairs Safely
Drive Metal Pins Safely
Handle Cab Door Safely—If Equipped
Clean Exhaust Filter Safely
Group 0003: Torque Values
Additional Metric Cap Screw Torque Values
Check Oil Lines And Fittings
Inch Series Four Bolt Flange Fitting For High Pressure Service Recommendations
Metric Bolt and Cap Screw Torque Values
O-Ring Face Seal Fittings With Metric Hex Nut and Stud End for High-Pressure Service Recommendations
O-Ring Face Seal Fittings With Metric Hex Nut And Stud End For Standard Pressure Service Recommendations
O-Ring Face Seal Fittings With SAE Inch Hex Nut and Stud End for High-Pressure Service Recommendations
Service Recommendations for 37° Flare and 30° Cone Seat Connectors
Service Recommendations for Flared Connections—Straight or Tapered Threads
Service Recommendations For Inch Series Four Bolt Flange Fittings
Service Recommendations for Metric Series Four Bolt Flange Fitting
Service Recommendations for O-Ring Boss Fittings
Unified Inch Bolt and Cap Screw Torque Values
Section 01: Tracks
Group 0130: Track System
Measure Rubber Track Height
Track Remove and Install
Track Roller Remove and Install
Drive Sprocket Remove and Install
Front or Rear Idler Remove and Install
Front Idler Yoke Assembly Remove and Install
Track Adjuster and Recoil Spring Assembly Remove and Install
Track Adjuster Recoil Spring Remove and Install
Track Adjuster Cylinder Disassemble and Assemble
Section 03: Transmission
Group 0315: Controls Linkage
Left and Right Joystick Remove and Install
Group 0325: Flywheel Coupler
Hub Coupler Remove and Install
Group 0360: Hydraulic System
Hydraulic/Hydrostatic Component Failure Cleanup Procedure
Hydrostatic and Hydraulic Start-Up Procedure
Hydrostatic Motor and Park Brake Repair
Hydrostatic Motor and Park Brake Remove and Install
Hydrostatic Motor and Park Brake Disassemble and Assemble
Hydrostatic Pump Remove and Install
Hydrostatic Pump Disassemble and Assemble
Charge Pump Remove and Install
Park Brake Solenoid Valve Remove and Install
Section 04: Engine
Group 0400: Removal and Installation
John Deere Engine
Engine Remove and Install
Engine Cradle Remove and Install
Starter Motor Remove and Install
Accessory Drive Belt Tensioner Remove and Install
Damper Plate Remove and Install
Compressor Bracket Remove and Install
Engine Oil Dipstick Tube Remove and Install
Section 05: Engine Auxiliary System
Group 0510: Cooling Systems
Fan Remove and Install
Radiator Remove and Install
Cooling Package Remove and Install
Cooling Package Disassemble and Assemble
Group 0520: Intake System
Air Cleaner Remove and Install
Charge Air Cooler Remove and Install
Group 0530: External Exhaust Systems
Exhaust Tube Remove and Install
Diesel Particulate Filter (DPF) Remove and Install
Exhaust Filter Remove and Install
Group 0560: External Fuel Supply Systems
Fuel Tank Remove and Install
Low-Pressure Fuel Pump Remove and Install
Primary Fuel Filter and Water Separator Assembly Remove and Install
Final Fuel Filter Assembly Remove and Install
Section 16: Electrical System
Group 1600: Removal and Installation
Installation of Repair Wire Assembly (RWA)
Engine Control Unit (ECU) Remove and Install
Hydraulic Control Unit (HCU) Remove and Install
Engagement and Monitor Unit (EMU) Remove and Install
Joystick Controller Remove and Install
Joystick Disassemble and Assemble
Control Panel Remove and Install
Backup Alarm Remove and Install
Battery Remove and Install
Motor Speed Sensor Remove and Install
Replace (Pull Type) Metri-Pack™ Connectors
Replace (Push Type) Metri-Pack™ Connectors
Replace Metri-Pack™ Connectors
Replace WEATHER PACK WEATHER PACK is a trademark of Packard Electric. Connector
Install WEATHER PACK WEATHER PACK is a trademark of Packard Electric. Contact
Replace DEUTSCH DEUTSCH is a trademark of Deutsch Co. Rectangular or Triangular Connectors
Replace DEUTSCH DEUTSCH is a trademark of the Deutsch Co. Circular Connectors
Replace DEUTSCH DEUTSCH is a trademark of the Deutsch Co. Connectors
Install DEUTSCH DEUTSCH is a trademark of the Deutsch Co. Contact
Replace CINCH™ Connectors
Install CINCH™ Contact
Repair 32 and 48 Way CINCH™ Connectors
Remove Connector Body from Blade Terminals
Section 17: Frame or Supporting Structure
Group 1740: Frame Installation
Welding on Machine
Bumper Remove and Install
Raising and Blocking Machine
Section 18: Operator's Station
Group 1800: Removal and Installation
Operator's Station Remove and Install
Group 1810: Operator Enclosure
Cab Door Remove and Install
Top Window Remove and Install
Rear Window Remove and Install
Side Window Remove and Install
Raising Operator’s Station
Group 1821: Seat and Seat Belt
Seat Remove and Install
Seat Belt Remove and Install
Interlocking Seat Bar Remove and Install
Seat Air Spring Remove and Install
Group 1830: Heating and Air Conditioning
Refrigerant Cautions and Proper Handling
R134a Refrigerant Oil Information
R134a Refrigerant Recovery, Recycling, and Charging Station Installation Procedure
Recover R134a Refrigerant
Flush and Purge Air Conditioner System
Evacuate R134a System
Charge R134a System
Air Conditioner Compressor Remove and Install
Expansion Valve Remove and Install
Receiver-Dryer Remove and Install
Condenser Remove and Install
Air Conditioner and Heater Remove and Install
Evaporator Remove and Install
Blower Fan Remove and Install
Heater Core Remove and Install
Section 19: Sheet Metal and Styling
Group 1910: Hood or Engine Enclosure
Footwell Remove and Install
Engine Cover Remove and Install
Rear Door Remove and Install
Section 20: Safety and Convenience
Group 2001: Radio
Radio Antenna Remove and Install
Section 21: Main Hydraulic System
Group 2160: Hydraulic System
General Oil Cleanup Procedure
Hydraulic/Hydrostatic Component Failure Cleanup Procedure
Hydraulic Oil Cooler Remove and Install
Hydraulic Oil Reservoir Remove and Install
Hydraulic Pump Remove and Install
Hydraulic Pump Disassemble and Assemble
Hydraulic Oil Cooler Bypass Valve Remove and Install
Section 31: Loader
Group 3104: Attachment Coupler
Quik-Tatch™ Coupler Remove and Install
Quik-Tatch™ Actuator Remove and Install
Group 3140: Frame
Upper Boom Link Remove and Install
Lower Boom Link Remove and Install
Boom Remove and Install
Boom Lock Remove and Install
Boom Lock Disassemble and Assemble
Boom Lock
Group 3160: Hydraulic System
Control Valve Remove and Install
Control Valve Disassemble and Assemble
Self Leveling Valve Remove and Install
Ride Control Accumulator Remove and Install
Ride Control Valve Remove and Install
Boom Cylinder Remove and Install
Bucket Cylinder Remove and Install
Hydraulic Cylinder Disassemble and Assemble
Hydraulic Oil Filter Manifold Remove and Install
Hydraulic Cylinder Bleed Procedure
Section 99: Dealer Fabricated Tools
Group 9900: Dealer Fabricated Tools
ST4920 Track Recoil Spring Disassembly and Assembly Tool
DFT1087 Track Recoil Spring Disassembly and Assembly Guard Tool
DFT1325 Solenoid Power Harness
DFT1358 Engine Lifting Bracket
DFT1359 Engine Lifting Bracket
DFT1380 Lift Bracket
JT38077 Boom Pin Driver
John Deere 317G Compact Track Loader Repair Service Manual (TM13854X19)