UV Deformer
Introducing UV Deformer
Unlock precise, intuitive UV deformation!
If you've ever struggled with tweaking UV maps to get textures just right, UV Deformer is here to make it way easier. This handy add-on lets you warp and adjust UVs using simple lattice grids right in the UV Editor.
It's great for fixing distortions, adjusting selections, or getting those precise layouts right.
Key Features
- Multi-Instance Support: Manage multiple lattices per mesh, each targeting specific UV selections for layered deformations.
- Interactive Modal Mode: Enter "Warp Mode" for real-time manipulation. Hover, select, and drag control points.
- Multi-Select Points: Ctrl + Click to toggle selection of multiple lattice points, then drag them together for synchronized adjustments.
- Dynamic Resolution: Easily change U/V grid resolutions (2-10) on the fly, with automatic interpolation to preserve your deformations.
- Lattice Management: Toggle visibility, delete, or confirm (bake) individual lattices directly from the UV Editor sidebar.
- Real-Time Deformation: Smooth bilinear interpolation updates UVs instantly as you edit, with undo support and original UV restoration on cancel.
- User-Friendly Panel: Accessible in the UV Editor's N-panel under "Tool," with simple controls for adding and managing lattices.
- Customizable Visuals: Personalize colors for selected points, hover states, normal points, and grid lines via the add-on's preferences panel.
UV Deformer Add-on Documentation
Overview
UV Deformer is a Blender add-on that provides a multi-instance lattice deformer. It allows users to deform UV maps using a lattice grid in the UV Editor, supporting multiple lattices per mesh, point selection, and interactive deformation. This is useful for precise UV adjustments, such as warping textures or correcting distortions.
Installation
- Download the uvdeformer_v0_1.zip
- In Blender, go to Edit > Preferences > Add-ons.
- Click Install from disk and select the file.
- Enable the add-on by searching for "UV Deformer" and checking the box.
- The panel will appear in the UV Editor's sidebar (N-panel) under the "Tool" tab.
- Customize visuals in Edit > Preferences > Add-ons > UV Deformer (expand for color and line width settings).
Usage
UV Deformer operates in the UV Editor while in Edit Mode for a mesh object.
1. Entering Warp Mode
- In the UV Editor sidebar (N-panel) > UV-Deformer panel, click Enter Warp Mode.
- This activates the modal operator, enabling interactive lattice manipulation.
- A draw handler will display lattices and control points in the UV Editor.
- While in Warp Mode:
- Use mouse to hover and interact.
- ESC: Exits the modal
- ENTER or RETURN: Confirm and exit, keeping changes (but lattices remain until confirmed individually).
- Note: The modal must be active to manipulate lattices. Exiting Warp Mode stops interaction but preserves lattices.
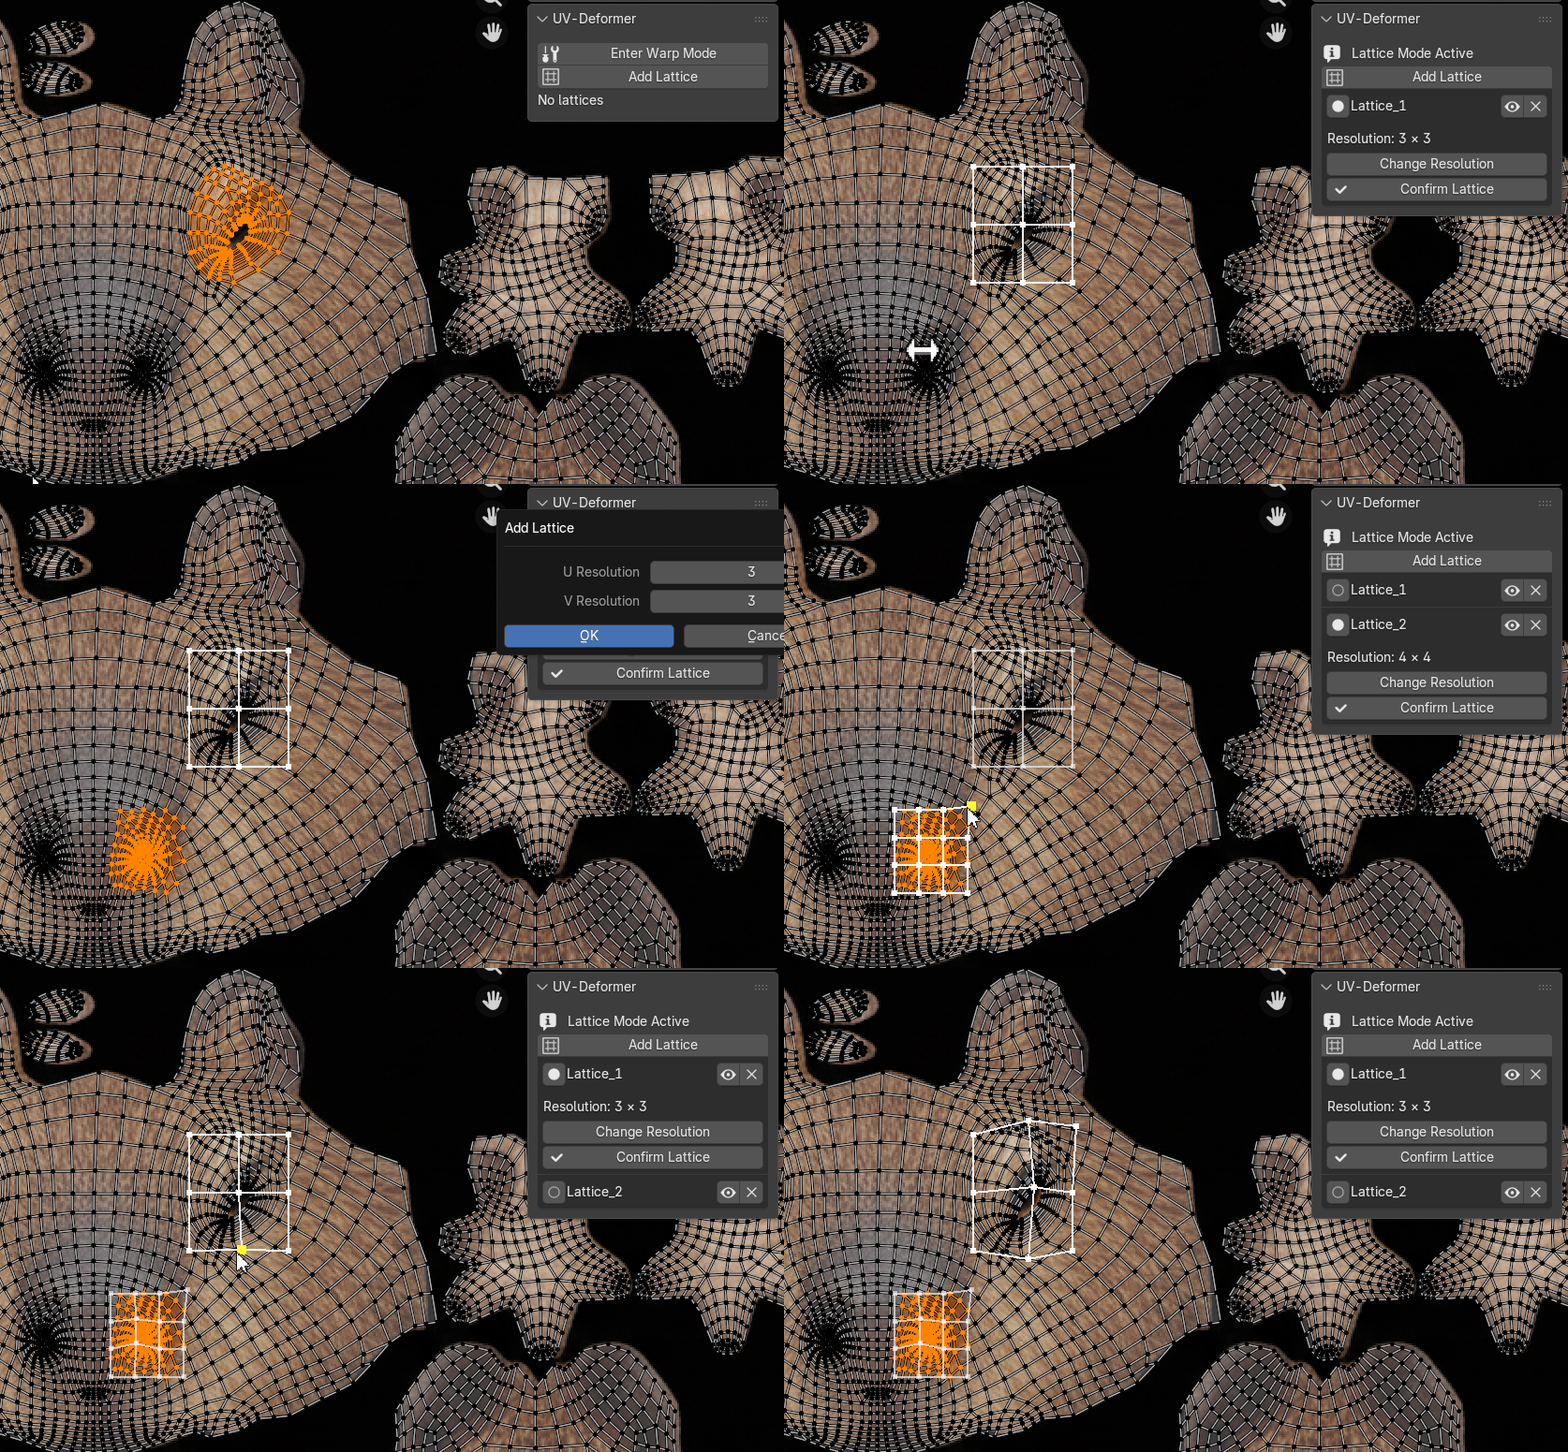
2. Adding a Lattice
- In the UV-Deformer panel, click Add Lattice.
- A dialog will prompt for U Resolution (horizontal divisions, default 3, min 2, max 10) and V Resolution (vertical divisions).
- The lattice is created based on the currently selected UV vertices.
- The new lattice appears as a grid overlay in the UV Editor.
- It captures the bounding box of selected UVs and initializes control points uniformly.
- The lattice is added to the list in the panel, and it becomes active by default.
3. Manipulating the Lattice
- Selection:
- Hover over a control point (turns to hover color, default yellow).
- Ctrl + Left Click: Toggle selection (adds/removes from multi-selection; selected points turn to selected color, default green).
- Deformation:
- Left Click (without Ctrl) on a point: Start dragging.
- If points are selected, all selected points move together.
- If none selected, only the clicked point moves.
- Drag to deform; the UVs update in real-time.
- Cancel Drag:
- Right Click during drag: Reset the current drag to original positions.
- Hover and Visuals:
- Normal color (default red): Unselected points.
- Hover color (default yellow): Hovered.
- Selected color (default green): Selected.
- Grid color (default black): Lattice lines.
- Line width (default 1.0): Thickness of grid lines.
- Active lattice has full opacity; inactive ones are semi-transparent.
- Customize all colors and line width in add-on preferences (Edit > Preferences > Add-ons > UV Deformer).
- Resolution Change:
- For the active lattice, click Change Resolution in the panel.
- Adjust U and V in the dialog.
- The lattice resamples control points while preserving deformation.
- Selection is reset after change.
4. Managing Lattices
- The panel lists all lattices:
- Radio button: Select/activate the lattice.
- Eye icon: Toggle visibility (hides/shows the grid and points).
- X icon: Delete the lattice (removes without baking).
- Confirming the Lattice:
- For the active lattice, click Confirm Lattice.
- Bakes the deformation permanently to the UVs.
- Removes the lattice from the list.
- Lattices store original UVs, allowing restores on cancel.
5. Exiting and Best Practices
- Exit Warp Mode via ENTER or ESC
- To bake all changes: Confirm each lattice individually.
- Performance: High resolutions (e.g., 10x10) may slow down on large UV selections due to real-time updates.
- Undo: The add-on supports Blender's undo (Ctrl + Z).
- Customization: Adjust visual colors and line width in add-on preferences to match your theme or preferences.
- Troubleshooting:
- If no deformation occurs: Ensure UVs are selected when adding lattice and modal is active.
- If draw handler fails: Restart Blender or re-run the script.
Limitations
- Works only in UV Editor for meshes.
- Lattices are stored in memory (global store); they reset on Blender restart unless saved in a .blend.
- Max resolution 10x10 to prevent performance issues.
Please contact me if any errors persist through the Payhip inbox or email: animationsvfx@gmail.com


