
John Deere 1700 Series 1700 1710 1720 1730 1750 1780 Drawn & Integral Planters Repair Service Technical Manual (TM124719) - MJODTM124719.zip
A full workshop service and repair manual covering John Deere 1700 Series Drawn & Integral Planters — Models 1700, 1710, 1720, 1730, 1750, and 1780 — containing every piece of shop data needed to maintain, troubleshoot, and rebuild these machines just as a trained technician would.
Inside the John Deere 1700 Series Drawn & Integral Planters Models 1700, 1710, 1720, 1730, 1750, 1780 repair (technical) manual, you'll find:
* Numbered table of contents easy to use so that you can find the information you need fast.
* Detailed sub-steps expand on repair procedure information
* Numbered instructions guide you through every repair procedure step by step.
* Notes, cautions and warnings throughout each chapter pinpoint critical information.
* Bold figure number help you quickly match illustrations with instructions.
* Detailed illustrations, drawings and photos guide you through every procedure.
* Enlarged inset helps you identify and examine parts in detail.
tm124719 - 1700 Series Drawn and Integral Planters (S.N. 740101—XXXXXX) Repair Technical Manual.pdf
tm124719 - 1700 Series Drawn and Integral Planters (S.N. 740101—XXXXXX) Repair Technical Manual.epub
PRODUCT DETAILS:
Total Pages: 1,102 pages
File Format: PDF/EPUB/MOBI/AZW (PC/Mac/Android/Kindle/iPhone/iPad; bookmarked, ToC, Searchable, Printable)
Language: English
MAIN SECTIONS
Foreword
General
Safety
Lubricants
General Information
Vacuum System
Vacuum System
Central Commodity System
Seed Tanks and Manifolds
Seed Delivery Hose
Central Commodity System Fan
Planting Units
MaxEmerge Plus™ / MaxEmerge XP™ Vacuum Seed Meters
MaxEmerge Plus™ / MaxEmerge XP™ Plateless Seed Meters
MaxEmerge XP Twin Row™ Vacuum Seed Meters
PRO-SERIES™ / Pro-Series XP™ / Pro-Series XP™ Twin Row Vacuum Seed Meters
PRO-SERIES™ / Pro-Series XP™ Plateless Seed Meters
Seed Openers
Closing Wheels
Row Tillage
Insecticide/Herbicide Meter
Mechanical Row Unit Down Force
Pneumatic Row Unit Down Force
Electrical
Connector Repair
Sensors and Switches
Lighting repair
Drives
Specifications
Seed Drive Transmission
Clutch
Countershaft, Drillshaft and Jackshaft
Fertilizer Drive
Dry Fertilizer
Liquid Fertilizer
Variable Rate Drive
Frames
Repair and Welding
Wheel Module Repair
Lift Assist
Row Marker
Hydraulics
General Information
Motors
Master Cylinder
Wheel Cylinders
Marker Cylinders
1710 Vertical Fold Cylinders
1720, 1720 CCS, and 1720 CCS Twin Row Fold and Wing Lift Cylinders
1720 CCS and 1720 CCS Twin Row Lift Assist Cylinders
Valves
PTO Pump
Quik-FillQuik-Fil™ Hydraulic System-Dry Fertilizer
Miscellaneous
Polyethylene Tank Repair
Dealer Fabricated Tools
tm124719 - 1700 Series Drawn and Integral Planters (S.N. 740101—XXXXXX)Repair
Table of Contents
Foreword
Section 10: General
Group 05: Safety
Recognize Safety Information
Understand Signal Words
Handle Fluids Safely—Avoid Fires
Prepare for Emergencies
Avoid Harmful Asbestos Dust
Practice Safe Maintenance
Avoid High-Pressure Fluids
Service Accumulator Systems Safely
Park Machine Safely
Support Machine Properly
Wear Protective Clothing
Use Steps and Handholds Correctly
Handle Agricultural Chemicals Safely
Avoid Contact with Agricultural Chemicals
Clean Vehicle of Hazardous Pesticides
Work in Clean Area
Service Machines Safely
Work In Ventilated Area
Illuminate Work Area Safely
Replace Safety Signs
Use Proper Lifting Equipment
Remove Paint Before Welding or Heating
Servicing Electronic Control Units
Welding Near Electronic Control Units
Keep Electronic Control Unit Connectors Clean
Keep Electronic Control Unit Connectors Clean
Avoid Heating Near Pressurized Fluid Lines
Service Tires Safely
Use Proper Tools
Construct Dealer-Made Tools Safely
Dispose of Waste Properly
Live With Safety
Group 10: Lubricants
Grease
Gear Oil
Alternative and Synthetic Lubricants
Lubricant Storage
Group 15: General Information
Unauthorized Modifications
Sealants and Adhesives Cross-Reference Chart
Metric Bolt and Screw Torque Values
Unified Inch Bolt and Screw Torque Values
O-Ring Boss Fitting Torque Chart
Face Seal Fittings Assembly and Installation—All Pressure Applications
Metric Face Seal Fitting Torque Chart—Standard Pressure Applications
SAE Face Seal Fitting Torque Chart—Standard Pressure Applications
External Hexagon Port Plug Torque Chart
Service Recommendations For 37° Flare and 30° Cone Seat Connectors
Identification Plate
Serial Numbers
Specifications — 1700, 1700 Twin Row, 1710, and 1730
Specifications — 1720, 1720 CCS, and 1720 CCS TwinRow
Specifications — 1750 and 1780
Section 20: Vacuum System
Group 05: Vacuum System
Essential or Recommended Tools
Other Material
Specifications
Adjust Vacuum Gauge
Check Row Vacuum — MaxEmerge Row Units
Check Row Vacuum — Pro-Series Row Units
Vacuum Manifold Blower System
Clean Vacuum Manifold System
Repair Vacuum Monitoring Assembly
Repair Vacuum Monitoring Assembly —Two Vacuum Gauges
Repair Vacuum Monitoring Assembly with SeedStar™
Remove and Install Vacuum Blower Assembly (S.N. —715100)
Remove and Install Vacuum Blower Motor (S.N. —715100)
Remove and Install Vacuum Blower Motor (S.N. 715101—)
Section 25: Central Commodity System
Group 05: Seed Tanks and Manifolds
Other Material
Specifications
Service Parts Kits
Remove and Install Central Commodity Seed Tank
Remove and Install Refuge Plus Third Tank
Tank Repair
Seal Central Commodity System Tanks To Prevent Water Leakage
Remove and Install Seed Agitator Motor Assembly
Remove and Install Seed Delivery Manifold Seal
Remove and Install Seed Delivery Manifold Nozzle
Repair Central Commodity System Seed Tank Manifold (with Steel End Plates)
Repair Central Commodity System Seed Tank Manifold (with Plastic End Plates)
Remove and Install Seed Tank Lid Ring and Seal
Group 10: Seed Delivery Hose
Other Material
Remove and Install Seed Delivery Hose
Repair Seed Delivery Hose
Group 15: Central Commodity System Fan
Specifications
Remove and Install Central Commodity System Blower Fan (S.N. —715100)
Remove and Install Central Commodity System Blower Fan (S.N. 715101—)
Repair Central Commodity System Blower Fan Assembly (S.N. —715100)
Repair Central Commodity System Blower Fan Assembly (S.N. 715101—)
Section 30: Planting Units
Group 05: MaxEmerge Plus™ / MaxEmerge XP™ Vacuum Seed Meters
Essential or Recommended Tools
Other Material
Specifications
Remove MaxEmerge Plus and MaxEmerge XP Vacuum Meter
MaxEmerge Plus and MaxEmerge XP Vacuum Meter Field Test
MaxEmerge Plus and MaxEmerge XP Vacuum Seed Meter Exploded View
Repair MaxEmerge Plus and MaxEmerge XP Vacuum Meter
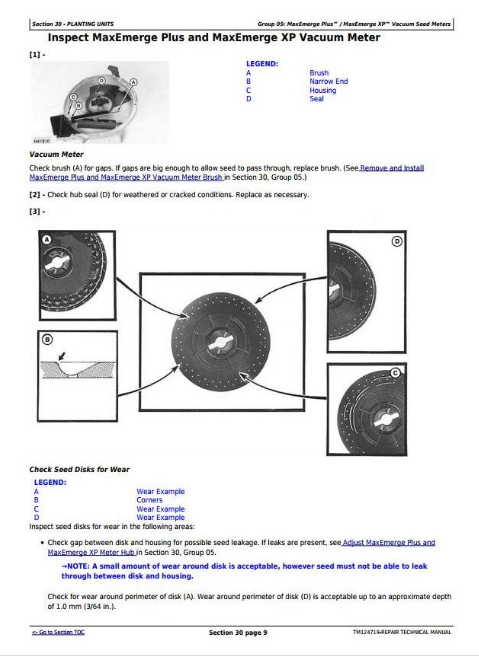
Inspect MaxEmerge Plus and MaxEmerge XP Vacuum Meter
Remove and Install MaxEmerge Plus and MaxEmerge XP Vacuum Meter Brush
Adjust MaxEmerge Plus and MaxEmerge XP Vacuum Meter Baffle
Inspect Seed Disk
Adjust MaxEmerge Plus and MaxEmerge XP Meter Hub
Remove and Install MaxEmerge Plus and MaxEmerge XP Vacuum Meter Seal
Install Knockout Assembly
Install Double Eliminator for ProMax 40, Small Sweet Corn, or Edible Bean Disks
Install Seed Disk
Repair MaxEmerge XP Pro-Shaft Drive
Adjust MaxEmerge XP™ Pro-Shaft Drive-to-Meter Alignment
Remove and Install RowCommand Row Unit Clutch with Chain Drive
Adjust Chain Drive-to-Meter Drive Alignment
Group 10: MaxEmerge Plus™ / MaxEmerge XP™ Plateless Seed Meters
Specifications
Finger Pick-Up Exploded View
Inspect Finger Pick-Up
Remove and Install Finger Pick-Up
Disassemble Feed Cup
Assemble Feed Cup
Install Feed Cup
Disassemble Radial Bean Meter
Assemble Radial Bean Meter
Group 15: MaxEmerge XP Twin Row™ Vacuum Seed Meters
Essential or Recommended Tools
Other Material
Remove and Install MaxEmerge XP Twin Row Vacuum Meter
Disassemble and Assemble MaxEmerge XP Twin Row Vacuum Seed Meter
Remove and Install MaxEmerge XP Twin Row Vacuum Meter Seal
Remove and Install MaxEmerge XP Twin Row Seed Disk
Inspect MaxEmerge XP Twin Row Vacuum Meter
Install Knockout Assembly
Remove and Install MaxEmerge XP Twin Row Vacuum Meter Brush
Adjust MaxEmerge XP Twin Row Vacuum Meter Baffle
Adjust MaxEmerge XP Twin Row Meter Hub
Install MaxEmerge XP Twin Row Dust Seal
Install Double Eliminator for ProMax 40, Small Sweet Corn, or Edible Bean Disks
Replace Pro-Shaft Drive
Group 20: PRO-SERIES™ / Pro-Series XP™ / Pro-Series XP™ Twin Row Vacuum Seed Meters
Essential or Recommended Tools
Other Material
Specifications
PRO-SERIES™ / Pro-Series XP™ Row Unit Vacuum Seed Meter Exploded View
Remove and Install PRO-SERIES, Pro-Series XP, and Pro-Series XP Twin Row Vacuum Meter Seal
Remove and Install PRO-SERIES, Pro-Series XP, and Pro-Series XP Twin Row Vacuum Meter
Remove and Install PRO-SERIES, Pro-Series XP, and Pro-Series XP Twin Row Seed Disk
Remove and Install Double Eliminator Plate
Repair PRO-SERIES, Pro-Series XP, and Pro-Series XP Twin Row Vacuum Meter
Inspect PRO-SERIES, Pro-Series XP, and Pro-Series XP Twin Row Vacuum Meter
Remove and Install Knockout Assembly
Remove and Install PRO-SERIES, Pro-Series XP, and Pro-Series XP Twin Row Vacuum Meter Brush
Adjust PRO-SERIES, Pro-Series XP, and Pro-Series XP Twin Row Meter Hub
Install Dust Seal
Adjust Meter Latch
Repair Pro-Shaft Drive
Group 25: PRO-SERIES™ / Pro-Series XP™ Plateless Seed Meters
Specifications
Finger Pick-Up Meter Exploded View
Inspect Finger Pick-Up Meter
Disassemble and Assemble Finger Pick-Up Meter
Radial Bean Meter Exploded View
Disassemble Radial Bean Meter
Assemble Radial Bean Meter
Group 30: Seed Openers
Essential or Recommended Tools
Other Material
Specifications
MaxEmerge Double Disk Opener Exploded View
PRO-SERIES Double Disk Opener Exploded View
MaxEmerge XP Runner Opener (S.N. 730101— ) Exploded View
ProRow and MaxEmerge XP Twin Row Double Disk Opener Exploded View
Remove and Install Seed Tube
Inspect and Adjust Seed Opener Blades
Replace Seed Opener Blades and Seed Tube Guard
Gauge Wheels— Exploded View (S.N. —710100)
Gauge Wheels—Exploded View (S.N. 710101—)
Gauge Wheel Bearing Replacement (S.N. —710100)
Gauge Wheel Bearing Replacement (S.N. 710101— )
Remove and Install Gauge Wheel Depth Adjusting Handle
Adjust Gauge Wheels
Replace Scrapers
Replace Heavy-Duty Scrapers
Replace Rigid Scrapers
Remove and Install Twin Row Parallel Arm Bushing — Upper
Remove and Install Twin Row Parallel Arm Bushing — Lower
Remove and Install Twin Row Front Rank Row Unit Lock
Remove and Install Twin Row Rear Rank Extension Bracket
Group 35: Closing Wheels
Other Material
Specifications
MaxEmerge™ Closing Wheels Repair
PRO-SERIES Closing Wheels Repair
Center Closing Wheels
Adjust Closing Wheel Spacing
Stagger Closing Wheels
Adjust Closing Wheel Down Force
Remove and Install Twin Row Closing Wheel Assembly
Disassemble and Assemble Closing Wheel (Rubber)
Group 40: Row Tillage
Other Material
Specifications
Adjust Coulter Bearing
Disassemble and Assemble Unit Mounted Row Cleaner Unit with Tapered Wheels
Remove and Install Floating Row Cleaner for Unit Mounted Coulter
Group 45: Insecticide/Herbicide Meter
Other Material
Specifications
Calibrate Insecticide/Herbicide Meter
Insecticide/Herbicide Meter Drive Alignment
Replace Pro-Shaft Drive
Group 50: Mechanical Row Unit Down Force
Specifications
Remove and Install Row Unit
Down Force Springs-Light Duty Non-Adjustable
Down Force Springs-Double, Light Duty Non-Adjustable
Remove and Install Heavy-Duty Down Force Spring Assembly
Repair Heavy-Duty Down Force Spring Assembly (Regular Parallel Arms)
Repair Heavy-Duty Down Force Spring Assembly (Long Parallel Arms)
Group 55: Pneumatic Row Unit Down Force
Other Material