

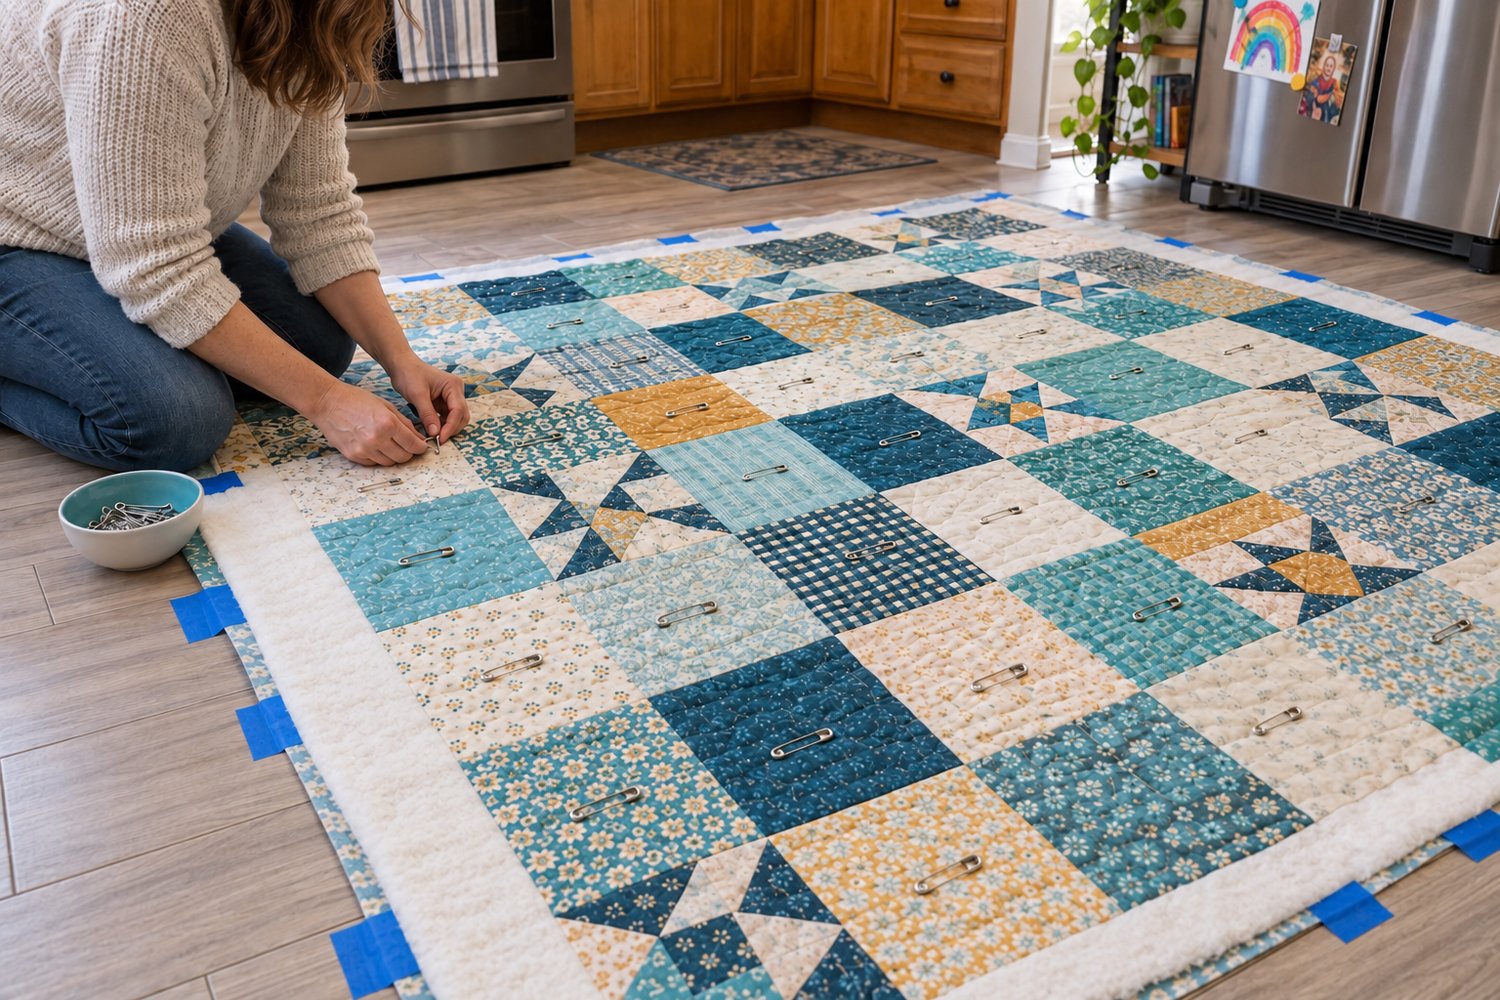
How to Sandwich a Quilt on the Floor When You Don’t Have a Large Table
I do not own a table large enough to sandwich a quilt.
What I do have is a kitchen floor—and three children—so you can probably imagine the condition of that floor on an average day. If you are picturing crumbs, sticky mystery spots, and at least one small toy waiting to injure an unsuspecting foot, you are picturing it correctly.
Frankly, needing to sandwich a quilt has become one of my most reliable reasons to mop.
If you also quilt in a real home rather than a pristine sewing studio, your floor may be the largest flat surface available. The good news is that you can successfully sandwich and baste a quilt on the kitchen floor. You do not need an enormous table, fancy equipment, or even curved quilting pins. I use ordinary large safety pins, and they work perfectly well.
Here is how I do it.
What Is a Quilt Sandwich?
A quilt sandwich consists of three layers:
- The quilt backing
- The batting
- The quilt top
Before quilting, the three layers must be smoothed and temporarily secured together. Careful basting keeps the layers from shifting and helps prevent wrinkles, folds, and puckers in the finished quilt.
The kitchen floor may not be glamorous, but it provides the large, flat surface this process requires.
Supplies for Sandwiching a Quilt on the Floor
You will need:
- A completed and pressed quilt top
- Quilt batting
- Quilt backing
- Painter’s tape
- Large safety pins
- Scissors
- A measuring tape or ruler
- A broom, vacuum, and mop—unfortunately
- Optional knee pad, folded towel, or gardening cushion
- Optional lint roller
Curved quilting pins are designed to be easier to close through multiple layers, but they are not essential. I use regular large safety pins because those are what I have. They may require a little more effort to fasten, but they hold the quilt layers together just fine.
Use what you have. Your quilt will not know the difference.
Step 1: Use the Quilt as Motivation to Clean the Floor
First, remove the chairs and anything else that might be in the way. Then sweep or vacuum thoroughly.
You may be tempted to decide that sweeping is enough. This is when you will notice the sticky spot under the table that has apparently been collecting historical evidence of every meal your children have eaten this week.
Go ahead and mop.
Allow the floor to dry completely before bringing out the quilt. Then inspect it for crumbs, pet hair, moisture, or small toys. A lint roller is helpful for catching anything the broom missed.
Is this the most dignified part of quiltmaking? No. Is my kitchen floor cleaner than it was yesterday? Yes.
Step 2: Prepare the Quilt Layers
Press the quilt top and backing before you begin. Wrinkles are much easier to remove now than after they have been pinned between the layers.
The batting and backing should extend approximately three to four inches beyond the quilt top on every side. This gives you some breathing room if the layers shift slightly during quilting.
If your backing is pieced, press its seams carefully. Check the back of the quilt top for loose threads, especially if you have light-colored fabric where darker threads might show through.
Step 3: Tape the Backing to the Floor
Place the backing on the clean, dry kitchen floor with the wrong side facing up.
Tape the center of each side to the floor with painter’s tape. Continue working toward the corners, adding tape every several inches.
You want the fabric to be smooth and secure, but do not pull it drum-tight. Stretching the backing can distort it. When the tape is removed, the fabric may contract and create puckers.
Run your hands over the backing to check for wrinkles. If you find one, lift the closest tape, smooth the fabric, and tape it down again.
Step 4: Add the Batting
Center the batting over the taped backing. Carefully unfold or unroll it so that you do not disturb the fabric underneath.
Smooth the batting from the center toward the edges. Use a light touch and avoid stretching it.
Make sure the backing is still visible around every edge of the batting. If your batting has deep fold lines, open it ahead of time and let it relax before assembling the quilt sandwich.
Step 5: Position the Quilt Top
Place the quilt top right side up over the batting.
Center it carefully and confirm that the batting and backing extend beyond it on all four sides. Smooth the quilt top outward from the center, checking that the borders and block seams remain straight.
This is also a good time to remove any child who has decided that the quilt is a picnic blanket, racetrack, or ideal place to lie down.
Step 6: Baste with Large Safety Pins
Begin pinning near the center of the quilt and work outward in sections. Place a large safety pin approximately every three to four inches.
Regular large safety pins work perfectly well for quilt basting. Curved pins can be easier to close, but there is no rule stating that you must own them before you are allowed to finish a quilt.
To make regular pins easier to use:
- Keep the layers flat as you insert each pin.
- Avoid lifting the quilt off the floor more than necessary.
- Close each pin as you go rather than leaving several open.
- Keep open pins in a small container so they do not scatter across the floor.
- Place pins a little closer together in areas that seem likely to shift.
Continue working from the center toward the edges. Do not crawl or step on an unbasted area because this can pull the quilt top out of position or create a fold in the backing.
A folded towel or gardening cushion under your knees makes this process significantly more pleasant.
Step 7: Check the Backing Before Removing the Tape
Before lifting the quilt, inspect the top for ripples, loose areas, or puckers.
Carefully release part of the painter’s tape and lift an edge so you can examine the backing. Check multiple areas, including the corners and center.
If you discover a fold, do not pretend you did not see it. I understand the temptation, especially after crawling around on the kitchen floor fastening dozens of safety pins. Unfortunately, the fold will still be there when you quilt over it.
Remove the nearby pins, smooth the layers, and pin that section again.
Once everything is secure, remove the remaining painter’s tape. Leave the extra batting and backing in place until the quilting is finished.
Common Floor-Basting Problems
My backing keeps wrinkling
The fabric may be taped unevenly or stretched too tightly. Release the tape around the problem area, smooth the fabric from the center outward, and secure it again without stretching.
My batting shifts when I smooth it
Use lighter pressure. Batting should be gently patted and smoothed rather than pulled.
My quilt top is not centered
Find the center of each layer before assembling the sandwich. You can gently fold each piece to locate the center or mark the center edges with clips.
The layers shift after I pick up the quilt
Use more safety pins. If you can easily place your whole hand between pins, they may be too far apart.
Regular safety pins are difficult to close
Work slowly and use large, sturdy pins. A spoon can also help lift the tip of the pin after it passes through the layers. Just be careful not to snag or damage the fabric.
A Few Tips for Protecting Your Knees and Sanity
Sandwiching a quilt on the floor works, but it is not particularly kind to your knees or back.
- Use a folded towel, knee pad, or gardening cushion.
- Start in the middle and work outwards. Work in sections and change positions regularly.
- Keep pins and tools in a container that moves with you.
- Take breaks during larger quilts.
- Keep children and pets out of the room until every pin has been accounted for.
- Count or carefully collect unused pins so none remain on the floor.
For a very large quilt, complete one reachable section at a time while regularly checking that all three layers remain aligned.
You Don’t Need a Perfect Sewing Studio
Would I enjoy owning a beautiful sewing studio with an enormous cutting table? Absolutely.
Do I currently sandwich quilts on the kitchen floor after clearing away evidence of three children and reluctantly mopping? Also yes.
Quilting in a home full of people often requires creativity before you ever begin choosing fabrics or arranging blocks. If your kitchen floor is the only surface large enough for your quilt, clean it, tape down the backing, and use the safety pins you already own.
You do not need curved pins or expensive equipment. You need three smooth layers, enough pins to keep them secure, and a willingness to spend some time crawling around on a freshly mopped floor.
As a bonus, you will end the day with both a basted quilt and a clean kitchen floor. I cannot promise the floor will stay clean, but the quilt will be ready for quilting.
Plan Your Next Quilt with Made to Learn
Use the Made to Learn Quilting Project Planner to organize your fabric choices, measurements, supplies, block construction, and quilting plans.
If you need help calculating backing, batting, borders, or binding, the Made to Learn Quilt Math Guide and Workbook can help you work out the numbers before your quilt reaches the kitchen-floor stage.
Made to Learn.
Learn to Make.