

Yep, I'm going to be another one of those designers who bangs on about gauge. Gauge in garments is absolutely vital. It's important that you understand why it's vital but also how you can use gauge to your advantage (or disadvantage).
It's easier if I give you examples. So I'm going to tell you about a design I've been working on for a couple of months. There's nothing overly fancy in it. I just wanted a comfortable jumper I could wear everywhere that includes some features for size inclusivity. So, it has short rows in the back of the neck, bust darts and an optional curved base (which I haven't done). I'm calling it the Andy Jumper after my Grandpa Andy who passed away this year after a full and happy life at the age of 98.
I've made two versions of the Andy Jumper. Here's the yarn stats for both:
- Fibre Arts Shed Donegal Nepp Sock Yarn, fingering weight undyed, 100g/400m, 85% superwash merino, 15% Donegal Nepp. This is the white yarn you can see in my photos.
- Raxor Yarns Raw Bamboo Sock, fingering weight (Australian 4 ply), 100g/400m, 80% superwash merino, 20% raw bamboo. This is the red yarn you can see in my photos.
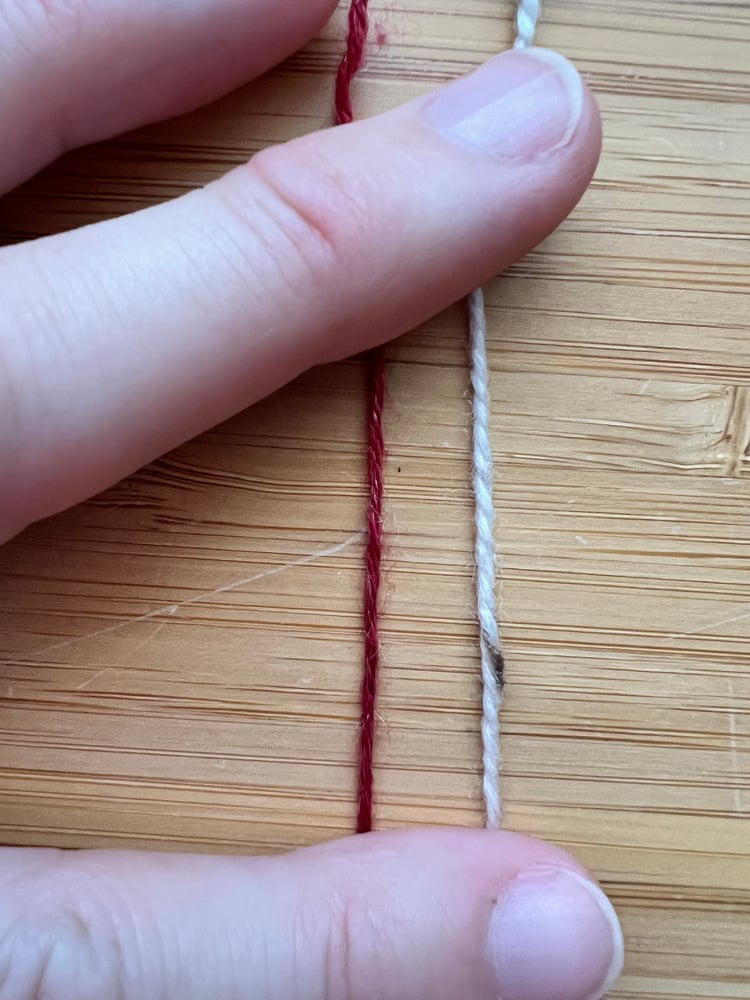
There's not a huge difference between the two here. The below photo is of leftovers of my yarn which have both been frogged, so they're a bit wiggly. I'm holding them out just to take out the wiggle.
When I look closely at the yarn, the white yarn seems a bit fuller. When I feel the yarns, the red yarn is the actual fuller one. The visual difference is all in the spinning. The yarn is spun tighter on the red yarn than it was on the white.
I'm not a technical yarn expert, but I also believe the inclusion of bamboo gives the red yarn a little more bulk than the merino/nepp mix.
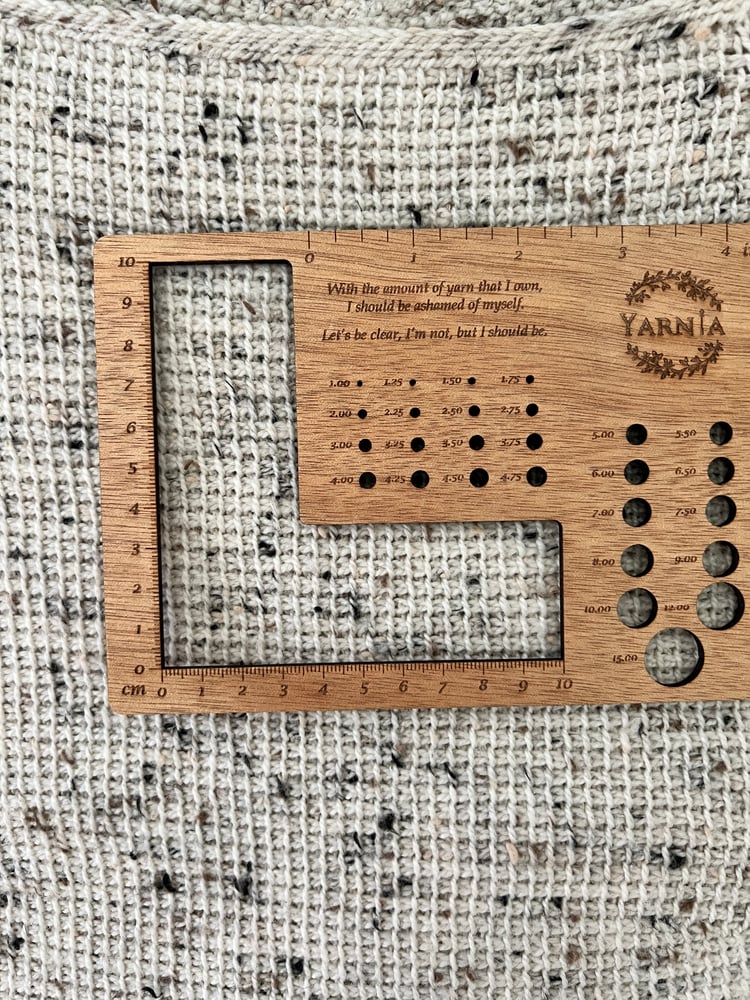
Ok, so my white version is my first prototype. I made a swatch (which I've since frogged so I can't show you). I ALWAYS make my swatches bigger than 10cm/4in square - always aim for at least another 50%, so my swatch was about 15cm/6in square. I measured the inner stitches and determined by BLOCKED gauge was 20 stitches wide by 19 rows high.
Merrily on my way I went. I graded my pattern as I stitched and have it all worked out for the different sizes including my own.
When I got near the end of my white jumper, I realised that it was a bit too tight on my hips. So I added increases at my hips so it flared out a little and sat better on my tummy and hips. Happy with that. Blocked it and wore it a few times. Sweet.
When I went to put some finishing touches on my pattern, I realised something.... my blocked jumper gauge is different to my blocked swatch. It's actually 21 stitches wide x 19 rows high. That's ok, I can make adjustments to my pattern to fix that.
What does all this tell you?
- My swatch wasn't big enough to be accurate. It lied!
- My stitches were tighter when working my jumper compared to my swatch.
- 1 stitch in 10cm difference isn't that big a deal, is it? Well.... two stitches equals 1 cm. and I did that 5 times. It means my jumper is about 5cm narrower than I wanted it to be. And it's the reason why I needed the hip adjustment. My torso measurement should be 99cm all the way around. It's actually 95cm.
All of this I can live with and I know why it happened.
I put all that out of my mind and a few weeks later, I was looking for another project to make and I found a red jumper hanging in my sample cupboard that I've never worn because everything was wrong with it. So I frogged the entire thing and decided I'd do another sample using that reused yarn, of my Andy jumper.
AND I DIDN'T SWATCH....
Different yarn, same hook used as the white jumper (5.5mm), same pattern. Abbey, you say, you have lectured me over and over again, to ALWAYS SWATCH. Hey, guess what, I'm human. I get excited about new projects too and a little over-confident!
I finished my red jumper and noticed before I blocked it that it was a bit bigger already than my white one.
Here's an Instagram post of it pre-blocked.
I'd had an inkling while I was making it that it was bigger and I was happy about this because I wanted something a bit more roomy and comfortable. I blocked it this week and left it to dry for several days. I had to pin down the openings to eliminate the curl but I didn't stretch or pull the jumper at all.
Here's an Instagram post of it post-blocked.
I'm really happy with it. I know it's a bit baggy, more roomy than my usual jumpers. This is without layering though. I want it to accomodate a long sleeve t-shirt under it in the winter time so I'm extra snug, and who doesn't love a jumper that you're just so comfy in!?
But let's work out the thing about gauge. I'll show you in photos.
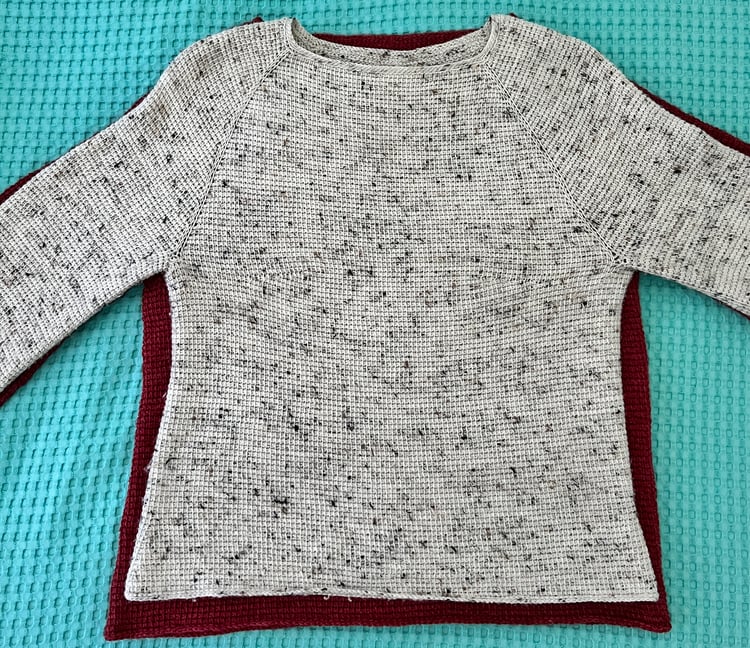
It's very clear that the white one is narrower than the red one. Ignore the length as I deliberately added rows to the red one. You can see where the white one flares out at the hip.
What I want to draw your attention to, is the extra width under the armpit. The bust measurement of the red one is 102cm compared to the bust measurement of the white one, 95cm.
Each has the same number of stitches. I made the same size with the same bust darts. I used the same hook and followed the same pattern. What's different? The gauge.
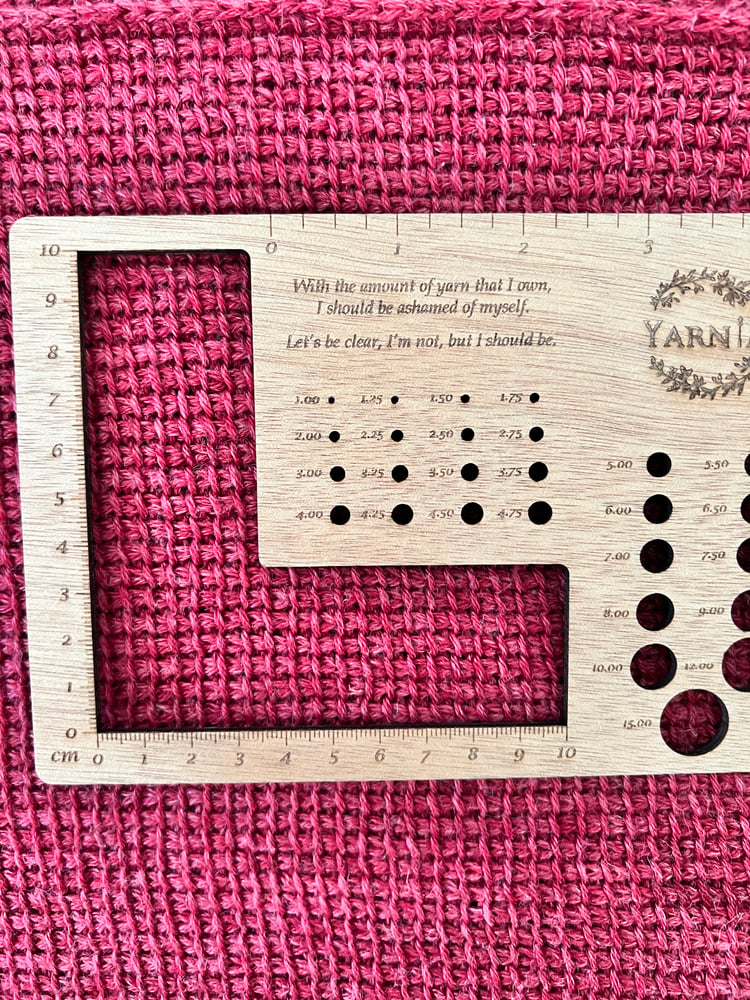
Turns out the blocked gauge on my red jumper is 19 stitches across by 19 rows high per 10cm/4in. What does this mean? It means the same number of stitches take up more width in the red yarn versus the white yarn.
If I had swatched the red yarn to meet my pattern gauge, I would have needed to go down a hook size, or maybe 2. But, I can tell you that I wouldn't have done that because the texture of this jumper would have been awful. I would have run out of yarn around my belly button and the drape would have not been good.
I could see this as a disaster, or I could embrace the fact I have two jumpers, both that fit me, both I like and will wear regularly. In terms of pattern writing and designing, I have some adjustments to make. I'm going to re-grade this pattern based on the 19 stitches per 10cm/4in rule.
Rules to achieve the pattern gauge
- The swatch must be at least 50% bigger than the area to be measured. If the pattern says it's a 10cm/4in square, your swatch needs to be at least 15cm/6in square.
- Use the same hook you intend to use in the garment making.
- Measure your swatch, stitches and rows per 10cm/4in BEFORE you block it. Write those stats down.
- Block the swatch as you would intend to wash your garment. Don't just steam a swatch. Some designers will say you can. But will you ever wash your jumper? Of course you will! Wash your swatch.
- Don't stretch your swatch out too much. You want to mimic your jumper fabric. Are you going to pull the crap out of your jumper? No? Don't pull the crap out of your swatch. You can pin your swatch down to achieve neat edges and eliminate curl but avoid pulling too much.
- Let the swatch dry completely. 12-24 hours is best. Don't measure the blocked swatch until it has fully dried and has been unpinned. The yarn will relax.
Why measure the unblocked swatch? So you can check your unblocked gauge while you make your garment. Does it match? Does it not match? Why? You might be stressed. Your tension can change over the life of a garment, I've done it!
What else might you want to know? Well, even though designers talk about meeting gauge exactly, you can be strategic with gauge. Say you want to make a jumper that is in between two sizes in the pattern. If you happened to deliberately make your jumper in a slightly different gauge, you could achieve this! It takes practice and experience to get it right. You may have to adjust other things along the way and you may have to frog if it doesn't work out. But if you're like me and you like a bit of a puzzle to solve, you could give this a go.
Tian Connaugthon wrote a book 'Cardigans For Every Body' which has step by step instructions on how to play with gauge to ensure your garments fit. It's a crochet book, but in my view, the principles can be applied to any knit, crochet or tunisian crochet garment. You can find out more about it on her website here. I've played with her concepts recently and was successful!
Comments ()