

# The Best Bandsaw Blades and Stock Prep for Smooth Bandsaw Boxes
You can have the most beautiful piece of figured curly maple in the world, but if your bandsaw setup isn't dialed in, cutting a bandsaw box can quickly become an exercise in frustration.
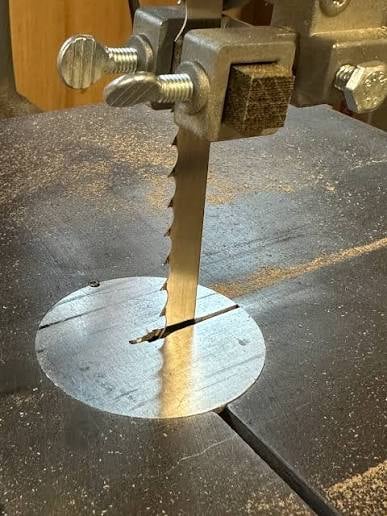
Bandsaw boxes place unique demands on your saw: you are cutting through 3.5 to 4.5 inches of dense hardwood, maneuvering around tight radiuses, and relying on a narrow blade that must stay perpendicular to the table throughout the entire cut.
In this guide, we break down the ideal **bandsaw blades for bandsaw boxes**, how to tune your saw to prevent drift, and the best practices for preparing solid and laminated stock for rock-solid results.
---
## Choosing the Right Bandsaw Blade
When setting up your saw for box making, three blade specifications dictate your cut quality: **width**, **tooth pitch (TPI)**, and **tooth pattern**.
### 1. Blade Width: The Sweet Spot
The width of your blade determines how tight a curve you can cut without binding:
- **1/8-inch Blade:** Unbeatable for tiny, intricate scrollwork and sub-1/4-inch radius cuts. However, a 1/8-inch blade lacks beam strength; when cutting through a 4-inch tall hardwood block, it can easily deflect or bow inside the wood, creating concave or slanted drawer walls.
- **3/16-inch Blade (The Gold Standard):** For most medium-sized bandsaw boxes (like those in our [Stuff That Works Payhip catalog](https://payhip.com/b/EFgd0)), a high-quality 3/16-inch blade is the undisputed sweet spot. It provides enough beam rigidity to prevent barrel cuts in 4-inch stock while comfortably executing 5/16-inch turning radiuses.
- **1/4-inch Blade:** Excellent for larger, flowing contemporary boxes with broader curves. It tracks exceptionally straight through tall blanks, but you must plan your turn radiuses accordingly.
### 2. Teeth Per Inch (TPI)
Cutting a bandsaw box is essentially a resawing operation along continuous curves.
- **Too Few Teeth (3–4 TPI):** Cuts quickly and clears sawdust easily, but leaves severe kerf chatter that requires hours of aggressive sanding inside the box cavity.
- **Too Many Teeth (14–18 TPI):** Produces a glass-smooth surface on thin stock, but gullets pack with dust in 4-inch deep hardwood cuts, causing friction, heat buildup, and scorched wood.
- **The Ideal TPI (6–10 TPI):** A 6-TPI or 8-TPI skip-tooth or regular-tooth blade provides clean evacuation of sawdust in deep cuts while leaving a manageable surface that cleans up quickly with 100-grit sandpaper.
---
## Dialing in Bandsaw Tracking and Tension
Before making your primary cuts, take 10 minutes to run through these critical checks:
1. **Tension Properly:** Modern silicon-steel or carbon-steel thin-kerf blades need adequate tension to resist lateral bowing. Use the saw’s gauge as a starting point, then test blade deflection with your finger: with the saw unplugged and guides backed off, the blade should deflect no more than 1/8 inch under moderate sideways thumb pressure.
2. **Guide Bearing Alignment:** Bring your upper and lower thrust bearings to within 1/64 inch (the thickness of a folded dollar bill) behind the blade back. Set your side guides just behind the tooth gullets so you don’t pinch or dull the blade’s set.
3. **Check for Table Square:** Use a reliable engineer's square against the blade body (avoiding the teeth) and verify that the table is dead square at 90 degrees. Even a 1-degree tilt will produce slanted drawer cavities that won't slide smoothly.
---
## Stock Preparation: The Art of the Laminated Blank
While finding 16/4 (4-inch thick) kiln-dried solid hardwood is possible, laminating your own blanks from 4/4 (3/4-inch net) or 8/4 lumber offers major advantages:
- **Better Stability:** Multiple laminated boards are less prone to seasonal cupping or internal tension release during deep cuts.
- **Creative Contrast:** Alternating dark woods (black walnut) with light woods (hard maple) or reddish tones (cherry, padauk) creates striking lamination lines that flow across the drawer faces.
- **Standard Blank Recipe:** Five layers of 3/4-inch hardwood produce a finished depth of approximately 3.75 inches—the exact depth specified in the **Stuff That Works** 1:1 scale drafting blueprints.
### The Lamination Checklist:
- **Joint and Plane Flat:** Ensure all mating faces are perfectly flat before gluing. Gaps in the glue line will open up when cutting the drawer cavity.
- **Uniform Glue Spread:** Use a roller to apply an even coat of PVA wood glue (such as Titebond II) across both mating surfaces.
- **Avoid Starved Joints:** Clamp firmly from center to outside, watching for uniform glue squeeze-out. Let the blank dry under clamp pressure for at least 12 to 24 hours before making any cuts.
---
## Put Your Tuned Saw to Work
Now that your blade is sharp, your guides are adjusted, and your laminated blank is cured and squared, you’re ready to build.
If you want professionally engineered templates dimensioned specifically for 3.75-inch laminated blanks, check out the [printable bandsaw box designs at Stuff That Works on Payhip](https://payhip.com/b/EFgd0). With instant PDF downloads, you can print full-scale templates right in your shop and start cutting immediately.
Comments ()