

One of the most overlooked diagnostic techniques in electronics and electrical troubleshooting is voltage drop testing.
Many technicians verify that voltage is present, check continuity, and replace parts that "look suspicious." Yet a circuit can have the correct voltage at the power source and still fail because of excessive resistance somewhere between the source and the load.
That's exactly what voltage drop testing is designed to find.
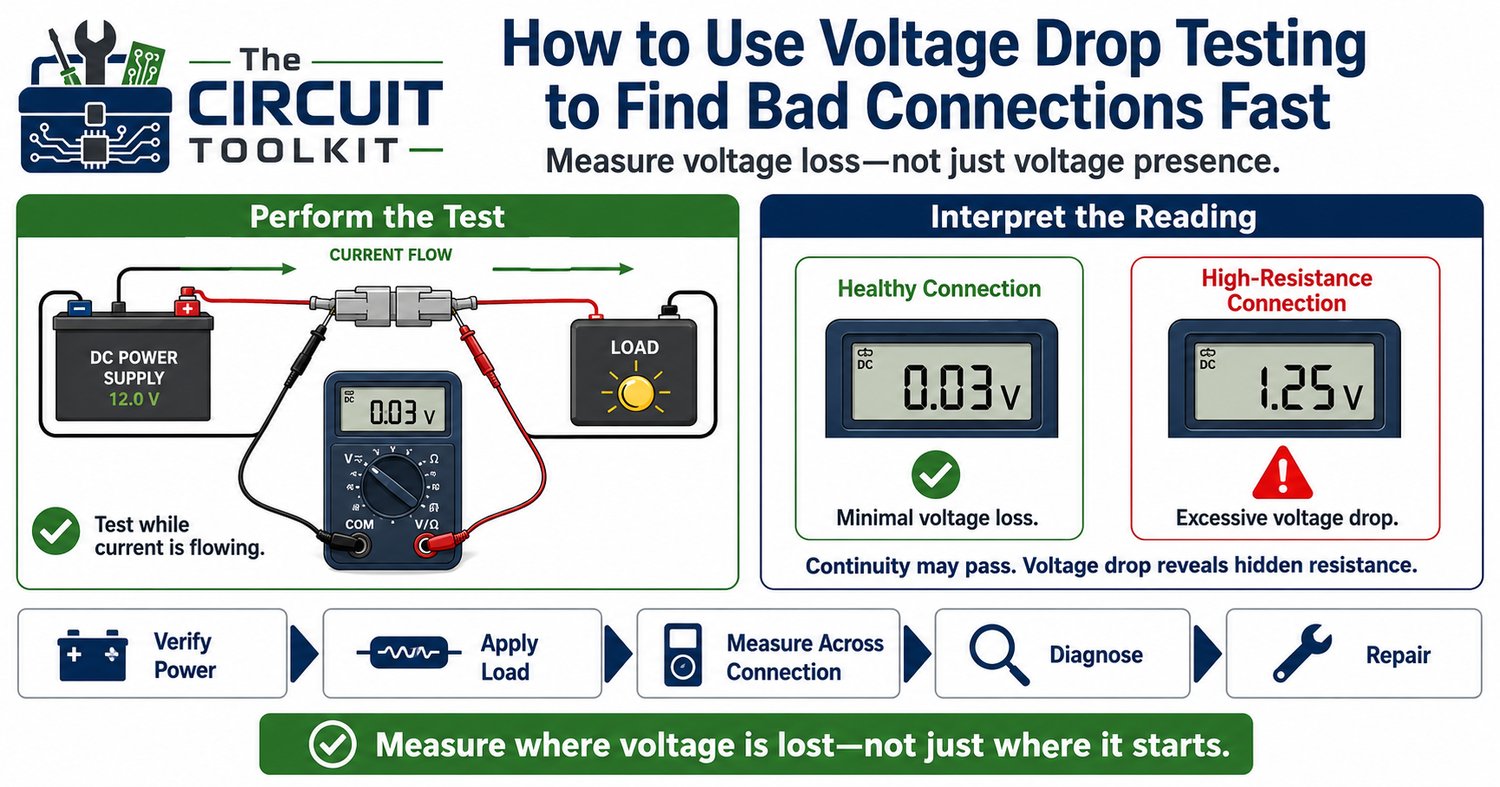
Unlike continuity testing, voltage drop testing evaluates a circuit while current is flowing. This makes it one of the best methods for locating loose terminals, corroded connectors, damaged wires, worn relay contacts, and poor ground connections.
If you want to troubleshoot faster and avoid replacing perfectly good components, this technique deserves a permanent place in your diagnostic process.
What Is Voltage Drop?
Every conductor has some resistance.
When current flows through that resistance, a small voltage is lost.
This is called voltage drop.
In a healthy connection, the voltage drop is usually very small.
When resistance increases because of corrosion, loose terminals, or damaged wiring, the voltage drop increases—even though continuity may still indicate the circuit is "good."
That's why continuity testing alone cannot detect many real-world connection problems.
Why Voltage Measurements Alone Can Be Misleading
Suppose you measure 24 V at the input of a circuit.
Everything appears normal.
But when the equipment starts operating, the load suddenly receives only 18 V.
Where did the missing voltage go?
It was lost across a high-resistance connection.
Standard voltage measurements don't always reveal where that loss occurs.
Voltage drop testing does.
When Should You Perform a Voltage Drop Test?
Voltage drop testing is especially useful when diagnosing:
- Loose terminals
- Corroded connectors
- Relay contacts
- Switch contacts
- Long cable runs
- Ground connections
- Fuse holders
- Crimp terminals
- High-current power wiring
It's particularly effective when equipment works intermittently or fails only under load.
How to Perform a Voltage Drop Test
Unlike resistance measurements, voltage drop testing is performed with the circuit energized and operating normally.
For example, to test a connector:
- Set the multimeter to DC voltage.
- Place one probe on one side of the connector.
- Place the other probe on the opposite side.
- Energize the circuit so current flows.
- Read the voltage displayed.
A healthy connector should show only a very small voltage drop.
A significantly larger reading indicates excessive resistance.
Test Both the Positive and Ground Side
Many technicians only check the power conductor.
Don't forget the return path.
A poor ground connection can produce the same symptoms as a faulty power wire.
Measure voltage drop across:
- Positive supply wiring
- Ground conductors
- Connector pins
- Relay contacts
- Switches
- Fuse holders
Testing both sides provides a complete picture of the circuit.
A Practical Example
Imagine a 12 V motor that runs slowly.
At the power supply you measure:
12.5 V
At the motor terminals you measure:
11.9 V
Everything seems acceptable.
But then you measure across one connector while the motor is running.
The meter reads:
1.3 V
That connector should only have a very small voltage drop.
The excessive reading indicates high resistance, which is reducing the voltage reaching the motor.
Replacing the connector—not the motor—solves the problem.
Common Mistakes
Avoid these common errors:
- Performing the test with the circuit turned off.
- Measuring to ground instead of across the connection being tested.
- Forgetting that current must be flowing.
- Ignoring the ground return path.
- Replacing components before identifying where the voltage is actually being lost.
Voltage drop testing works because the circuit is under load.
Without load, many high-resistance faults remain hidden.
Safety Considerations
Because voltage drop testing requires energized equipment:
- Wear appropriate PPE when required.
- Use insulated probes in good condition.
- Keep fingers behind probe guards.
- Prevent probe slips between adjacent conductors.
- Verify the correct meter function before making contact.
Safety should always come before speed.
Conclusion
Voltage drop testing is one of the fastest ways to locate high-resistance faults that continuity testing cannot detect.
Instead of guessing which component has failed, you follow the electrical path and identify exactly where voltage is being lost.
The result is faster troubleshooting, fewer unnecessary part replacements, and a more systematic diagnostic process.
Remember:
Good voltage at the source doesn't guarantee good voltage at the load.
Measure where the work is actually being done.
Want to become more confident with your multimeter? The Digital Multimeter Quick Reference Guide and the Beginner Circuit Troubleshooting Guide from The Circuit Toolkit walk you through continuity testing, resistance measurements, voltage testing, and voltage drop diagnostics with practical examples you can use on the bench immediately.