

Creating Mosaic Overlay Stitch: A Step-by-Step Guide
The crochet mosaic overlay stitch is a captivating technique that adds texture and visual interest to your projects. In this step-by-step guide, we'll explore the process of creating this beautiful stitch. Let's dive in!
Materials Needed:
1. Yarn in contrasting colours
2. Crochet hook suitable for your chosen yarn
3. Scissors
4. Yarn needle
Step 1: Foundation Chain
Start by creating a foundation chain with an even number of stitches. The length of your chain will determine the width of your project.
Step 2: First Color Row
Work a row using Sc (US terms) with your first colour. (Yarn A) This will serve as the base colour for your mosaic design. Using your Sc stitch, maintain an even tension. When you have finished your row, cut your yarn and remain with the front side facing you to begin the next row.
Step 3: Switching Colours
Introduce the second colour (Yarn B) by joining it at the beginning of the next row, usually using a Standing Stitch.
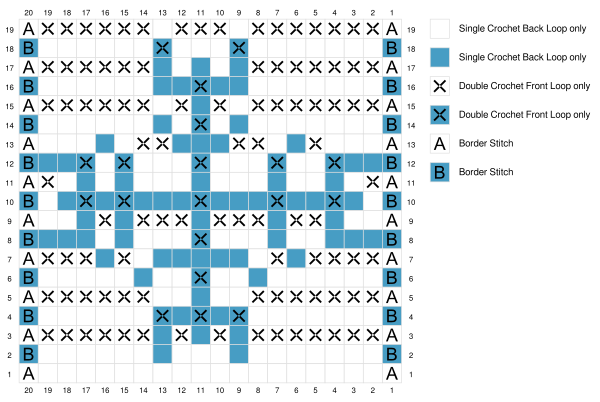
Step 4: Mosaic Pattern
Follow your chosen mosaic pattern for the colour changes. See the image above as an example. Common patterns include squares, diamonds, or other geometric shapes. Pay attention to the chart or written instructions that are provided. You can usually use one or the other, or both. This chart shows in the Legend that the blank squares are worked as Sc back loop (US terms) and the squares marked with an X are worked as Dc front loop. The Dc are worked in the front loop of the 2nd row below the working row.
Step 5: Weaving in Ends
As you change colours, leave a tail of each colour at each end, usually about 2". Weave in these ends neatly on the wrong side of your work to maintain a clean finish, or use the method of a no-sew border.
Step 6: Repeating Rows
Continue alternating between the two colours and following the mosaic pattern until your project reaches the desired length. Take care to maintain an even tension and consistent stitches.
Step 7: Finishing Touches
Complete your project by working a final row in the main colour. Fasten off, cut the yarn, and secure your ends using your chosen method.
The crochet mosaic overlay stitch opens up a world of creative possibilities. Experiment with different colour combinations and patterns to create unique and eye-catching projects. With practice, you'll master this technique and enhance your crochet skills. Enjoy the process and the stunning results of your mosaic masterpiece!
If you want to view the mosaic patterns I have available these are available here: The Pattern Scribe - Payhip
If you would like to read the news about forthcoming patterns click here.
Comments ()