

Where you place your Stop-Loss (SL) is critically important.
This post will offer a detailed guide to setting your SL based on a consistent strategy and managing your risk.
To fully grasp the concepts explained here, an understanding of Dow Theory and Multi-Timeframe Analysis is required.
If you haven't already, I recommend reading my previous posts on those topics before proceeding with this article.
Please note that these are my personal strategies, provided for educational purposes only.
They do not constitute trading signals or financial advice.
I hope this information proves useful in developing your own strategy with a statistical edge.
〜・〜・〜・〜・〜・〜・〜・〜・〜・〜・〜・〜・〜・〜・
The foundation of my strategy is trend-following, based on Dow Theory and Multi-Timeframe Analysis.
As a trend-follower, I enter once a trend has been confirmed and exit my position as soon as that trend has concluded.
It's remarkably simple.
The criteria for identifying a trend are also based on the simple principles of Dow Theory.
I then use Multi-Timeframe Analysis to pinpoint and focus on "points that are truly effective" and "areas where orders are likely to concentrate."
With that foundation, let's look at the following chart.
15m Chart

This is a trade I took last week.
The entry occurred at a point where the 1h chart made a lower high and broke the previous low, all within the structure of a lower high on the 4h chart.
(On this 15m chart, the red line indicates the 4h structure, blue indicates the 1h structure, and green is the 15m.)
In this case, the rationale for the trade is the definition of a downtrend according to Dow Theory: "a series of lower highs and lower lows."
Therefore, as long as this is our rationale, the "point where the rationale is invalidated" is the same as the "point where the trend is nullified."
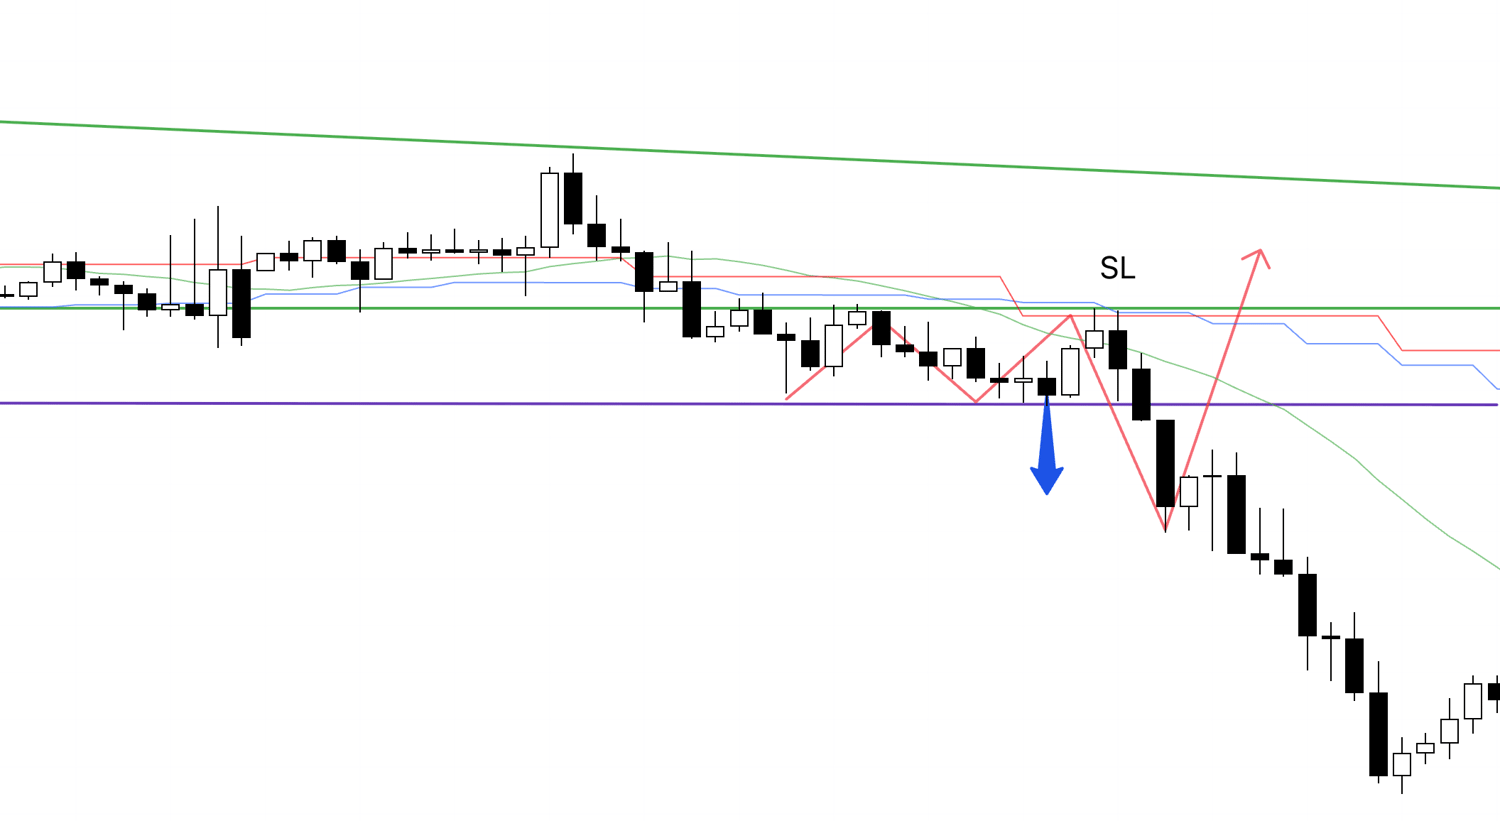
Take a look at where the SL was placed at the time of entry.
This point is the high that was formed when the break of the low was confirmed on the 15m chart.
Placing the SL above this high means that the position will be closed "precisely when the trend is invalidated."
Now, let's view this on the 1h chart.
1h Chart
Even on the 1h chart, a break above this high would nullify the downtrend.
If you entered based on the confirmation of a downtrend, there is no longer any reason to hold the position once that downtrend is over.
This is what it means to set a "logical" Stop-Loss.
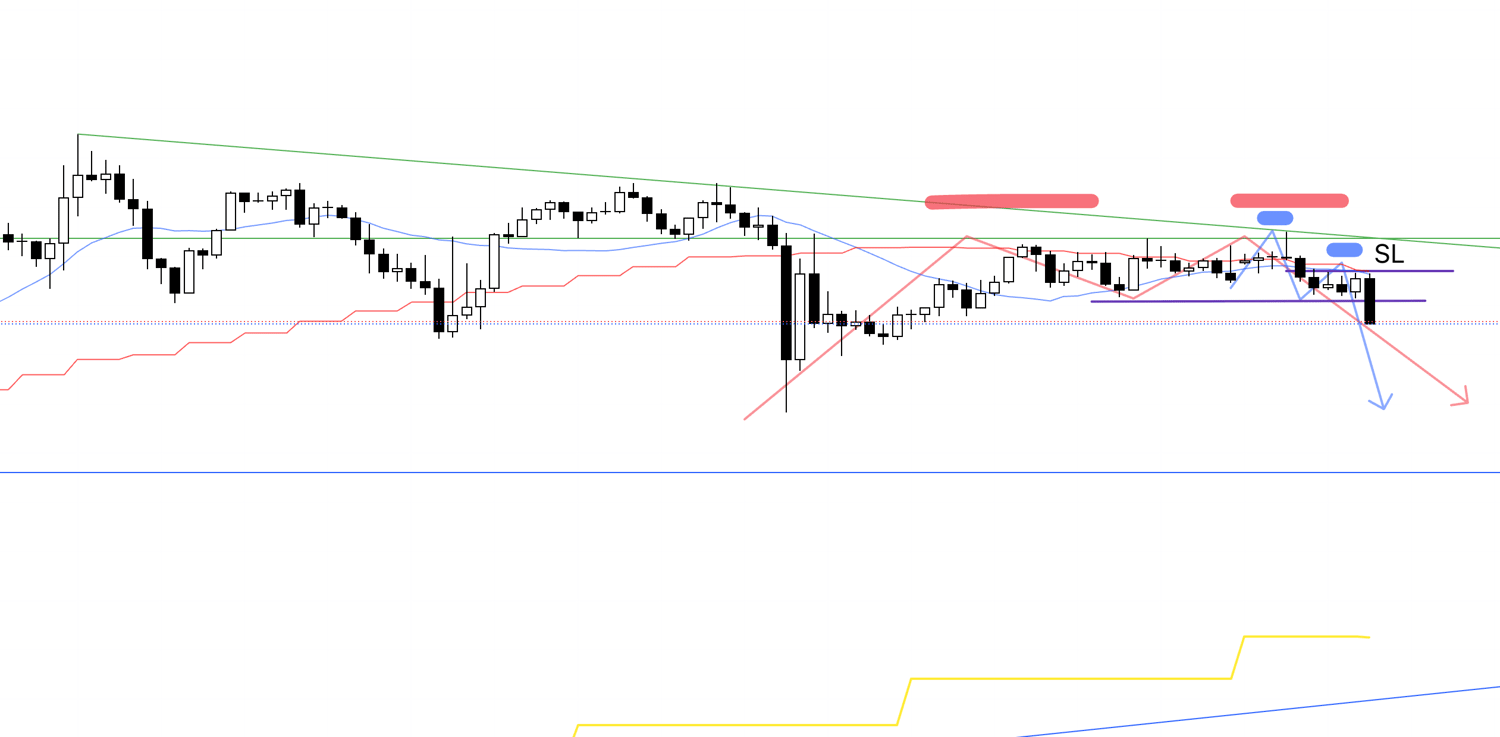
Now, let's examine what would happen on the 15m chart if the price had hit my SL.
Take a look at the following chart.
15m Chart

After entry, if the price had reversed and hit the SL, it would signify that the downtrend definition was broken because it "failed to make a lower high," thus ending the trend.
"It is precisely because the SL is placed at the trend's invalidation point" that you can confidently hold a position for the duration of the trend.
After entry, if the price does not hit the SL and continues to make lower lows and lower highs, you move the SL down to the newly formed lower high (a trailing stop).
The reason is exactly the same: if the price breaks above that new high, the trend is nullified, and "the rationale for holding the position ceases to exist."
Let's look at my actual trade.
15m Chart
This shows where I moved the SL on the 15m chart.
To repeat, if the price were to break above this high, the reason for holding the position would disappear, necessitating an exit.
In this way, the position is ultimately closed at "the point where the trend structure breaks."
15m Chart
This is the foundation of trend-following.
In other words, I hold my position from "the beginning of the trend to its very end."
Whether that exit is ultimately labeled a "take-profit" or a "stop-loss" simply depends on where the trend concluded in relation to my entry point.
Fundamentally, the label is irrelevant.
The action taken is always the same.
It is also vital to keep your risk constant when setting your SL.
For example, if you decide to risk 1% of your capital on a single trade, you calculate your position size at the time of entry.
If the distance from your entry point to your SL is 15 pips, you calculate your position size so that 15 pips equals a 1% loss.
If the distance to the SL is 30 pips, you similarly calculate your position size so that 30 pips equates to a 1% loss.
This method allows you to consistently trend-follow while always maintaining a uniform 1% risk.
You often hear the advice, "Keep your losses small," but many people misunderstand its meaning.
For a trader risking 1%, this means aiming for trades that yield 2% or 3% profit for that 1% loss.
It's an issue of "relativity" against your potential profit; it is not about blindly setting a tight stop in terms of pips.
Another common but flawed method is setting a fixed-pip SL, such as "always 30 pips."
This is an inconsistent way to set your Stop-Loss.
While the number "30 pips" is consistent, and it may seem like a consistent method at first glance, market volatility is not constant, which makes it impossible to repeatedly trade based on the same rationale.
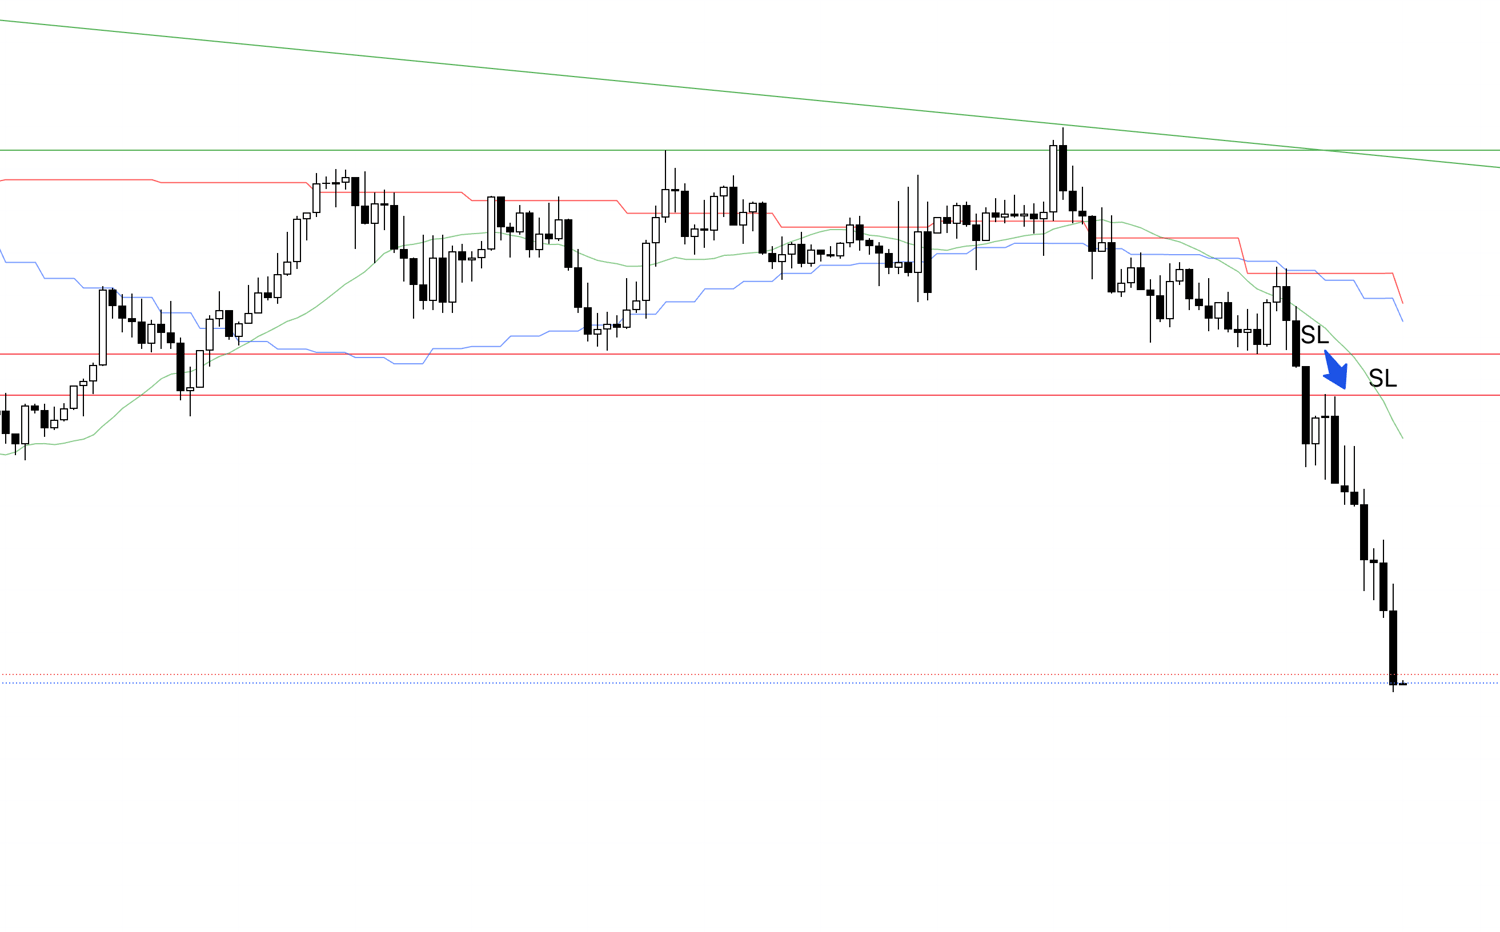
Please look at the following chart.
15m Chart
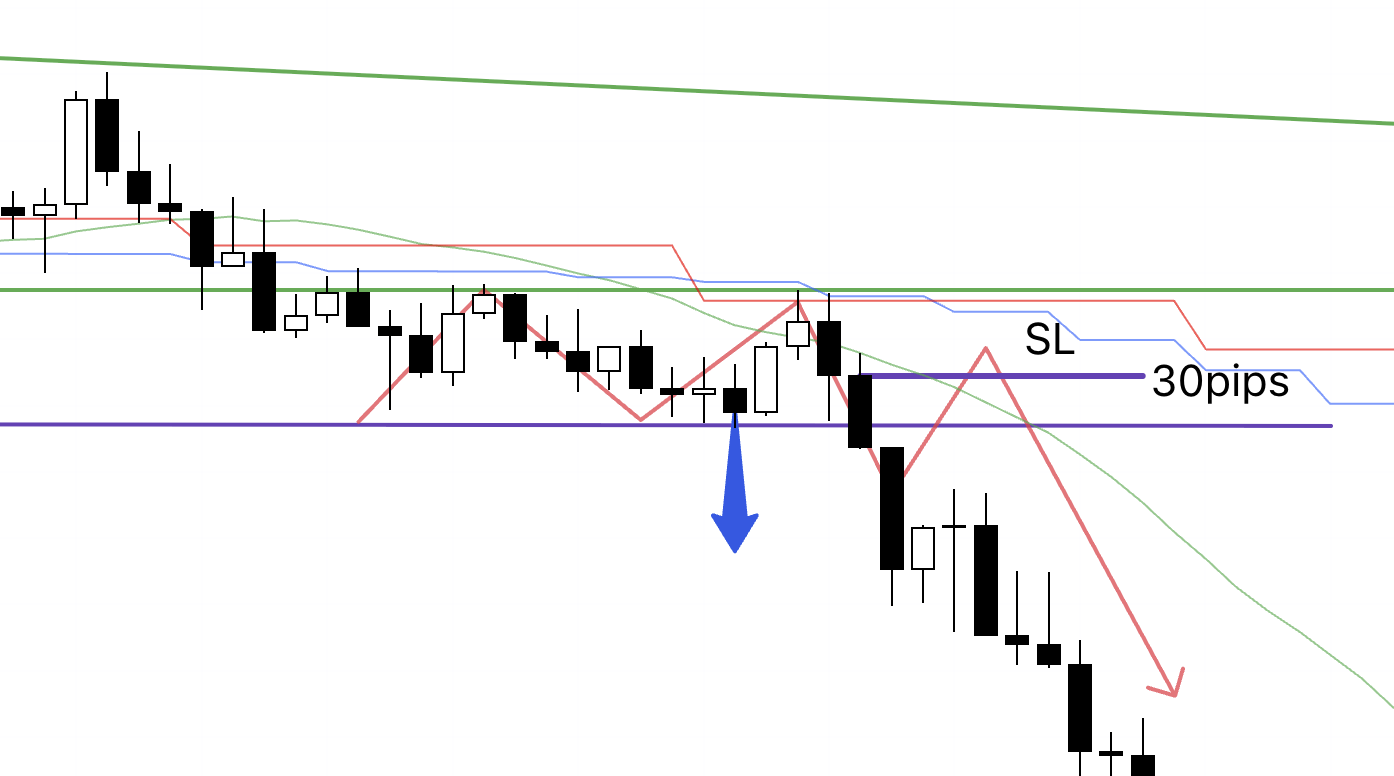
If you were using a fixed "30 pips" SL, and let's say the purple line marks that 30-pip distance, you would be forced to exit your position if the chart moved as shown in red, "even though the trend structure has not yet been broken."
Despite trend-following, your trade would result in a loss even though the trend is intact, causing you to miss out on the subsequent move.
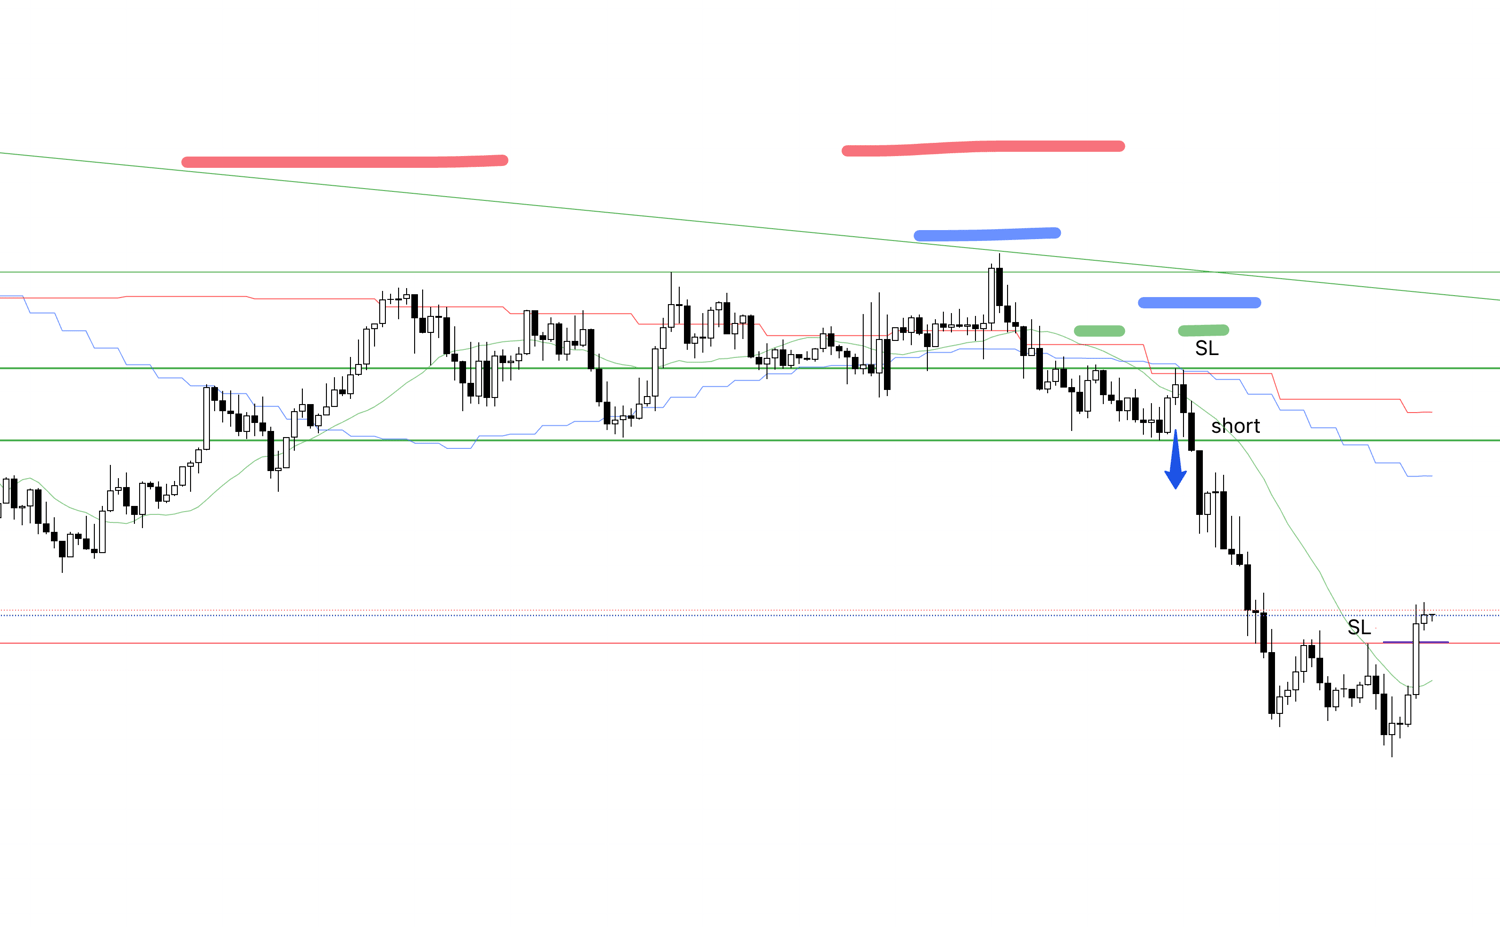
In another case, a problem arises if market volatility causes your 30-pip stop to be much farther than the recent high.
Take a look at the following chart.
15m Chart

If you set your SL far away from the recent high like this, you would continue to hold your position "even though the trend was invalidated long ago," resulting in unnecessary losses.
This is why setting a fixed-pip SL prevents you from "trading based on a consistent rationale."
Market volatility is not constant.
We must control our risk in accordance with market conditions, rather than imposing our own arbitrary rules onto the market.
(To be clear, this applies to my trend-following strategy. If your strategy dictates a fixed-pip stop for its own valid reasons, I am not refuting that approach.)
Thus, the foundation is to always set your SL at a location based on your strategy's rationale and to ensure you are always risking the same percentage of your capital.
If performing these calculations for every trade seems tedious, some platforms offer tools that automatically calculate position size.
I recommend checking if your platform provides such tools and trying them out.
I make good use of these tools myself, which allows me to always trade with a predetermined, consistent level of risk.
What I have introduced today are the "trading fundamentals" of my trend-following strategy.
I hope you will take the time to understand them thoroughly and use them as a reference in developing your own strategies.
I hope this blog post has been helpful for your own strategy development.