Your Cart
Loading

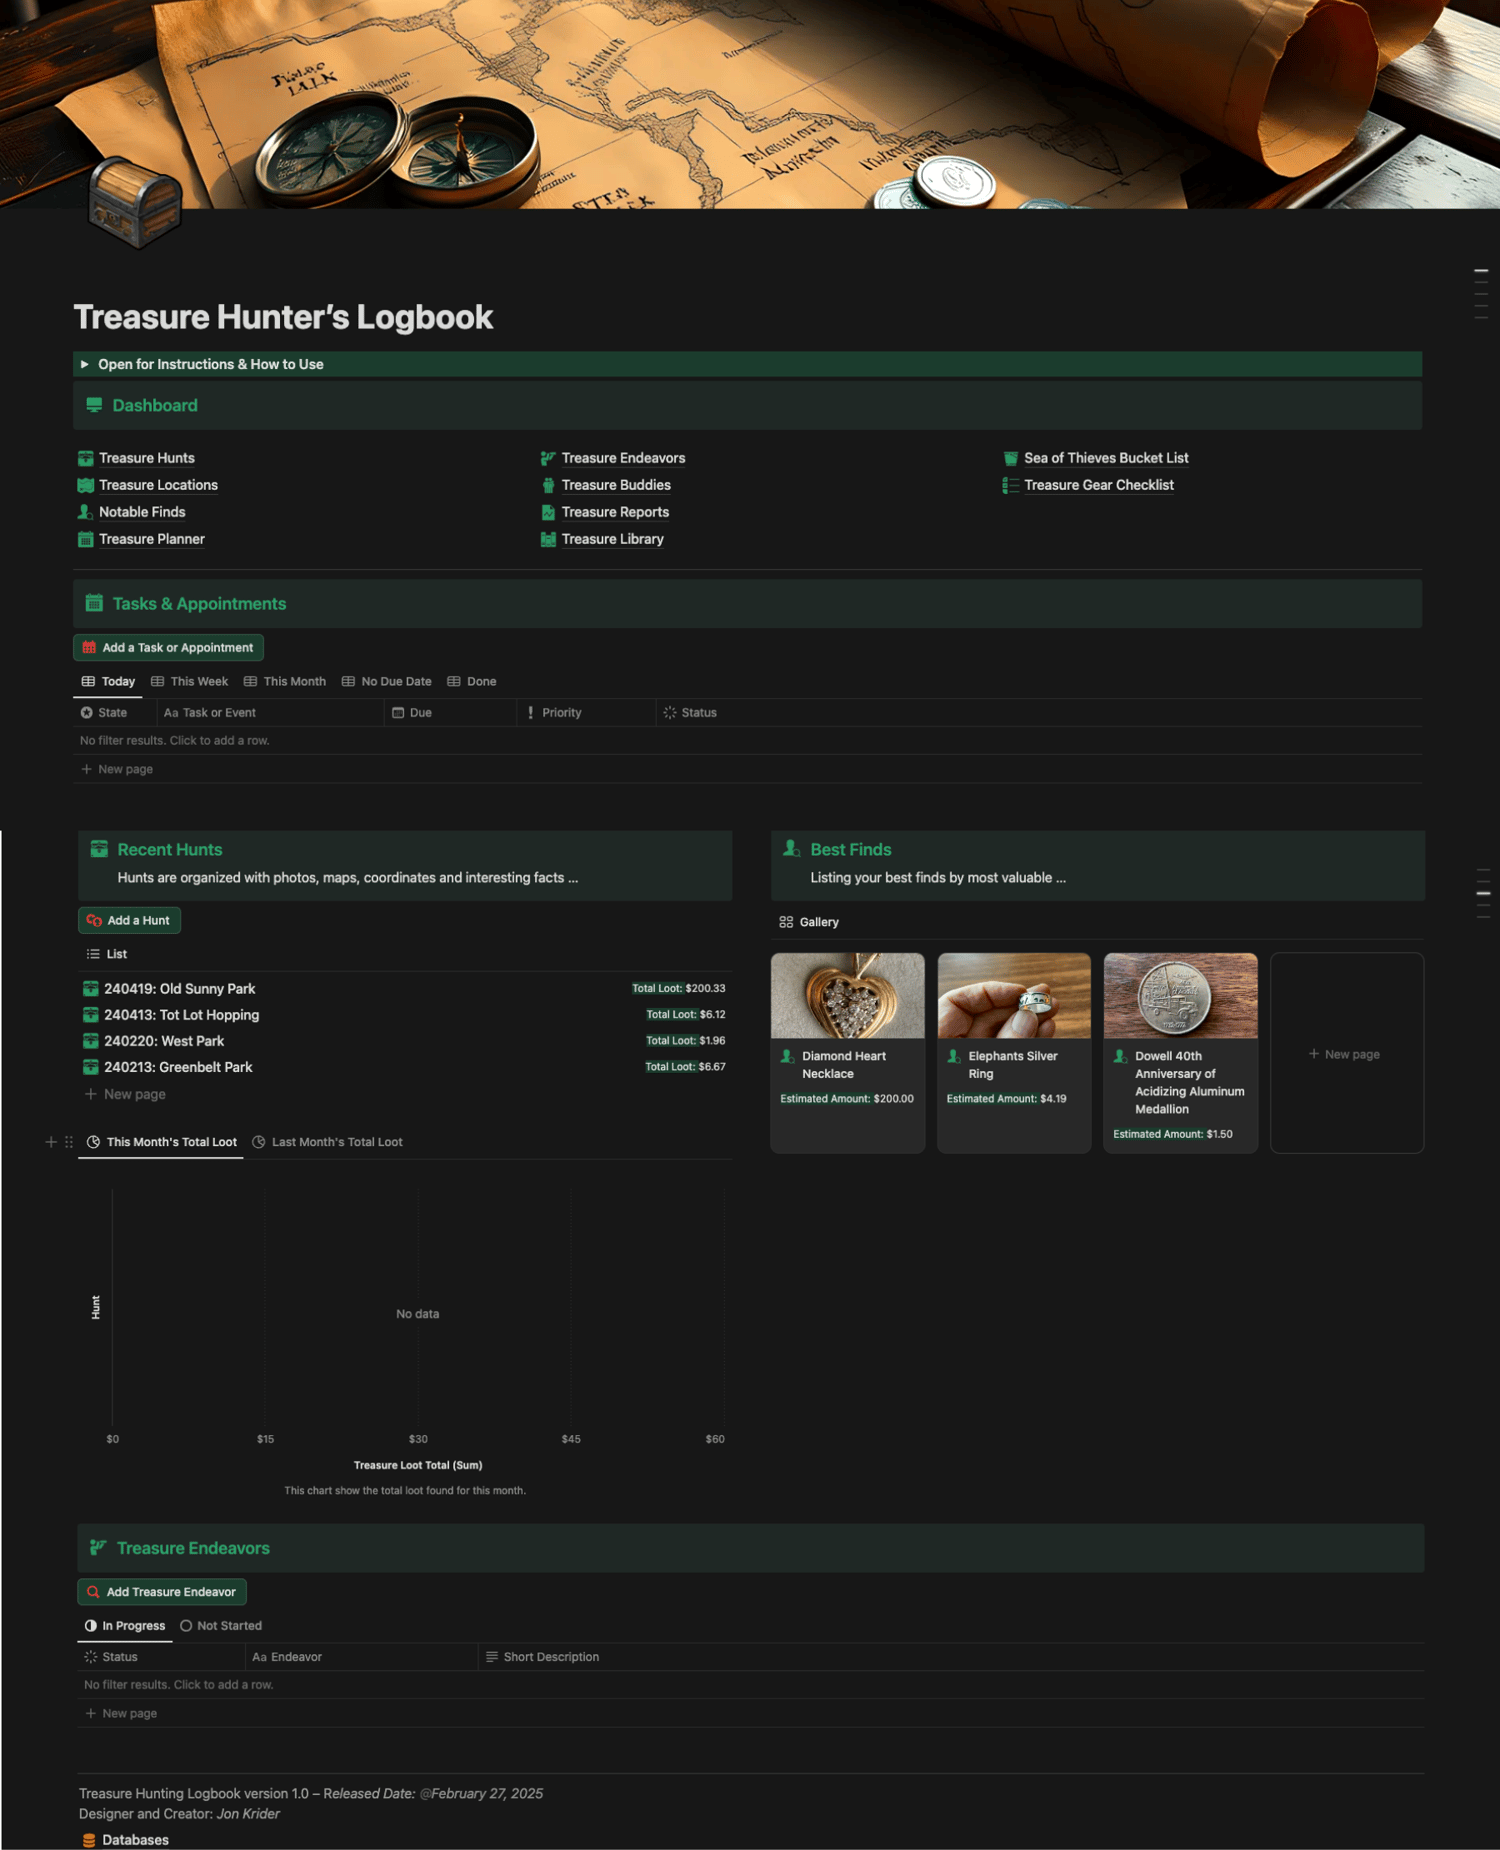
Treasure Hunter’s Logbook

Template Instructions & How to Use

✧ Welcome to your ultimate adventure companion! The Treasure Hunter's Logbook is designed to help you document and organize all your treasure hunting endeavors, discoveries, and collections. Whether you're a beach metal detector enthusiast, a Sea of Thieves player, or a passionate collector of unique finds, this template will help you track your adventures, map your locations, and catalog your discoveries.


Created by a metal detector enthusiast, this template is specifically designed for fellow treasure hunters!


The Treasure Hunter's Logbook is simple to use yet powerful enough to track both small and large hunting endeavors.

Duplicating the Template

At the top right hand corner of this page click  Duplicate to add the template into your own workspace.


If you don’t currently have a Notion account, you will be prompted to enter account details. It will then automatically duplicate the template into your new workspace!


Databases

All Treasure Hunter's Logbook databases are stored under the Databases page, consolidating them in one place for easy access.

All databases are locked by default to prevent accidental changes to their structure, such as property deletions. If you need to edit a database (e.g., adding an option to a Select or Status property), unlock it first. Remember to re-lock the database afterward to maintain its integrity.

If you would like to suggest any database additions or changes for future versions of the Treasure Hunter's Logbook, please message me.

‼️WARNING: The following fields should not be modified or updated unless you are comfortable editing Notion templates!

Database Relationship

Database relationships link Treasure Hunts and Treasure Endeavors to specific locations. These relationships are established from the Hunts and Endeavors pages rather than from the Locations page.

Calculated Fields

Both the Total in Coins and Total Loot are calculated from the Treasure Hunts page. There are a number of calculated fields through out the template.

Fields Used for Display Only

Fields that end in "Display" contain formulas used for various views and should not be modified.

Dashboard & Front Page

The Dashboard serves as your central hub to access every section of the Treasure Hunter's Logbook. A convenient link menu at the top of each section lets you navigate the entire template effortlessly. The front page displays your most recent hunts (last 10) and showcases your best finds from all your adventures.


Locations - Add a Location First

The Treasure Hunter's Logbook is organized by location—you'll need a location entry for each hunt. Locations can be viewed in multiple ways: All, Star, Total Loot, Total Coins, and Gallery view—which displays images and totals for each location.


Add a Location

Add a location by clicking the Add New Location button above the views on the Treasure Locations page. You can also add a new location using the "New Page" template. Simply type over "New page" to name your location.

Adding an Address

Enter the address as a single line of text (for example: "1313 Mocking Bird Lane, Canton, OH 44641"). This address will be added to both Apple Maps and Google Maps links.


Contact Information

Several fields are available to store contact details for the location's owner, including names, email address, and phone number.

When you click these map links, they'll open in their respective apps and display the location. You can use this feature to get directions or share locations with your hunting partners.

Country

The country is a select option where you can choose the location's country. The default country is "United States".


Reminder: The databases are locked. To add more Countries, unlock the database first, add your Countries, and then make sure to lock it again when finished.


Notes

Add notes or journal entries about the location using the "Add a Note" button at the bottom of the page.

Year Established

This is the year the location was established, whether it's an old building or farm.


Image(s)

You can add images at the bottom of the page by clicking on the "Add an image" section. These images appear in Gallery views. I like using Google Maps to show location details—just zoom in, switch to satellite view, take a screenshot, and save it here. To add multiple images, simply use Notion's "/image" command below your image.

Treasure Hunts

The Treasure Hunts page is where all individual hunts are stored. Here you can add new hunts, edit existing ones, and view your adventures in various ways. You can view hunts by All, Location, or Endeavor, and there's even a special view that shows Rings Found per hunt.


Add a Hunt

Add a hunt by clicking the Add New Treasure Hunt button above the views on the Treasure Hunts page. You can also add a new hunt using the "Don’t Edit - Select Location" template.


Note: Choose a Location before naming your Treasure Hunt. The hunt name will be automatically created from the Location and Start Hunt Date, making it easier to organize and find related hunts.


Hunt Name Format: YYMMDD: Location Name (where YY = Year, MM = Month, DD = Day)

Ring Count

Enter the number of rings discovered during this hunt.


End Date & Time

Select the hunt's date. At the bottom of the date popup, toggle "Include time" to enter the end time. While time is optional, entering it allows the system to calculate the hunt's duration in hours and minutes.


Weather/Temperature/Soil

You can record the weather conditions and temperature during your hunt. The Soil Condition field lets you describe the ground's state—whether it's dry and hard, wet and clumpy, or something else.


Treasure Loot Total

This is a calculated field that combines the values of all coins and notable finds to show your total accumulated treasure.


Photos

This allows you to attach photo(s) to this particular treasure hunt.

Treasure Endeavor

Choose the associated Treasure Endeavor for this hunt, if one exists.


Total Hunt Time

The Total Hunt Time automatically calculates the duration between start and end times (when both are entered).


Coins Found

Enter the total count for each type of coin you find (pennies, nickels, dimes, quarters, etc.). The Total in Coins field automatically calculates based on the numbers you enter.


Treasure Buddies

Select any fellow treasure hunters who joined you during the hunt.


Notes

Add notes or journal entries about the hunt using the "Add a Note" button at the bottom of the page.

Start Date & Time

Select the hunt's date. At the bottom of the date popup, toggle "Include time" to enter the start time. While time is optional, entering it allows the system to calculate the hunt's duration in hours and minutes.


Area Searched

Record brief details about which specific area you searched at this location. For example: "behind the bleachers on the right side of the football field."


Notable Finds

Enter all your notable finds on the Notable Finds page. When adding finds, you can select which hunt they were discovered during. Total of Notable Finds: Automatically calculated based on the estimated value assigned to each notable find.


Bucket List

If you find one of your Bucket List items during the hunt—YEAH!!!—just select it and it will be tied to the hunt. This way you'll always know exactly which hunt yielded one of your bucket list treasures.

Notable Finds

The Notable Finds page lets you store and view all those special, exciting treasures discovered during your hunts.


Add a Notable Find

Add a notable find by clicking the Add New Notable Find button above the views on the Notable Finds page. You can also add a new notable find using the "New page" template.


Name your notable find by typing over "New page." Use descriptive names like "Silver Ring," "14K Gold Ring," or "Kid's Bracelet."

Condition

Select a condition from the dropdown list. Options include Fine, Good, Poor, VF (very fine), and XF (extremely fine), etc. These ratings are commonly used in coin collecting and will help you assess a coin's value.


Approx Depth

Select the approximate depth at which the item was buried. Options range from 1 to 10+ inches.


Coin Year

Enter the year shown on the coin.


Silver Weight in Grams

Enter the weight of the silver item in grams.


Silver Purity

Select the silver purity of the silver item from the dropdown list.

Jewelry

If the item is jewelry, select a category such as bracelet, charm, earring, necklace, ring, etc.


Reminder: The databases are locked. To add new Jewelry, unlock the database first, add your Jewelry, and then make sure to lock it again when finished.


Coin Face Value

If the find is a coin, enter its face value. For example, if you find a quarter, enter .25.


Gold Weight in Grams

Enter the weight of the gold item in grams.


Notes

Add notes or journal entries about the notable found item using the "Add a Note" button at the bottom of the page.

Estimate Value

Enter your estimated value. You must determine this value yourself, as it is not automatically calculated.


Coin Mink Mark

The mint marks available in the system are: D (Denver), O (New Orleans), P (Philadelphia), and S (San Francisco).


Gold Purity

Select the karat purity of the gold item from the dropdown list.


Image(s)

You can add images at the bottom of the page by clicking on the "Add an image" section. These images appear in Gallery views. To add multiple images, simply use Notion's "/image" command below your image.

Treasure Planner

The Treasure Planner is a calendar for tracking your treasure hunting tasks and appointments. The Treasure Planner page offers several views to manage your schedule. The top section includes Today, Week, and Month views, along with views for tasks without due dates and completed items. The By Status and By Priority views use a kanban board layout, letting you update a task's status or priority by simply dragging it between boards.


Add a Task or Appointment

Add a task or appointment by clicking the Add New Task/Appointment button above the views on the Treasure Planner page. You can also add a new task or appointment using the "New page" template.

Due

Select the task or appointment's due date. For appointments, toggle "Include time" to specify the appointment time.


Status

Select the status of your task or appointment: "To Do," "Doing," or "Done." The default setting is "To Do."

State

The state provides a visual status for your task or appointment. A smiley face indicates completion, white indicates no due date, and the other colors (red, yellow, and green) are self-explanatory.


Treasure Endeavor

Tasks and appointments can be associated with specific Treasure Endeavors, allowing you to organize and track activities related to particular treasure hunting projects or ongoing searches. This makes it easier to keep all related tasks, plans, and appointments grouped together for better planning and follow-through.

Priority

Choose a priority level of Low, Medium, or High for your task or appointment. Medium is the default setting.


Notes

Add detailed notes for your tasks and appointments using the "Add a Note" button at the bottom of the page.

Treasure Endeavors

Think of Treasure Endeavors as hunting projects. A Treasure Endeavor collects all related information from your Treasure Hunter's Logbook, keeping everything organized when you're doing major hunts or research. For example, let's say you're searching for thirteen pack mules loaded with gold and silver that were buried during an Indian raid. You might have research documents (saved in the Library) and multiple hunting locations where you've conducted searches. All these items are logged under different sections in the system, but they're linked together when you assign them to the same Treasure Endeavor.


Add a Treasure Endeavor

Add an endeavor by clicking the Add New Treasure Endeavor button above the views on the Treasure Endeavors page. You can also add a new endeavor using the "New page" template. Simply type over "New page" to name your endeavor.

Status

Select the current status of your endeavor. Options are "Not started," "In progress," or "Done." The default setting is "Not started."

Short Description

Enter a brief description of your treasure endeavor. You can add additional notes at the bottom of the page.

Notes

Add detailed notes for your endeavor using the "Add a Note" button at the bottom of the page.

Treasure Buddies

Treasure Buddies are your friends and fellow metal detecting enthusiasts who join you on your adventures. This section lets you store contact information and details about your treasure hunting companions.


Add a Treasure Buddy

Add a buddy by clicking the Add New Treasure Buddy button above the views on the Treasure Buddies page. You can also add a new buddy using the "New page" template. Simply type over "New page" with your buddy’s name.

Information

Enter the buddy's contact details including mailing address, country, phone number, and email address.

Database Relationships

You can assign buddies to specific treasure hunts and endeavors.

Notes

Add notes for your buddy using the "Add a Note" button at the bottom of the page.

Treasure Reports

Treasure Reports consist of a collection of predefined views including:


Predefined Views Are:

  • Total Loot
  • Total Loot by Year
  • Total Loot by Location
  • Total Coins by Year
  • Total Coins by Location
  • Total Notable Finds by Year
  • Ring Count by Year
  • Ring Count by Location

Treasure Library

The Treasure Library serves as a comprehensive repository for all your treasure hunting documentation and research materials. This includes detailed treasure research notes and historical documents, technical information about metal detectors and their operation, important legal documentation such as property permission slips, membership information for treasure hunting clubs, hunting location maps and coordinates, and any other relevant reference materials that support your treasure hunting adventures. This centralized collection helps keep all your important documents organized and easily accessible when needed.


Add a Note

To add a new note, select one of the templates from the list. The default template is “Research”. The available note templates are:

  • Detectors
  • Miscellaneous
  • Research
  • Club
  • Legal

Note Date

The Note Date automatically defaults to today's date and does not need to be modified.


URL

Enter any URLs related to the note, such as relevant websites.


Attachments

Sometimes you want to attach a photo or PDF to your note; this is a good place to add them.


Database Relationship

You can link a note to any specific treasure hunt or endeavor.

Type

The type will default to whichever template you choose to start your note with.


Reminder: The databases are locked. To add new Types, unlock the database first, add your Types, and then make sure to lock it again when finished.


Add Note Information

Simply click anywhere on the page below the fields and begin typing your note.

Library Tags

Tags help you further categorize your notes. For example, if you belong to two different clubs, you could use tags like "Club1" and "Club2" to distinguish between them.


Reminder: The databases are locked. To add new Tags, unlock the database first, add your Tags, and then make sure to lock it again when finished.

Sea of Thieves Bucket List

Use the Sea of Thieves Bucket List to track and document those special, rare, or historically significant items you've always dreamed of discovering during your treasure hunting adventures. This personalized wishlist helps you stay focused on your ultimate treasure hunting goals and keeps track of those elusive finds you're still searching for. For example, my own bucket list includes finding a pristine Walking Liberty Silver Dollar, which represents one of the most beautifully designed coins in American numismatic history.


Add a Bucket List Item

Add an item by clicking the Add New Bucket List Item button above the views on the Sea of Thieves Bucket List page. You can also add a new item using the "New page" template. Simply type over "New page" with the title of your item.

Description

Write a detailed description of your bucket list item, including what makes it special to you.


Notes

Add notes about your discovered bucket list item using the "Add a Note" button at the bottom of the page.

Date Found

When you find your bucket list item, record the date of discovery.

Database Relationships

Link your found bucket list item to the specific treasure hunt where and when you discovered it.

Treasure Gear Checklist

The Treasure Gear Checklist serves as your comprehensive equipment preparation guide for treasure hunting adventures. Use the interactive item checkboxes to ensure you're fully equipped and prepared before heading out into the field. This systematic approach helps make your hunt more effective, comfortable, and safe by preventing forgotten essentials. While designed to be thorough, keep in mind that some items may not apply to your specific hunt, location, or treasure hunting style, and this list can be customized to match your particular needs. Though extensive, this checklist isn't meant to be exhaustive - you can always add personal items based on your experience and preferences.


Add a Treasure Gear Item

Add a new item by clicking the Add New Treasure Gear button above the views on the Treasure Gear Checklist page. You can also add a new item using the "New page" template. Simply type over "New page" with the title of your item.

Clearing All Checkboxes

To avoid the tedious task of manually unchecking all the checkboxes between uses, I've added a Clear All Check boxes button. When pressed, it automatically unchecks every checkbox, letting you quickly prepare for your next hunt.

Category

After adding your new treasure gear item's title, select a category from the dropdown menu to properly organize the item.