

I review the key takeaways from this week’s trading, focusing on the trades I actually executed.
I post this Weekly Trade Report every Saturday.
If you read it alongside Trade Scenarios, which I post every Sunday, you can see how I frame ideas in advance and how I then execute against those scenarios in practice.
This is not advice on “how you should trade,” nor am I claiming this is the one right answer.
It is not about showcasing individual wins or losses, nor recommending a specific strategy based on those results.
It is to demonstrate, at an operational level, how I repeat a scenario-led process with consistency, so you can reference that “process consistency” for your own strategy design and process discipline.
These results are mine alone and do not guarantee your future profits.
Please keep that firmly in mind and conduct your own testing and preparation, trading solely at your own responsibility.
My framework is buying pullbacks and selling rallies on the 4h chart.
For my pullback buy and rally sell approach, please see my prior blog posts on Dow Theory and multi‑timeframe analysis.
With that, let’s go to the charts.
USDJPY 4h

This is the USDJPY 4h chart.
This week’s action is to the right of the blue vertical line on the chart.
As with last week, price failed to break out of the range, and there were no actionable trade candidates in USDJPY.
Next, please see the EURUSD chart below.
EURUSD 4h

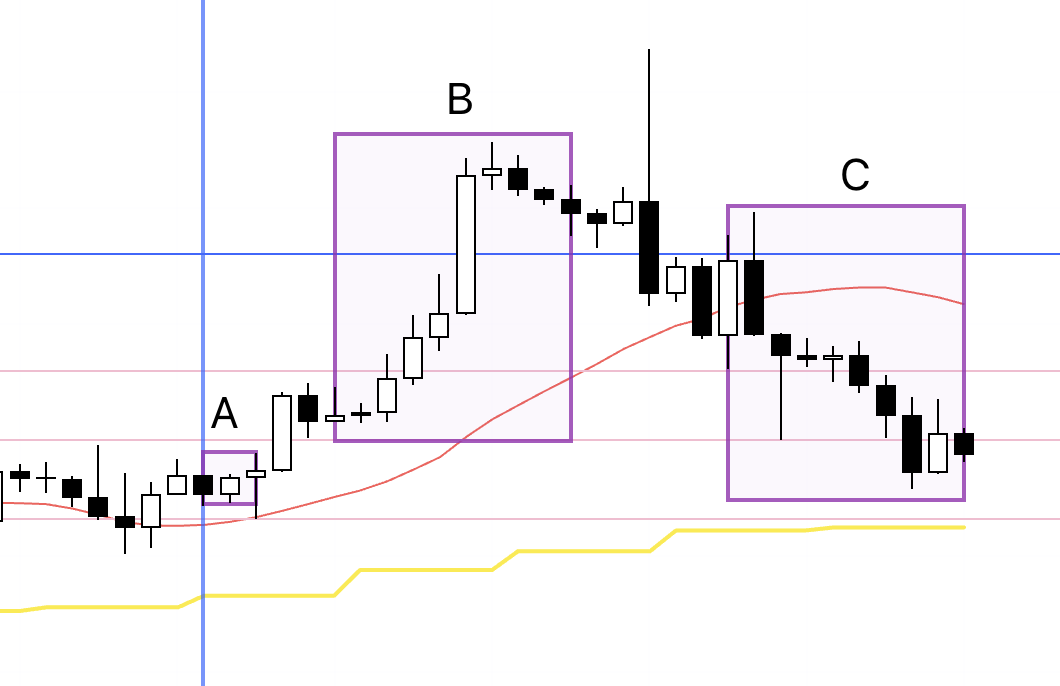
This is the EURUSD 4h chart.
There were three points this week where I considered trades in EURUSD.
In practice, I executed only A, while B and C were passed because the conditions were not met.
I will explain each in turn.
〜・〜・〜・〜・〜・〜・〜・〜・〜・〜・〜・〜・〜・〜・
September 15 (Mon)
EURUSD
The long setup I outlined in Sunday’s Trade Scenarios materialized.
4h chart from Sunday’s Trade Scenarios

In that scenario, within the pullback of the daily uptrend, the 4h was also making higher lows, so the question was whether I could time an entry on a lower timeframe within that structure.
Let’s look at the live chart.
4h

At this point, price is sitting within a 4h higher‑low zone.
If the 1h prints a higher low as well, I want to take an entry there.
1h

The 1h is also forming a higher‑low zone.
Within that low, I will check the 15m to see if I can get in one step earlier.
15m

On the 15m, it looks possible to enter even earlier than waiting for the 1h high to break.
I placed a buy stop order above the 15m high.
If triggered, and if a 15m uptrend then takes out the 1h high and carries through to the higher timeframe trend, the trade offers very attractive risk‑reward.
15m

I waited, but price broke the low, so I canceled the order for now.
However, the 1h low had not been broken, so the plan was to wait either for an entry on a 1h high break or for the 15m to re‑form a higher low and push to a new high.
〜・〜・〜・〜・〜・〜・〜・〜・〜・〜・〜・〜・〜・〜・
Soon after, the 15m ended its downtrend, so I set a buy stop order at the level that would flip it into an uptrend.
15m

Up to that point, the 15m had been making lower highs and lower lows, but that downtrend is not one I trade.
It was a pullback building out the 1h structure, and I wait for that down move to finish and for an uptrend to begin.
At last, we were approaching a turn with a higher low and a pending higher high, so I placed a buy stop above that high.
15m

The entry order was triggered.
This is my standard trade: enter where the lower timeframe first turns up within a higher‑timeframe pullback.
SL was set just below the 1h low.
From here, I watch whether price can take out the 1h high and extend into a 1h uptrend, but if the 15m trend breaks, the trade is over.
15m

I raised the SL to just below breakeven.
15m

Price hit the raised SL, and the trade closed.
〜・〜・〜・〜・〜・〜・〜・〜・〜・〜・〜・〜・〜・〜・
Now to the EURUSD trades labeled B and C, which I stood aside from.
Let’s start with the 1h chart.
1h

After the small stop‑out at A, price advanced without first putting in a higher low.
With hindsight you might think, “If you hadn’t stopped out, you could have caught the subsequent rise,” but that is the wrong way to think.
At A, when a lower high and a lower low print, you must exit.
This time price happened to rise afterward, but holding through a structure break is dangerous.
I was waiting for the type of higher low shown below.
1h

If price had formed another higher‑low point and then broken to a higher high, I could have entered, but instead it pushed to a higher high without carving out a higher low, so I had no entry.
After that, around point B, I waited for the 1h trend to reset by breaking and then forming a fresh higher‑low sequence, but price continued to rise and there was no trade.
1h

We did see a brief violation of the higher‑low sequence, but then price went on to a higher high without establishing a new higher low, so there was no trade.
1h

Had it rebuilt a higher‑low point like this and then broken the high, I would have considered a trade.
So what about the case we actually got, shown below.
1h

This time, the higher‑low and higher‑high sequence appeared at a level I do not trade because it is “too high.”
From the perspective of the 1h swing low, many will view the prior low as not decisively broken, and the small lower low earlier is something many traders will not even count.
See below.
1h

I labeled the lows 1, 2, 3, 4.
When the prior low has not been clearly broken, traders long from below are already timing profit‑taking, and initiating fresh longs at the 4‑higher‑low/higher‑high is too late.
Ideally, after trade A, I wanted a renewed higher‑low after low 1 so I could enter from the early 1h trend and trail the stop, arriving at the 4‑higher‑low/higher‑high while already carrying profit.
There is another reason I did not take this trade.
4h

This is the 4h view of an entry at the “4‑higher‑low/higher‑high” point.
On 4h, the blue arrow marks where that entry would sit.
By then, the 4h higher‑high break (red line) had already occurred.
I aim to be positioned by the time the 4h higher high prints, by entering at the initial upturn on the 15m or 1h within a 4h pullback.
My approach is 4h pullback buying and rally selling, which means capturing the very start of the lower‑timeframe turn within the 4h pullback.
This point was no longer a pullback, but an “after‑the‑move extension.”
Accordingly, the week’s biggest rise was not a move my system participates in.
Next, point C was the one I had mapped out in Sunday’s Trade Scenarios, and I was waiting for an entry.
4h chart from Sunday’s Trade Scenarios

This is the Sunday scenario I posted.
I was specifically waiting for a 4h trend break and a rollover from the resistance line to start a decline.
Let’s look at the live 4h chart.
4h

At the resistance line, price began to form a lower‑high area, so I waited for an entry, but C dropped without actually printing a lower high, and I could not capture the timing for an entry.
Let’s check the 1h.
1h

On the 1h, price had just made a higher high, which ended the immediate downtrend, so I waited for a fresh lower high to start a new downtrend, but price fell away without establishing that lower‑high point.
1h

For example, had it formed a new lower‑high like this and then restarted the downtrend, I could have taken the trade.
〜・〜・〜・〜・〜・〜・〜・〜・〜・〜・〜・〜・〜・〜・
That is all.
This week, I took only one trade, point A, which ended in a small stop‑out.
Thinking “I should have held through the stop” or “I missed the week’s biggest rally” and then changing your rules, or mislabeling that as something new you “learned,” and adding or altering rules based on a single outcome is abandoning consistency and simply reacting to randomness.
Stopping out when the rules say stop, and standing aside when the rules say stand aside, are not mistakes.
They are the necessary actions that allow a strategy’s performance to emerge over the long run.
I always build scenarios in advance and repeat only the same trades that align with my rules.
I hope some part of this is useful to you.
This content is provided solely for educational purposes and does not instruct you to buy or sell, nor does it guarantee future profits.
You are solely responsible for any trades you make, so spend the time to build and test your strategy and trade at your own risk.
If my consistency helps you cultivate your own consistent trading, I am glad.