Hello lovelies!
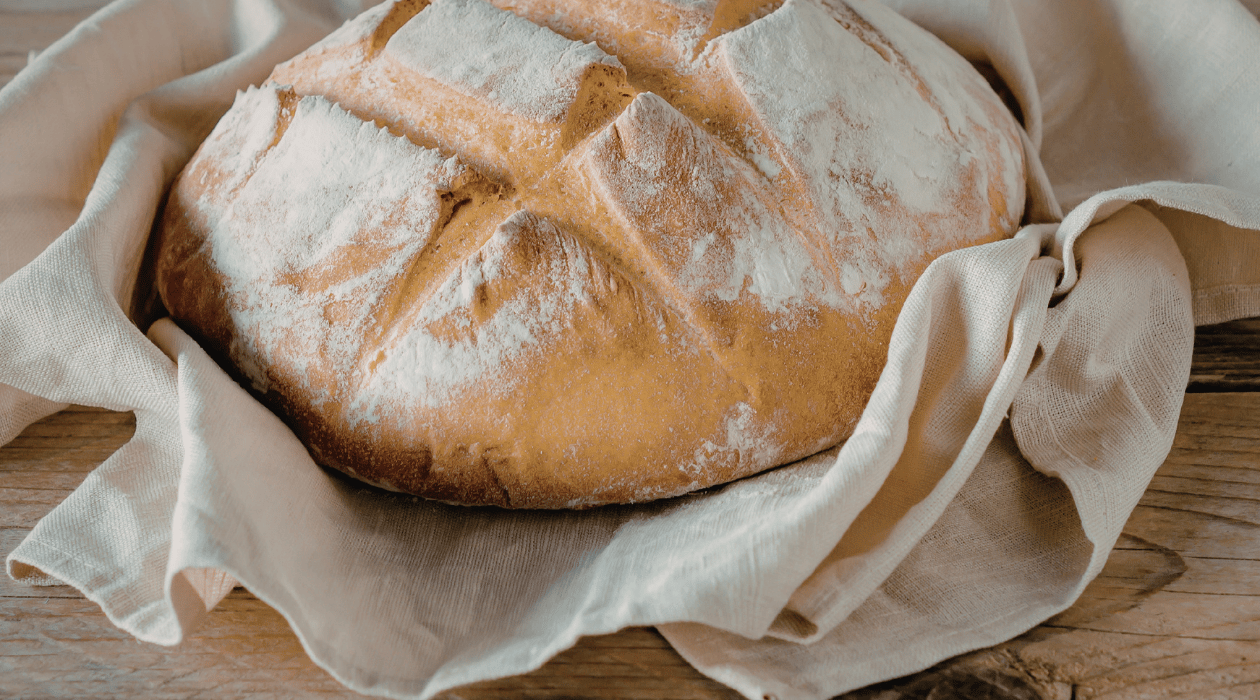
There's something magical about pulling a golden, crusty loaf of bread from your oven. The crackle of the crust, the soft, airy interior, the incredible aroma filling your kitchen. For years, I thought homemade artisan bread was reserved for professional bakers with fancy equipment and years of experience.
I was so wrong.
This no-knead artisan bread recipe changed everything for me. With just four pantry staples and virtually no hands-on time, you can create bakery-quality bread that will impress everyone at your dinner table.
Why This Recipe Works
The secret to this bread isn't in complicated techniques or expensive ingredients. It's in time. By allowing the dough to ferment slowly over 12-18 hours, the yeast works its magic, developing complex flavors and creating those beautiful air pockets you see in artisan loaves.
No kneading. No stand mixer. No stress.
What You'll Need
Ingredients:
- 3 cups all-purpose flour
- 1½ teaspoons salt
- ½ teaspoon active dry yeast
- 1½ cups warm water
Equipment:
- Large mixing bowl
- Wooden spoon
- Dutch oven with lid
- Parchment paper
That's it. You probably have everything already.
The Simple Process
Step 1: Mix (5 minutes)
In a large bowl, whisk together your flour, salt, and yeast. Add the warm water and stir until you have a shaggy, sticky dough. It won't look pretty, and that's perfectly fine. Cover the bowl and walk away.
Step 2: Wait (12-18 hours)
This is where the magic happens. While you sleep, work, or binge-watch your favorite show, the yeast is creating flavor and texture. The dough will double in size and develop bubbles on the surface.
Step 3: Shape (2 minutes)
Turn your bubbly dough onto a floured surface and gently shape it into a round ball. Don't overwork it! Place it on parchment paper, cover loosely, and let it rise for another 1-2 hours.
Step 4: Bake (50 minutes)
Preheat your oven to 450°F with the Dutch oven inside. Once hot, carefully place your dough (using the parchment paper) into the pot, cover with the lid, and bake for 30 minutes. Remove the lid and bake another 15-20 minutes until deep golden brown.
Step 5: Resist Temptation (30 minutes)
Let the bread cool for at least 30 minutes before slicing. I know it's hard, but cutting into hot bread can make the interior gummy.
Tips for Success
Use a Dutch oven. The covered pot traps steam, which creates that incredible crispy crust. If you don't have one, any oven-safe pot with a lid works.
Don't rush the first rise. The longer fermentation (up to 18 hours) develops better flavor. I usually mix my dough before bed and bake it the next evening.
The dough should be sticky. Resist the urge to add more flour. A wetter dough creates a lighter, airier crumb.
Let it cool completely. The bread continues to cook as it cools, and the texture improves.
Common Questions
Can I use whole wheat flour? You can substitute up to half the all-purpose flour with whole wheat, but the texture will be denser.
How do I store it? Keep it cut-side down on a cutting board at room temperature for 2-3 days. Don't store in plastic, or you'll lose that crispy crust.
Can I freeze it? Absolutely! Slice it first, then freeze in a freezer bag for up to 3 months. Toast slices straight from frozen.
What if I don't have a Dutch oven? You can bake it on a baking sheet.
Why Homemade Bread Matters
In a world of preservatives and mass production, there's something deeply satisfying about making your own bread. You know exactly what's in it. You control the ingredients. And honestly, nothing from the grocery store compares to a loaf that's still warm from your own oven.
This recipe has become my weekend ritual. I mix the dough Saturday morning, bake it Sunday afternoon, and enjoy fresh bread all week. It's become one of those recipes I make without even thinking about it anymore.
Your Turn
If you've been intimidated by bread baking, let this be your starting point. It's forgiving, it's simple, and the results are stunning. Your first loaf might not be perfect, but I promise it will be delicious.
Grab your flour, set a timer, and get ready to fill your home with the smell of fresh-baked bread. You've got this.
Ready to start baking? Save this recipe and let me know how your first loaf turns out! And if you're looking for more simple, foolproof recipes like this one, check out my complete collection of beginner-friendly baking guides.
Happy baking!
With love & wildflowers,
Foxglove and Flour
Looking for More No‑Guessing Recipes?
If you liked how clear and calm this recipe felt, you may enjoy my printable $1 Recipe Card Sampler — designed for days when you want to eat well without thinking too hard.
Simple ingredients. Clear steps. No scrolling.
Foxglove & Flour recipes are created for tired cooks who want food that works the first time.